Manage users
You need the admin rights to use this feature.
A super admin account kaizenadmin is created by default in the KAIZEN Default domain. Each domain is provisioned with a default admin user upon creation.
Admins can create additional users as required, assign roles accordingly, and export or import user accounts for backup or migration purpose:
-
A user belongs to only one domain.
-
A user may be assigned one or more roles, depending on their responsibilities.
-
Privileges are granted through role assignments, allowing users to inherit access rights indirectly.
Manage the users
To manage the users, perform the following:
-
In the KAIZEN studio console, on the left panel, click Access Controller > Users.
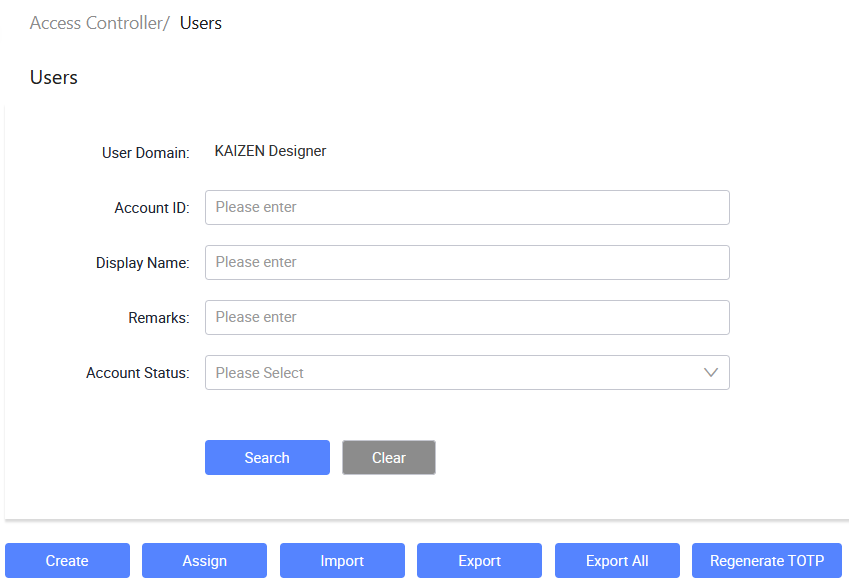
The Access Controller/ Users page displays.
-
You can use the filter fields at the top of the page to search for users by Account ID, Display Name, Remarks, or Account Status. The Account Status dropdown provides the following options:
Account Status Description Active The user account is active and can log in normally. Inactive The user account has been deactivated and cannot log in. Locked The user account has been locked, typically due to repeated failed login attempts. Terminated The user account has been permanently terminated. Suspended The user account has been temporarily suspended. Expired The user account has passed its expiry date. -
From here, you can create new users, import or export users, assign roles, regenerate TOTP and so on. Each user row in the table provides the following actions under the Actions column:
- View: Opens the user details in read-only mode.
- Edit: Opens the user details for editing.
- More: Expands a dropdown with additional actions: Deactivate, Terminate, Suspend, Assign Role, Reset Password, and Export.
note- Once a user account has been deactivated or terminated, a Delete option becomes available in the More dropdown, allowing you to permanently delete the user.
Create a new user
-
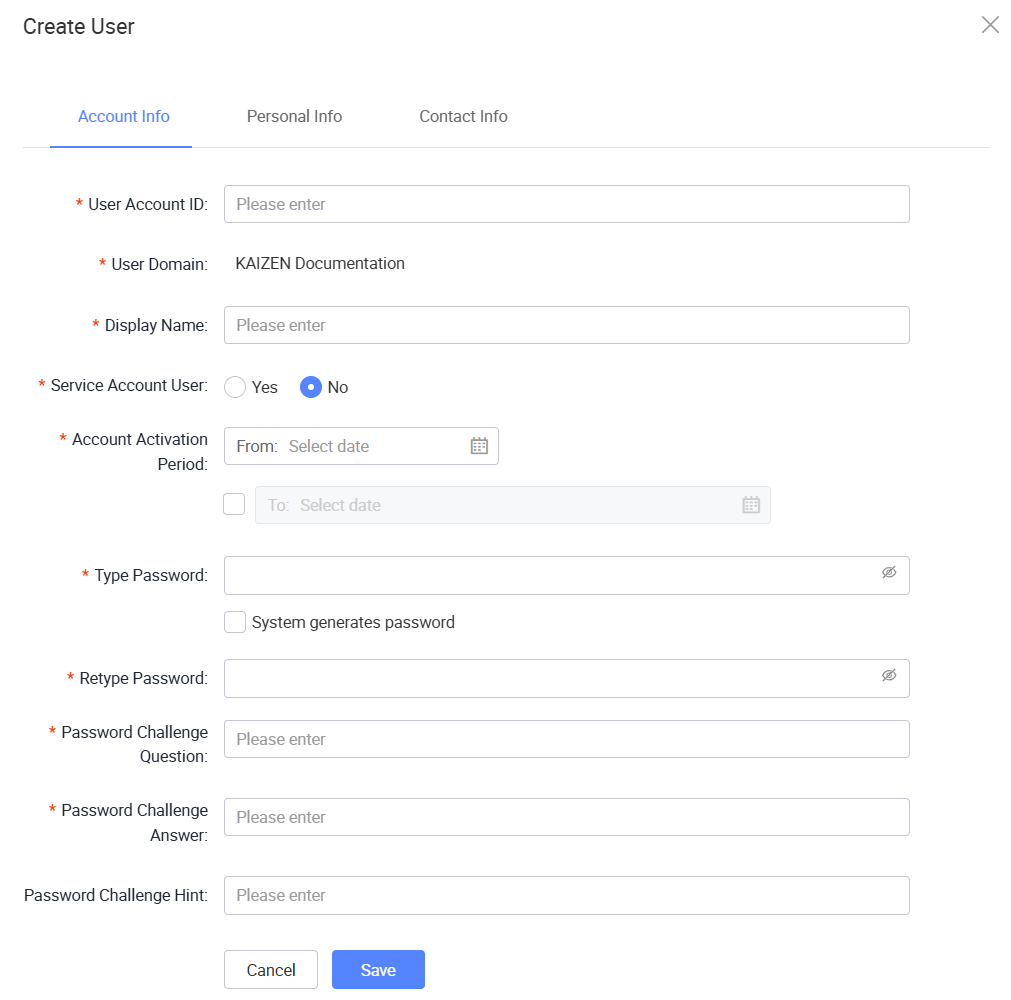
In Access Controller/ Users, click Create.
-
In the Create User window, enter the user information in these fields and click Save.
Search users
To search for user accounts, perform the following:
-
In Access Controller/ Users, enter or select the search criteria.
Field Description User Domain Displays the user domain for the current session. Account ID Search for users by their account ID. Display Name Search for users by their display name. Remarks Search for users by remarks or notes. Account Status Filter users by their account status. -
Click Search to find the result.
Deactivate a user
To deactivate a user, perform the following:
-
Click More on the same row as the user, then click Deactivate.
-
In the confirmation dialog, click OK.
A success message will confirm that the user has been deactivated. The user status will change from Active to Inactive.
After the deactivation, you have the option to reactivate it by clicking More > Activate. Or you can permanently delete the user account by clicking More > Delete.
Terminate a user
To terminate a user account, perform the following:
-
In Access Controller/ Users, select the user account you want to terminate.
-
Click More, then click Terminate.
-
The Confirm window pops up, asking for confirmation. Click OK.
A message will pop up, showing the selected user is terminated.
After the user account is terminated, the More dropdown displays the Delete option. You can use this option to permanently delete the terminated user account.
Suspend a user
To suspend a user account, perform the following:
-
In Access Controller/ Users, select the user account you want to suspend.
-
Click More, then click Suspend.
-
The Confirm window pops up, asking for confirmation. Click OK.
A message will pop up, showing the selected user is suspended.
After the user account is suspended, the More dropdown displays the Unsuspend option. To unsuspend the user account, follow the on-screen instructions.
Assign roles to a user
To assign roles to a user, perform the following:
-
In Access Controller/ Users, open the User Assignments window using one of the following methods:
- Select the user account and click Assign at the top of the page.
- Click More on the same row as the user account, then click Assign Role.
-
In the User Assignments window, review the selected user and user domain.
The window contains the following sections:
Section Description Assigned Roles Lists the roles that are currently assigned to the user. Available roles Lists the roles that can be assigned to the user. -
Use Search in either section to find specific roles.
-
To assign roles, select the roles from the list of available roles and click Add.
Reset password
To reset a user's password, perform the following:
-
In Access Controller/ Users, select the user account that requires a password reset.
-
Click More, then click Reset Password.
The User Reset Password window displays the selected user.
-
In Password Type, select how the new password is set.
Password Type Description System Generated Generates a password automatically. User Defined Allows you to enter a new password manually. User's Date of Birth Uses the user's date of birth as the password. User's Mobile No. Uses the user's mobile number as the password. User's Identity No. Uses the user's identity number as the password. User's Passport No. Uses the user's passport number as the password. -
If you select User Defined, enter the new password in Password and Confirm Password.
-
Click Save.
A message will pop up, showing the password reset is successful.
Export user accounts
To export a user account, perform the following:
-
In Access Controller/ Users, select the user account you want to export.
-
Open the Export function using one of the following methods:
- Click Export at the top of the page.
- Click More on the same row as the user account, then click Export.
-
The Confirm window pops up, asking for confirmation. Click OK.
An
XMLfile containing the selected user account information will be downloaded in your browser.
Export all user accounts
To export all user accounts, perform the following:
-
In Access Controller/ Users, click Export All.
-
The Confirm window pops up, asking for confirmation. Click OK.
An
XMLfile containing the information of all user accounts will be downloaded in your browser.
Import user accounts
When importing user accounts from a file, a Select Overwrite Fields window appears, allowing you to choose which fields in the imported file will overwrite existing values for matched users. The window provides a Select All Or Not toggle at the top to quickly select or deselect all fields.
| Category | Fields |
|---|---|
| Account & security | Password & Salt, Account Status, Is First Time Login, Password Change Required, Password Last Changed Datetime, Service Account User |
| Personal information | Display Name, Salutation, First Name, Middle Name, Last Name, Gender, Nationality, Birthday, Marital Status |
| Contact details | Email, Login Alias, Mobile Country Code, Mobile No., Other Contact No. |
| Address | Address, Postal Code, Address State, Address Country Code |
| Identity & documents | Identity No., Passport No., User Picture, E-Signature |
| Password recovery | Password Challenge Question, Password Challenge Answer, Password Challenge Hint |
| Account lifecycle | Account Activate Datetime, Account Deactivate Datetime |
| Other | Remarks |
Last updated on 21 Sep 2026