Manage user groups
You need the admin rights to use this feature.
User Groups allow administrators to organise multiple users into a logical group for easier management and access control. A user group can contain a set of specified users who share similar responsibilities or functions within the application. Grouping users simplifies assignment in scenarios where actions need to be applied to multiple users collectively instead of individually.
User Groups can be referenced in Workflow Designer > User Tasks to route tasks to a specific group of users. This ensures that tasks can be picked up by any eligible member within the group.
Administrators can create, manage, import, and export user groups to facilitate configuration management, backup, or migration across environments.
You cannot deactivate a User Group if it is currently associated with an Active or Scheduled Workflow. Deactivate or complete the associated workflows before deactivating the user group.
Manage the user group
To manage the user group, perform the following:
-
In the KAIZEN studio console, on the left panel, click Access Controller > User Group.
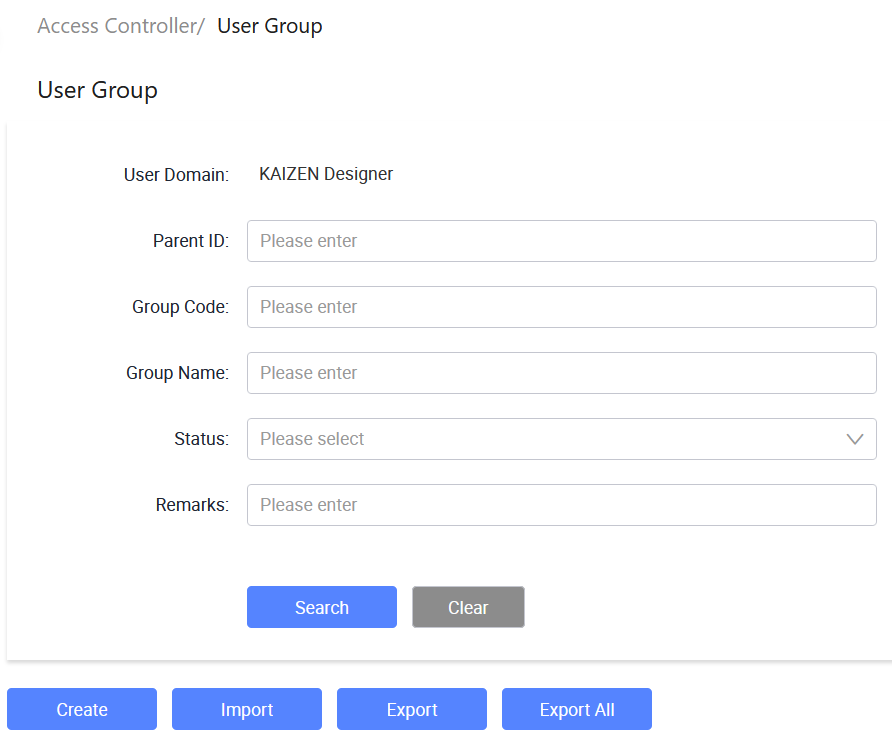
The Access Controller/ User Group page displays.
-
From here, you can create new user groups, import or export user groups, and so on. Each row in the table provides the following actions under the Actions column:
- View: Opens the user group details in read-only mode.
- Edit: Opens the user group details for editing.
- More: Expands a dropdown with additional actions: Add, Add User, Deactivate, and Export.
Create a user group
-
In Access Controller/ User Group, click Create.
-
In the Create User Group window, provide the details:
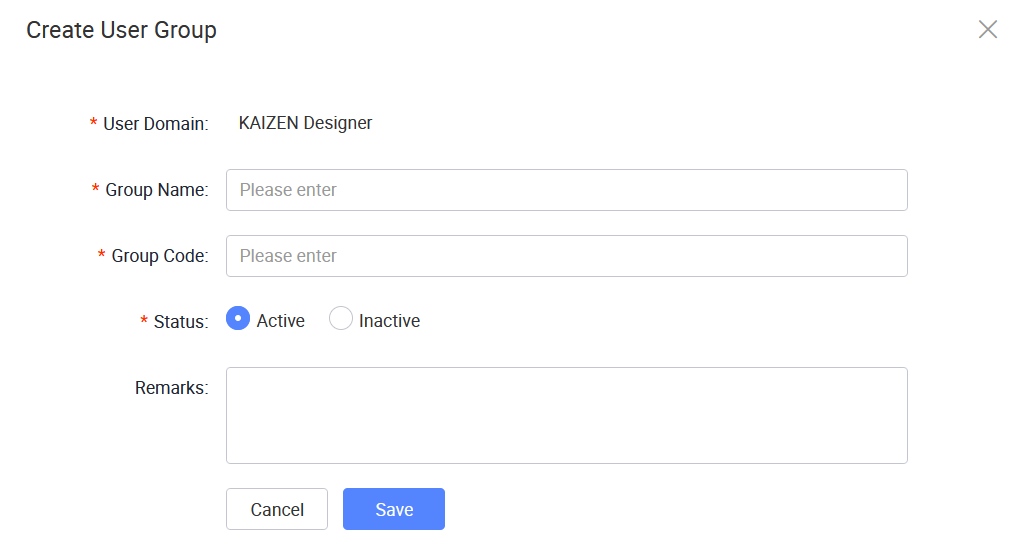
The following table describes each field from the window above:
Field Required Description User Domain Yes Displays the user domain for the user group. Group Name Yes Enter the name of the user group. Group Code Yes Enter a unique code to identify the user group. Status Yes Sets the status of the user group. Remarks No Enter optional remarks or notes for the user group. -
Click Save.
Search user groups
To search for user groups, perform the following:
-
In Access Controller/ User Group, enter or select the search criteria.
Field Description User Domain Displays the user domain for the current session. Parent ID Search for user groups by parent ID. Group Code Search for user groups by group code. Group Name Search for user groups by group name. Status Filter user groups by their status. Remarks Search for user groups by remarks or notes. -
Click Search to find the result.
Add a sub-group
To add a sub-group under an existing user group, perform the following:
-
In Access Controller/ User Group, select the user group that you want to use as the parent group.
-
On the same row, click More, then click Add.
The Create User Group window opens. The Parent ID field displays the selected user group.
-
Enter the sub-group information.
Field Required Description Parent ID No Displays the selected parent user group. User Domain Yes Displays the user domain for the sub-group. Group Name Yes Enter the name of the sub-group. Group Code Yes Enter a unique code to identify the sub-group. Status Yes Select whether the sub-group is Active or Inactive. Remarks No Enter optional remarks or notes for the sub-group. -
Click Save.
The sub-group is created under the selected parent user group.
Add user to a group
To add users to a user group, perform the following:
-
In Access Controller/ User Group, select the user group that you want to add users to.
-
On the same row, click More, then click Add User.
The Create User Group Membership window opens.
-
Enter or select the user information.
Field Description User Domain Select the user domain for the user account. Account ID Enter the account ID of the user you want to add. -
Click Assign.
The selected user appears in the list below and is added to the user group.
The list displays the following columns:
Column Description Account ID Displays the account ID of the assigned user. User Name Displays the name of the assigned user. User Domain Displays the user domain of the assigned user. Actions Provides available actions e.g., Remove for the assigned user.
Deactivate a user group
To deactivate a user group, perform the following:
-
Click More on the same row as the user group, then click Deactivate.
-
In the confirmation dialog, click OK.
A success message will confirm that the user group has been deactivated. The user group status will change from Active to Inactive.
After the deactivation, you have the option to reactivate it by clicking More > Activate.
Export a user group
To export a user group, perform the following:
-
In Access Controller/ User Group, select the user group you want to export.
-
Open the Export function using one of the following methods:
- Click Export at the top of the page.
- Click More on the same row as the user group, then click Export.
-
The Confirm window pops up, asking for confirmation. Click OK.
An
XMLfile containing the selected user group information will be downloaded in your browser.
Export all user groups
To export all user groups, perform the following:
-
In Access Controller/ User Group, click Export All.
-
The Confirm window pops up, asking for confirmation. Click OK.
An
XMLfile containing the information of all user groups will be downloaded in your browser.
Import user groups
To import user groups from an existing XML file, perform the following:
-
In Access Controller/ User Group, click Import. The File Explorer window opens.
-
Browse to the
XMLfile that contains the user group information. Click Open.The Select Overwrite Fields window displays.
-
Select the fields to overwrite when an imported user group matches an existing one.
You can use Select All Or Not to quickly select or clear all fields.
Field Description Group Name Display name of the matching user group. Remarks Remarks or description for the user group. Status User group's active or inactive status. Parent ID Parent group relationship for the user group. -
Click Import.
A message will pop up, showing the import is successful.
Last updated on 21 Sep 2026