Admin
You need the admin rights to use this feature.
Workflow/ Admin allows administrators to manage deployed workflow models in KAIZEN. From this page, you can deploy new workflows, search for existing workflows, edit workflow definitions, export workflow files, start workflow instances, manage task weightage, and deactivate or re-deploy workflows.
Actions for the Workflow Admin
To manage workflows, perform the following:
-
In the KAIZEN studio console, on the left panel, click Workflow > Admin.
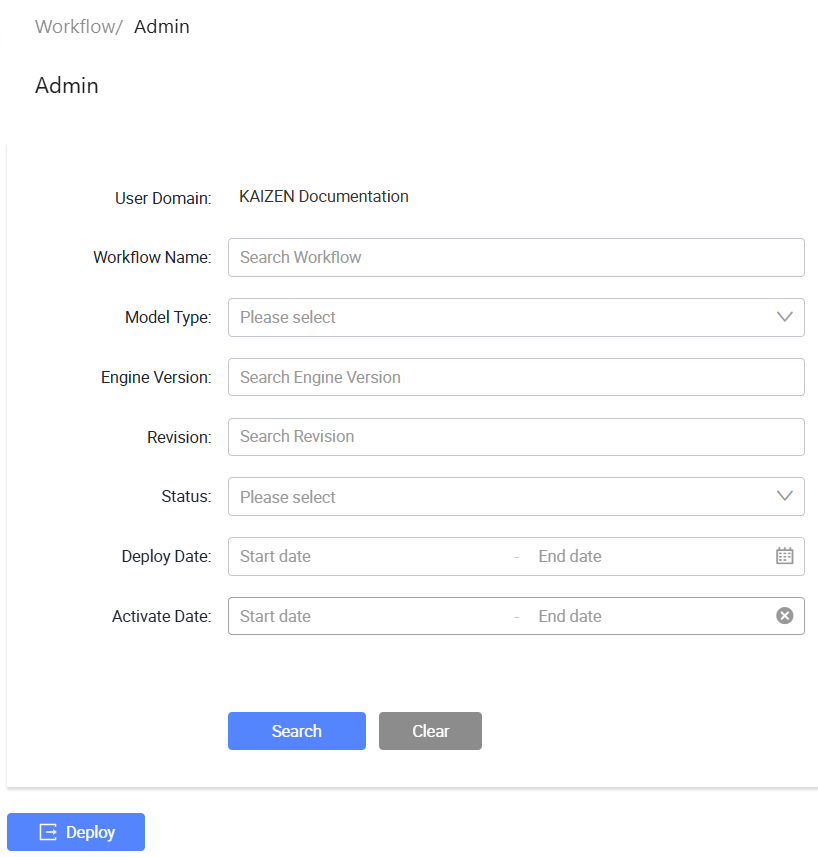
The Workflow/ Admin page displays.
-
From here, you can deploy workflows, search for existing workflows, and manage workflow actions. Each row in the table provides the following actions under the Actions column:
- Edit: Opens the workflow in Workflow Designer for editing.
- Export: Downloads the workflow as a BPMN or DMN file.
- Start Instance: Starts a workflow instance for an active workflow.
- Task Weightage: Opens the Task Weightage Management window for workflows configured with weighted round robin routing.
- Deactivate: Deactivates an active workflow.
- Re-deploy: Deploys an inactive workflow again.
Deploy a workflow
To deploy a workflow, perform the following:
-
In KAIZEN studio console, on the left panel, click Workflow > Admin.
-
Click Deploy.
-
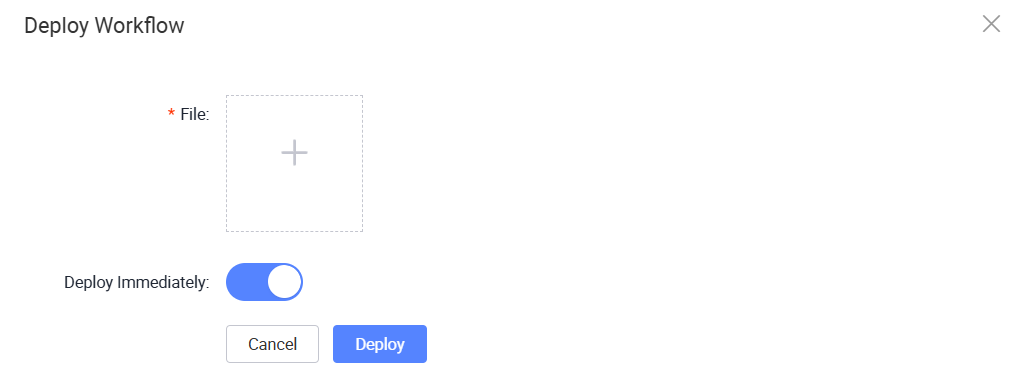
In the Deploy Workflow window, click the + icon near File.
-
Select a workflow file in
BPMNorDMNformat, then click Open. -
Choose when to deploy the workflow:
- To deploy the workflow immediately, keep Deploy Immediately switched on.
- To schedule the workflow deployment, switch Deploy Immediately off, then set the Activate Date and time.
-
Click Deploy.
- After the workflow is deployed, its status changes to Active.
- If the workflow deployment is scheduled, it appears in the workflow list with the Scheduled status and becomes Active at the specified date and time.
- If this is the first deployment for the workflow, it is shown as Revision 1.
Search workflows
To search for workflows, perform the following:
-
In Workflow/ Admin, enter or select the search criteria.
Field Description User Domain Displays the user domain for the current session. Workflow Name Search for workflows by their name. Model Type Filter workflows by model type. Engine Version Search for workflows by engine version. Revision Search for workflows by revision number. Status Filter workflows by their status. Deploy Date Filter workflows by deployment date range. Activate Date Filter workflows by activation date range. -
Click Search to find the result.
Edit a workflow
To edit a workflow, perform the following:
-
On the same row of the workflow, click Actions > Edit.
The selected workflow opens in Workflow Designer.
-
Make the required changes.
-
Click Save as Draft.
The revision number in Workflow Designer increases by
0.1. -
To deploy the updated workflow, click Deploy.
-
In the Deploy Workflow window, click Proceed.
After the workflow is deployed, the revision number in Workflow/ Admin increases by 1.
Export a workflow
To export a workflow, perform the following:
-
On the same row of the workflow, click Actions > Export.
-
A file will be downloaded in your browser in
BPMNorDMNformat, depending on the workflow model type.
Start Instance
You can start an instance only for workflows in Active status.
To start a workflow instance, perform the following:
-
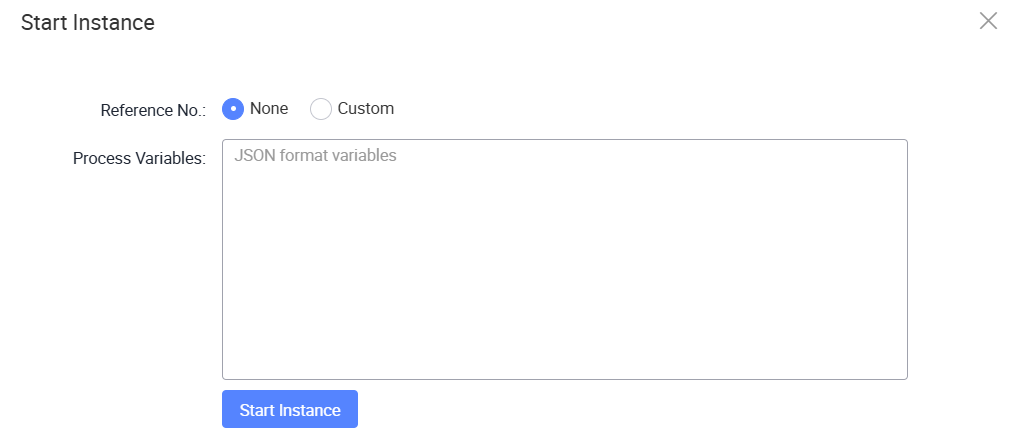
On the same row of the workflow, click Actions > Start Instance.
-
In the Start Instance window, enter the Reference No. and Process Variables if required.
-
Click Start Instance.
After the instance starts, click Workflow > Instances to view the running instance. The instance uses the same revision number as the workflow version that was started.
Task Weightage
Task weightage is available for user tasks that use weighted round robin routing.
Before managing task weightage, configure the user task in Workflow Designer:
-
Select the User Task in the workflow.
-
In the Routing properties, set Route Type to Weighted Round Robin.
-
Set Group Type to Role.
-
Select the Role Code and User Domain.
After the workflow is configured and deployed, you can manage its task weightage from Workflow/ Admin:
-
On the same row of the workflow, click Actions > Task Weightage.
The Task Weightage Management window displays the available tasks and their weightage details.

-
In Select Task, select the task to manage.
-
From the Task Weightage Management window, you can perform the following actions:
- Click Import to import task weightage settings from an
XMLfile. - Select one or more records, then click Export to export the selected task weightage settings as an
XMLfile. - Click Export All to export all task weightage settings as an
XMLfile. - On the same row of a record, click Actions > Modify Weightage to update its weightage.
- Click Import to import task weightage settings from an
Deactivate a workflow
To deactivate a workflow, perform the following:
-
On the same row of the workflow, click Actions > Deactivate.
The Change Status window displays.
-
Click OK to confirm.
After the workflow is deactivated, its status changes to Inactive.
Re-deploy an inactive workflow
To re-deploy an inactive workflow, perform the following:
-
On the same row of the inactive workflow, click Actions > Re-deploy.
A warning window displays, indicating that the current active workflow will be replaced with the selected revision.
-
Click Proceed to confirm the re-deployment.
After the workflow is re-deployed, the revision number increases by 1 and the new revision becomes Active. The previous inactive revision is retained and remains visible in the workflow list.
Last updated on 21 Sep 2026