Work on the AI agent flow
After creating a flow in AI Agent Builder, you can continue building it on the canvas. Add components, connect them in sequence, and configure each step to define how the AI agent receives input, processes data, and returns a result.
You can start with a blank flow or a template, then test and refine the flow before using it in your application. When the flow is ready, call it from Workflow Designer to include AI-generated responses or agent actions in a business process.
Create a basic flow
The following shows an example on how to create a basic flow using the OpenRouter model.
In this flow, OpenRouter provides the model connection and API credentials, while the Agent controls how the prompt is handled and how the response is generated.
Use this example to learn the basic pattern for building an AI agent flow. After the basic flow works, you can update the Agent Instructions or add more components.
Before you start, obtain the API key of OpenRouter or your preferred language model.
-
On your project toolbar, click AI Agent Builder
 .
. -
Click New Flow. On the template screen, click Blank Flow.
-
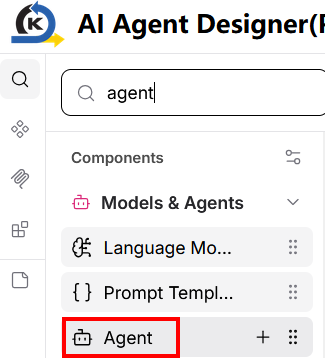
Search for Agent in the Components panel. Drag Agent and drop it onto canvas.
-
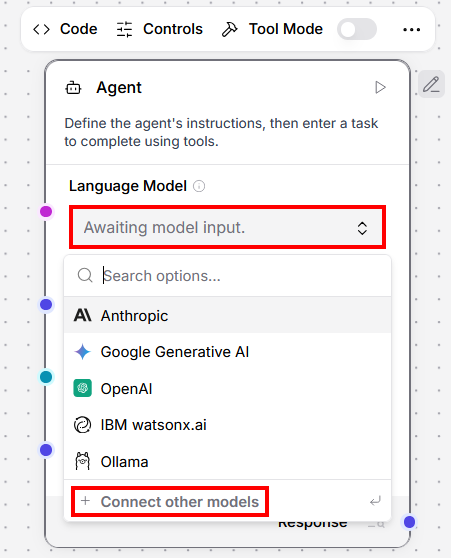
In the Agent, click the field below Language Model, then select + Connect other models.
-
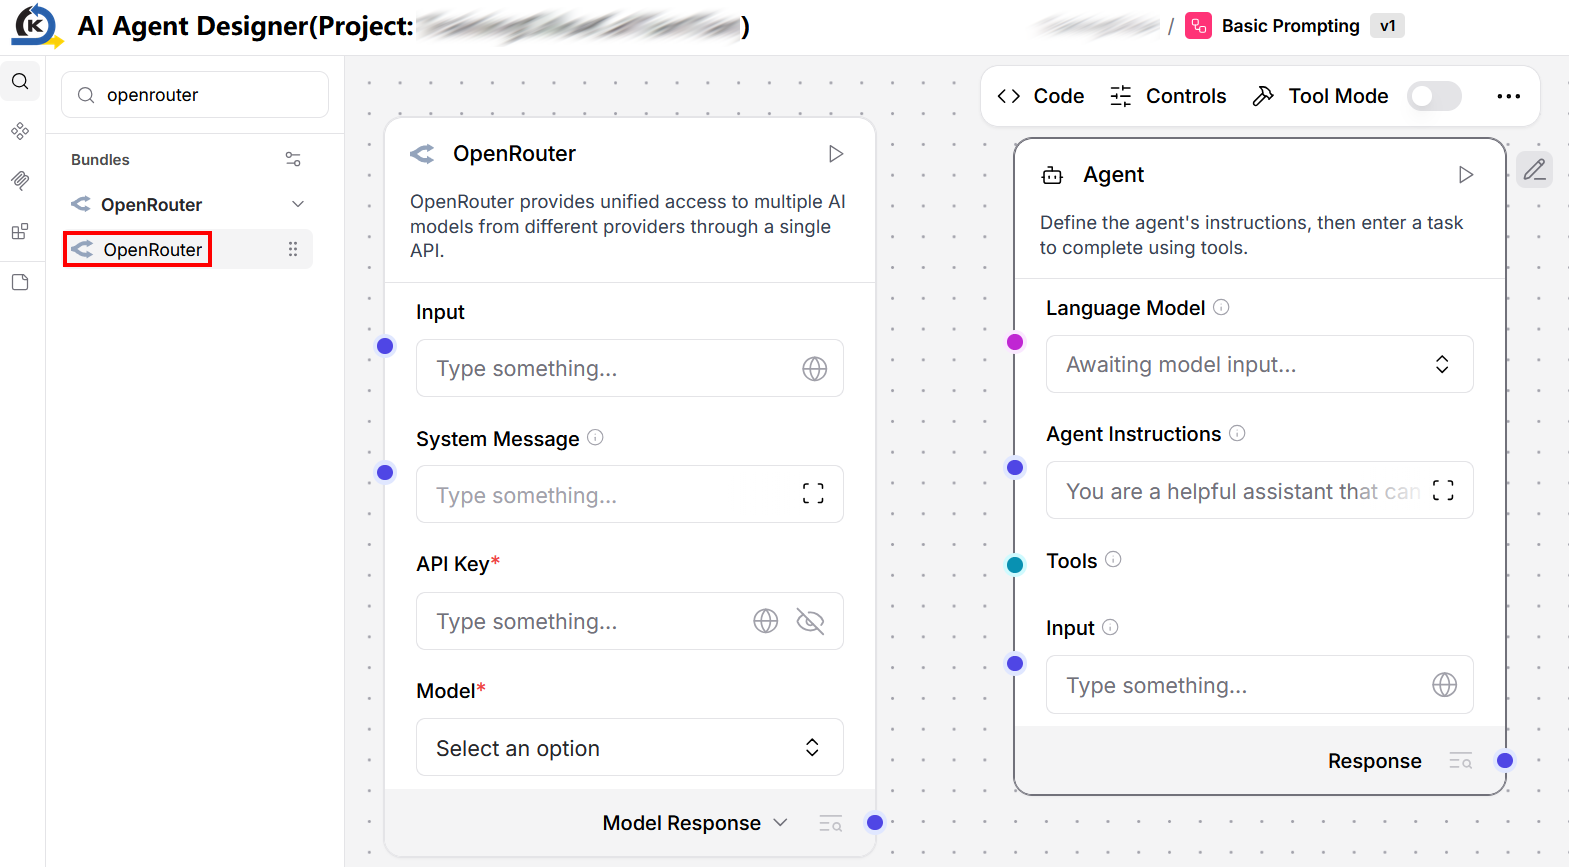
Search for OpenRouter in the Components panel. Drag OpenRouter and drop it onto canvas. Place it at the left side of the Agent.
-
In OpenRouter, enter its API Key and select a model.
This example uses
openrouter/free. You can choose other models for your project. -
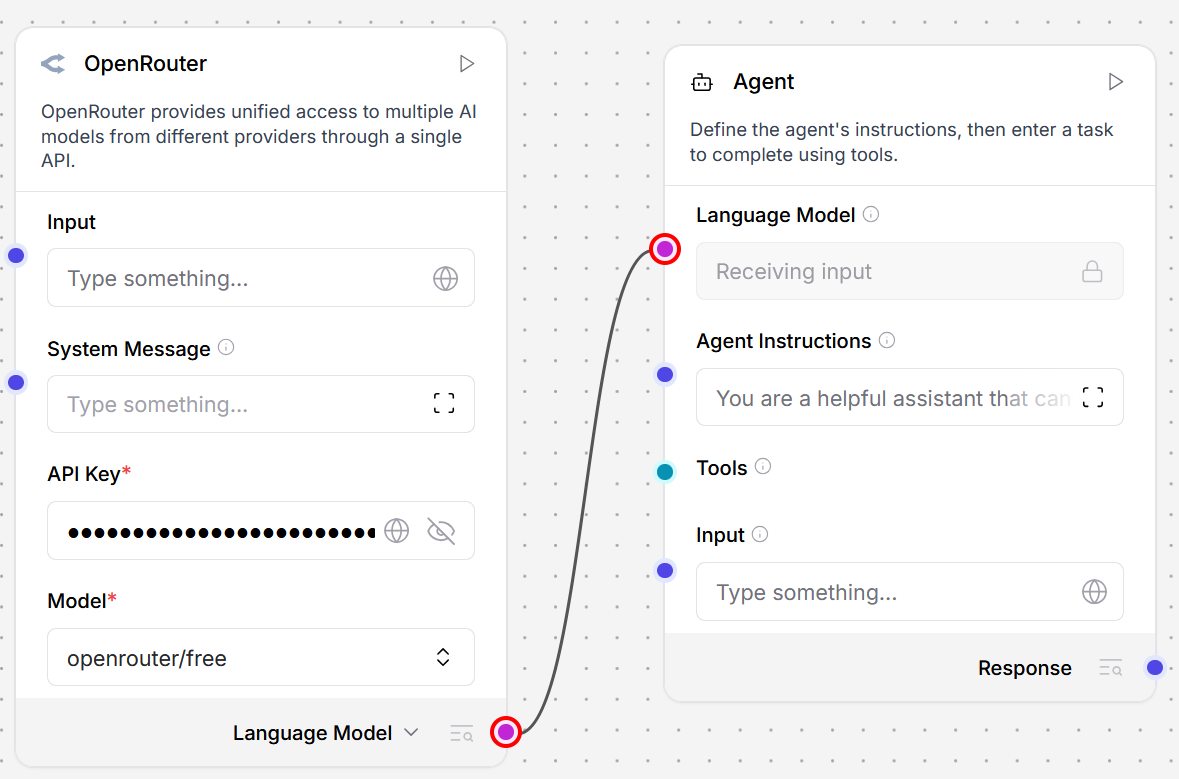
Connect the OpenRouter output to the input of the Agent's Language Model input.
-
Optionally, you can click the Agent then the pencil icon
 to rename it.
 -
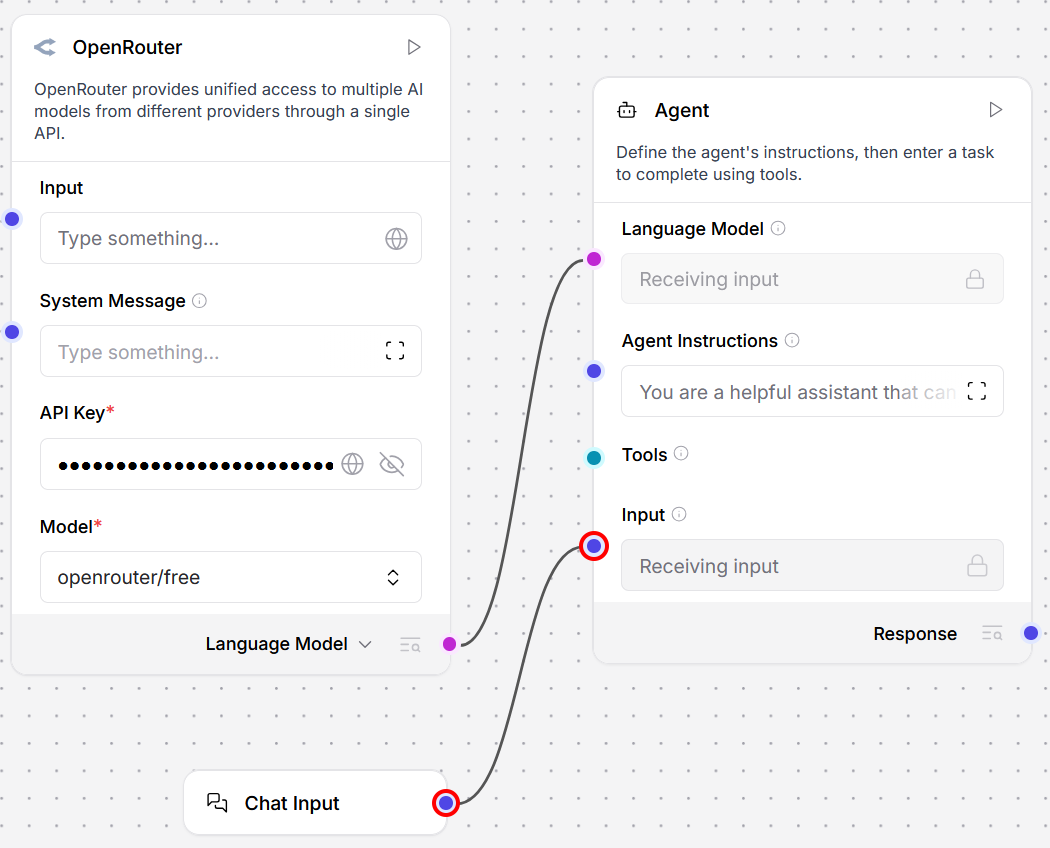
Drag Chat Input from the Components panel and drop it onto canvas. Place it below OpenRouter.
-
Connect the Chat Input to the Agent's Input.
-
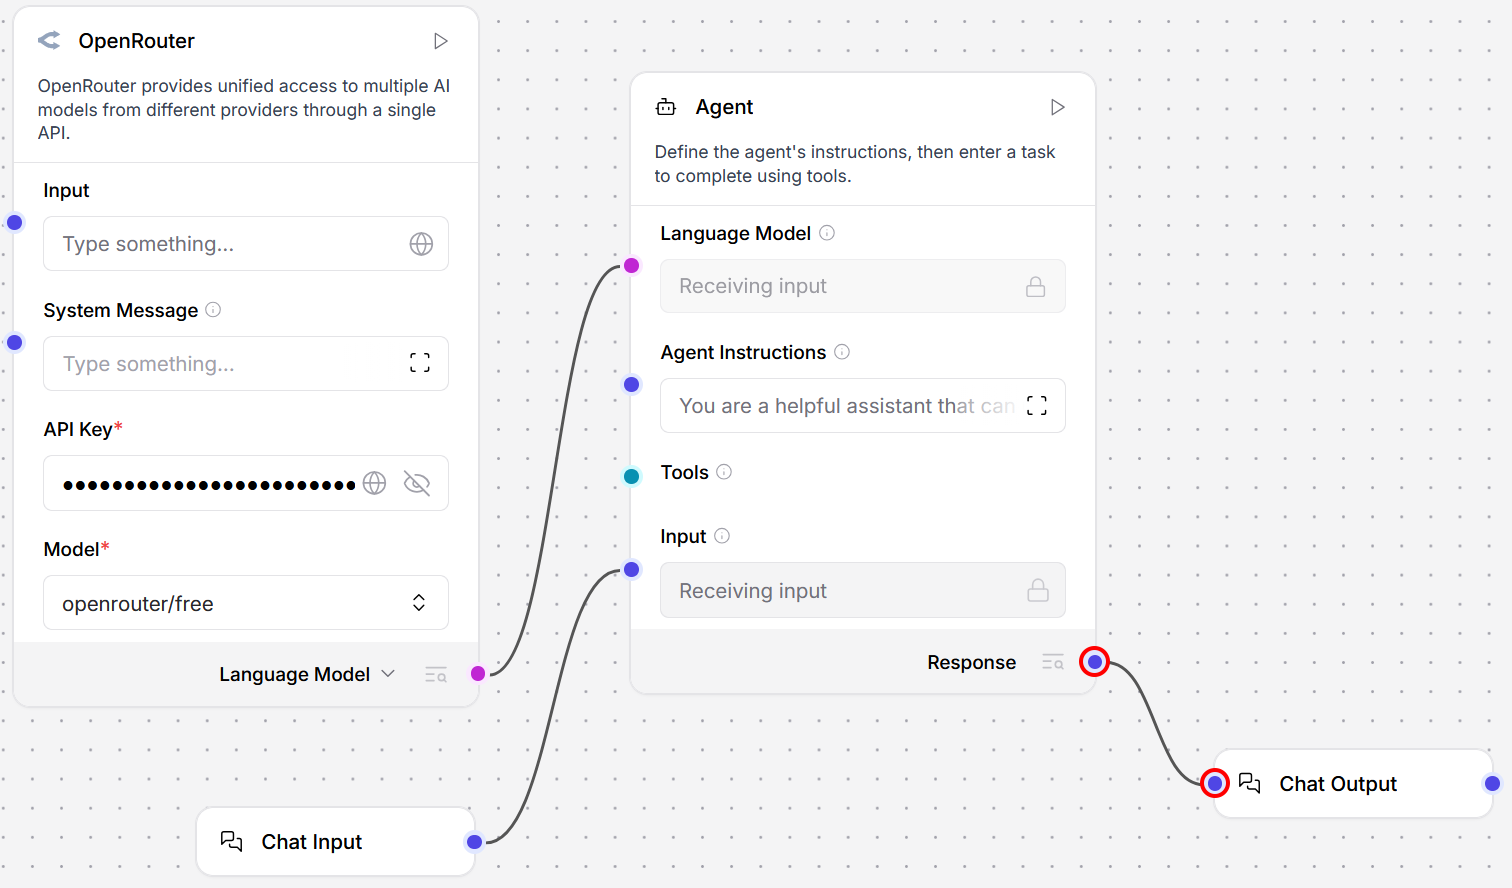
Drag Chat Output from the Components panel and drop it onto the canvas. Place it at the right side of the Agent.
-
Connect the Chat Output to the Agent's Response.
-
Click the field below Agent Instructions to customise the instructions. Click Finish Editing to apply your edits.
-
Click Playground at the top right corner of canvas to start testing.

Add a MCP server
The following example shows how to add a Playwright MCP server.
Model Context Protocol (MCP) is a standard way to connect an AI agent to external tools and services. By adding an MCP server, you give the agent access to actions that are provided outside the basic flow, such as using Playwright to inspect web pages, interact with browser elements, or support browser-based testing tasks.
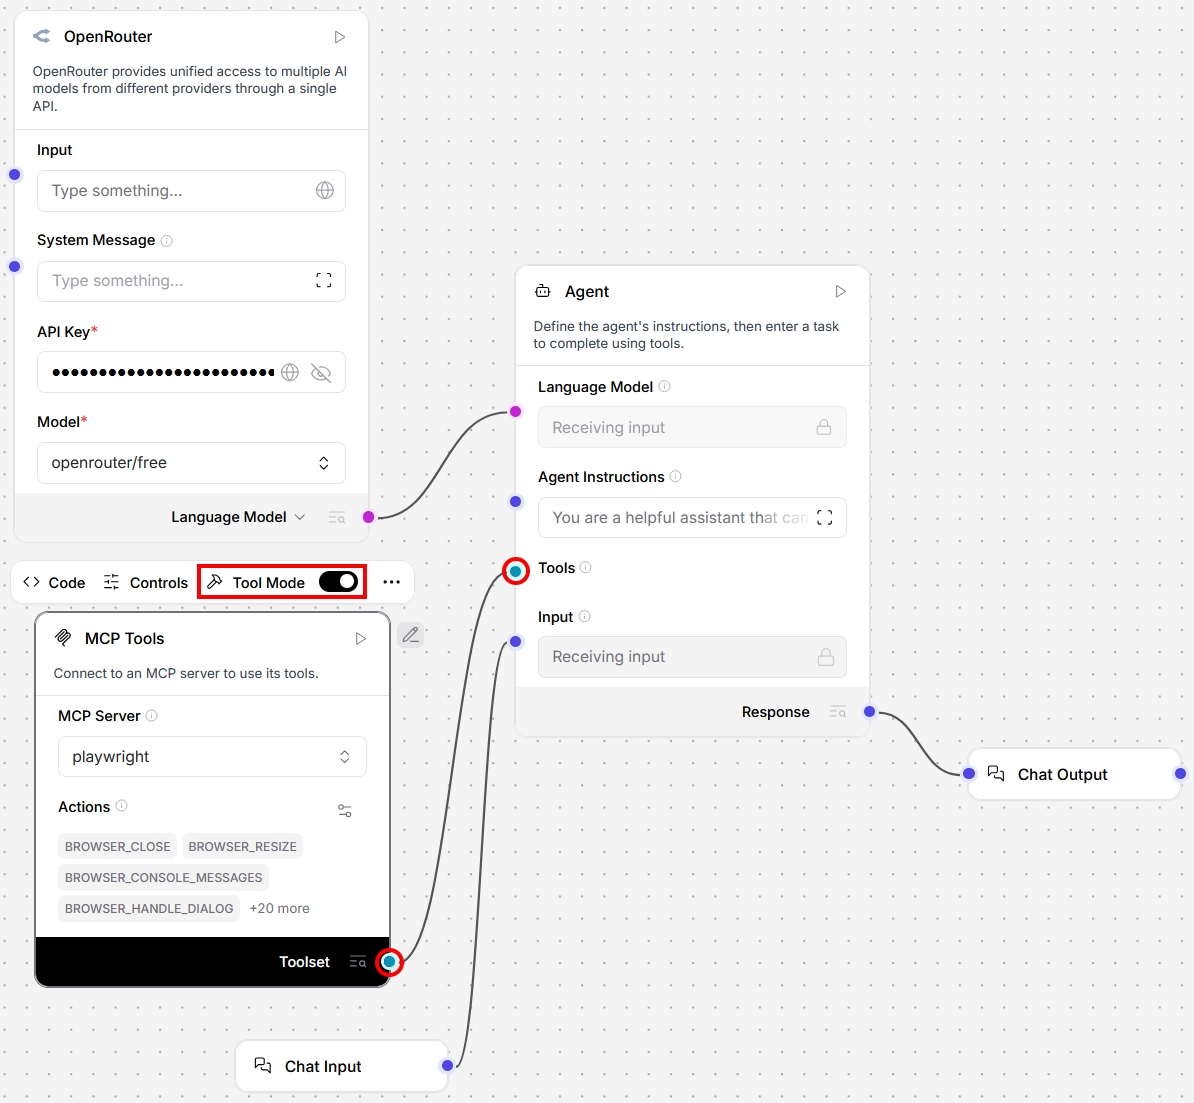
In this example, the MCP Tools component stores the Playwright server configuration and exposes its tools to the Agent.
Before your start, obtain the following:
- API key of OpenRouter or your preferred language model
- System prompt for the AI Agent
- Playwright installation instructions in
JSONfrom Playwright official site
-
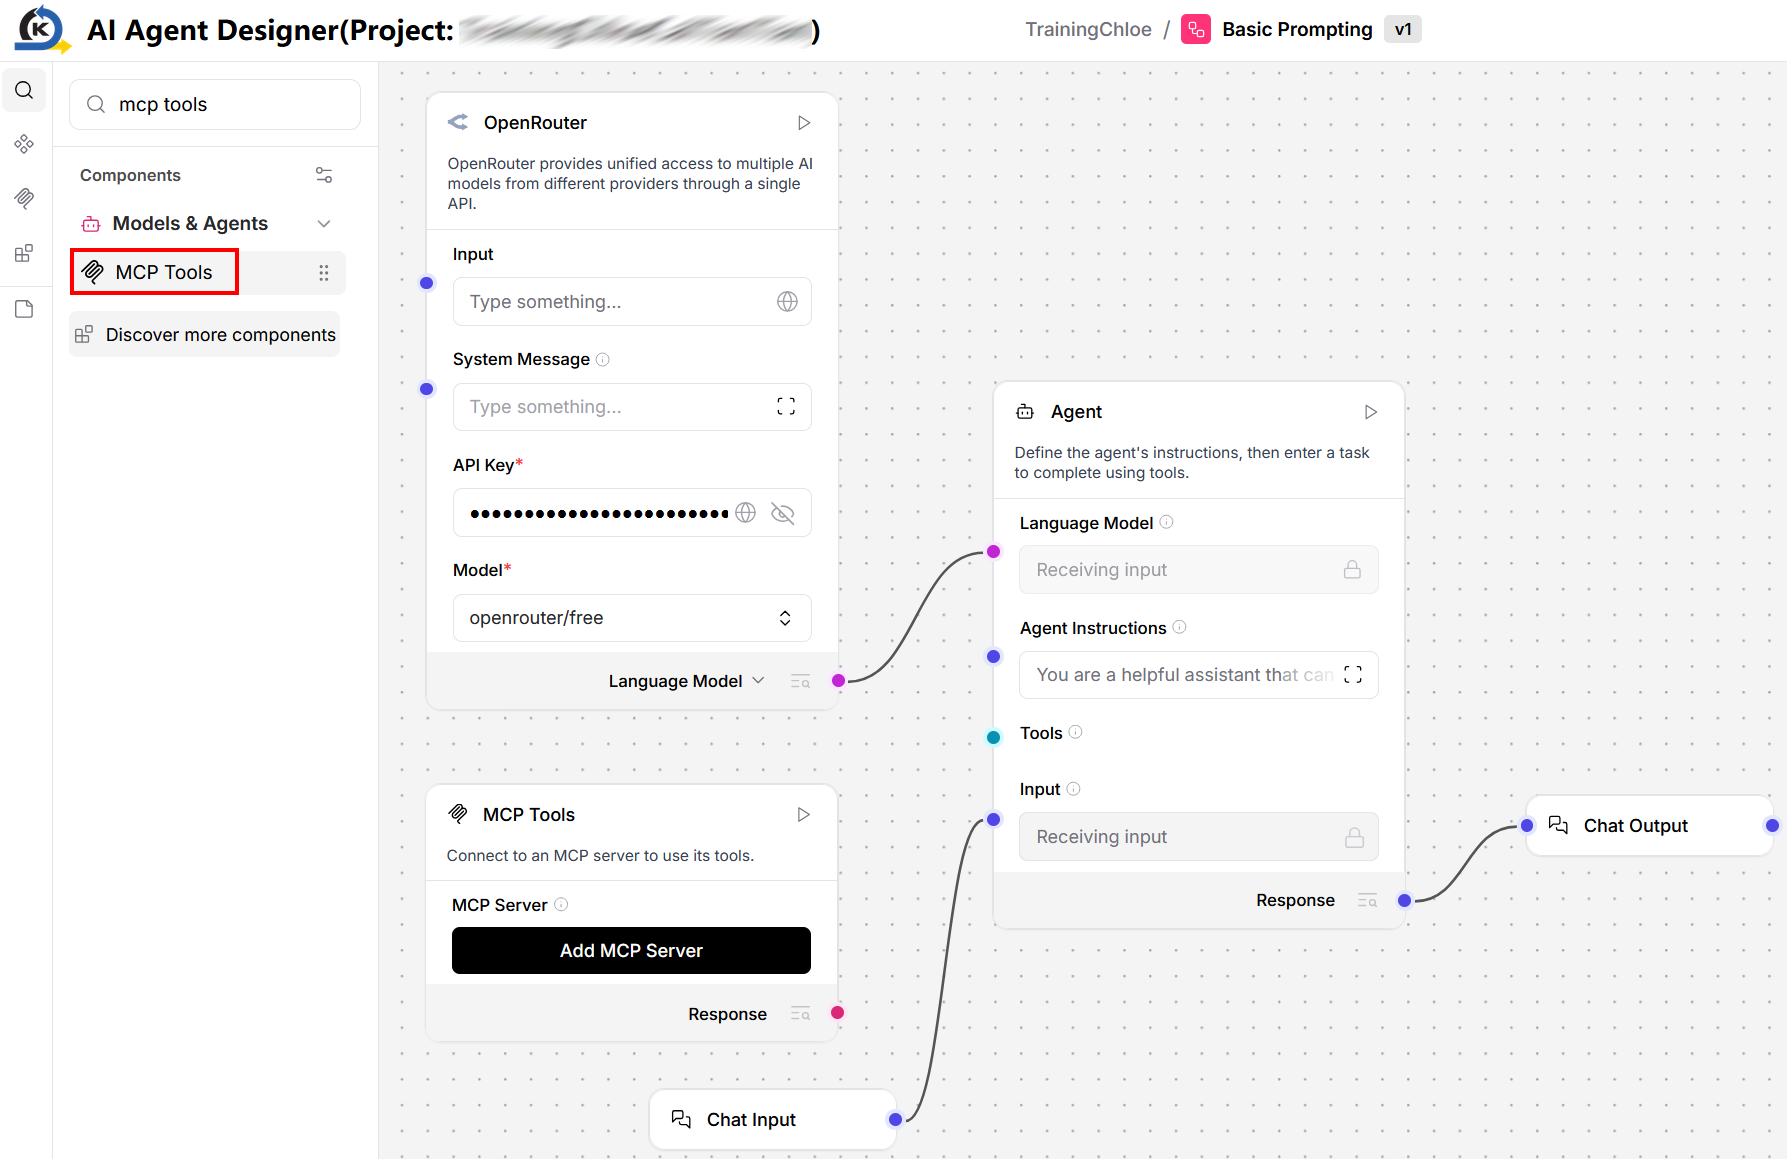
Search for MCP Tools in the Components panel. Drag MCP Tools and drop it on canvas. Place it below the OpenRouter component.
-
In MCP Tools, click Add MCP Server.
-
Copy the Playwright installation instructions in
JSONformat and paste it into the Add MCP Server window, JSON tab. Click Add Server.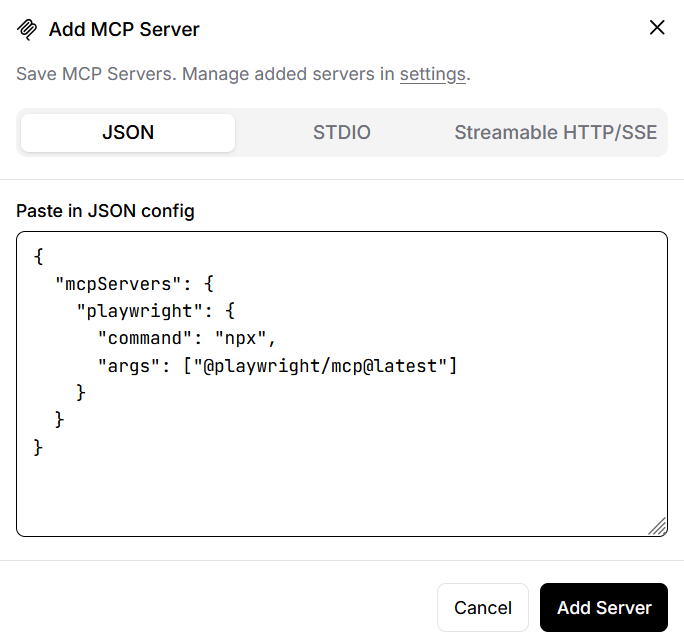
-
Click the MCP Tools component. Turn on Tool Mode.
-
Connect Toolset with the Agent's Tools.
-
In the field below Agent Instructions, add the system prompt.
A system prompt is the instruction that defines how the agent should behave, what tools it can use, and any rules it should follow when responding to users. For example:
You are a browser automation assistant. Use the Playwright MCP tools to inspect web pages, interact with browser elements, and report clear test results. Ask for clarification before submitting forms or changing data. -
Click Playground at the top right corner of canvas to start testing.
KAIZEN component: Call KAIZEN Service
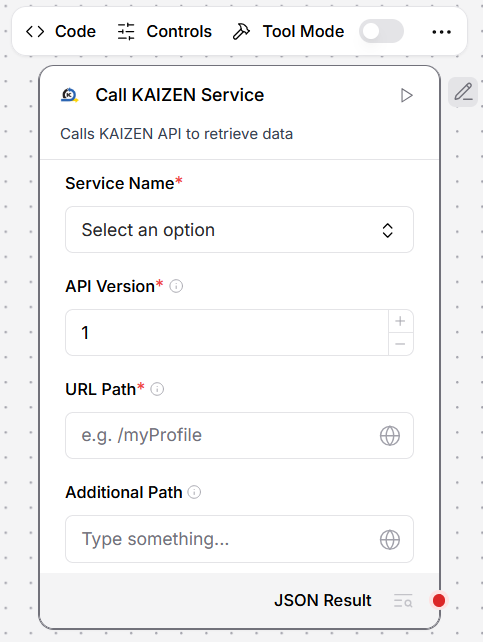
Use Call KAIZEN Service to call a KAIZEN API from an AI agent flow and return the API response as JSON Result.
To configure the component:
-
In Service Name, select the KAIZEN service that owns the API.
The available service options include Ai, Setup, Gateway, Iam, Common, Job, Workflow, Console, Pagescan, Theme, Dbeditor, Report, and Uirenderer.
-
In API Version, enter the endpoint version, e.g.,
1forv1. -
In URL Path, enter the path to call, e.g.,
/myProfile. -
Optionally, in Additional Path, enter an extra path segment to append to the base URL.
Use Additional Path when the API endpoint requires a request parameter in the path. This value can be provided by the Agent. For example, to retrieve a specific project from Console service, set URL Path to
/api/v1/console/projectsand Additional Path to/{project_id}. The full endpoint becomes/api/v1/console/projects/{project_id}, where{project_id}is the request parameter. -
Use JSON Result as the component output or response.
Call the AI agent flow from Workflow Designer
-
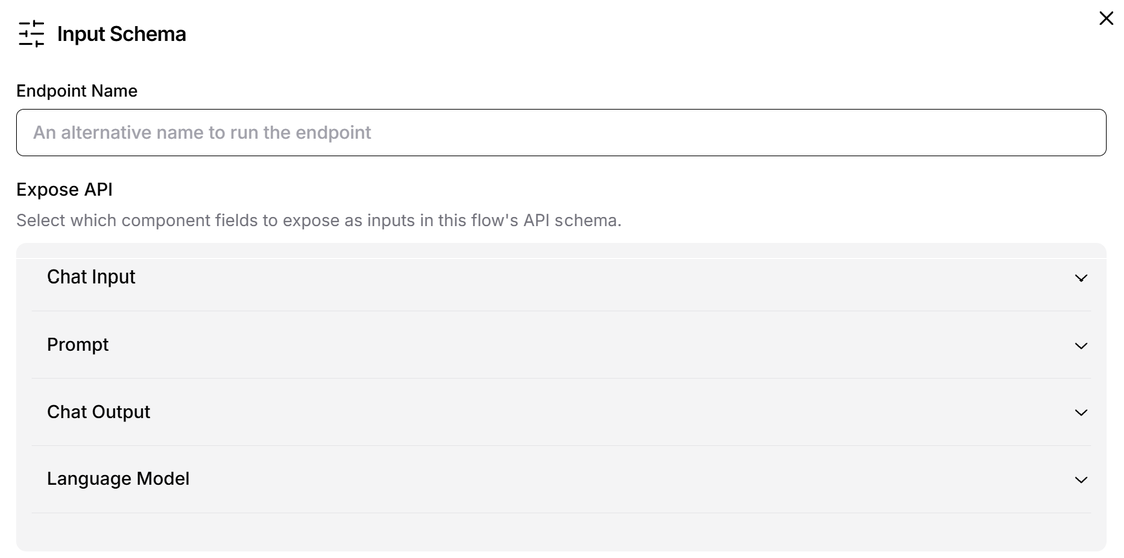
In AI Agent Builder, at the top right corner, click Share > API access > Input Schema.
-
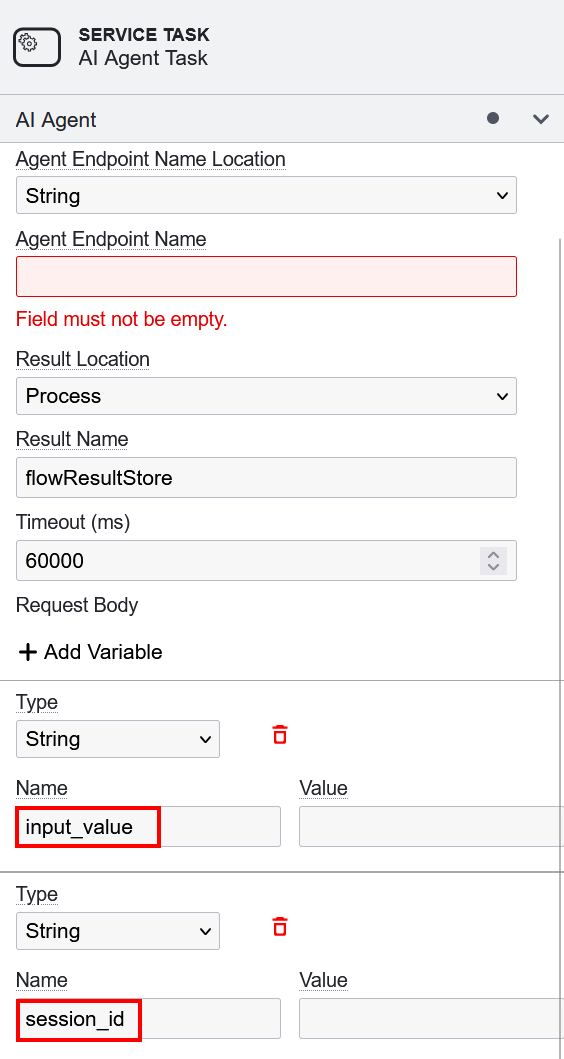
In the Input Schema window, set the AI agent endpoint name.
-
Copy the endpoint name from AI Agent Builder.
-
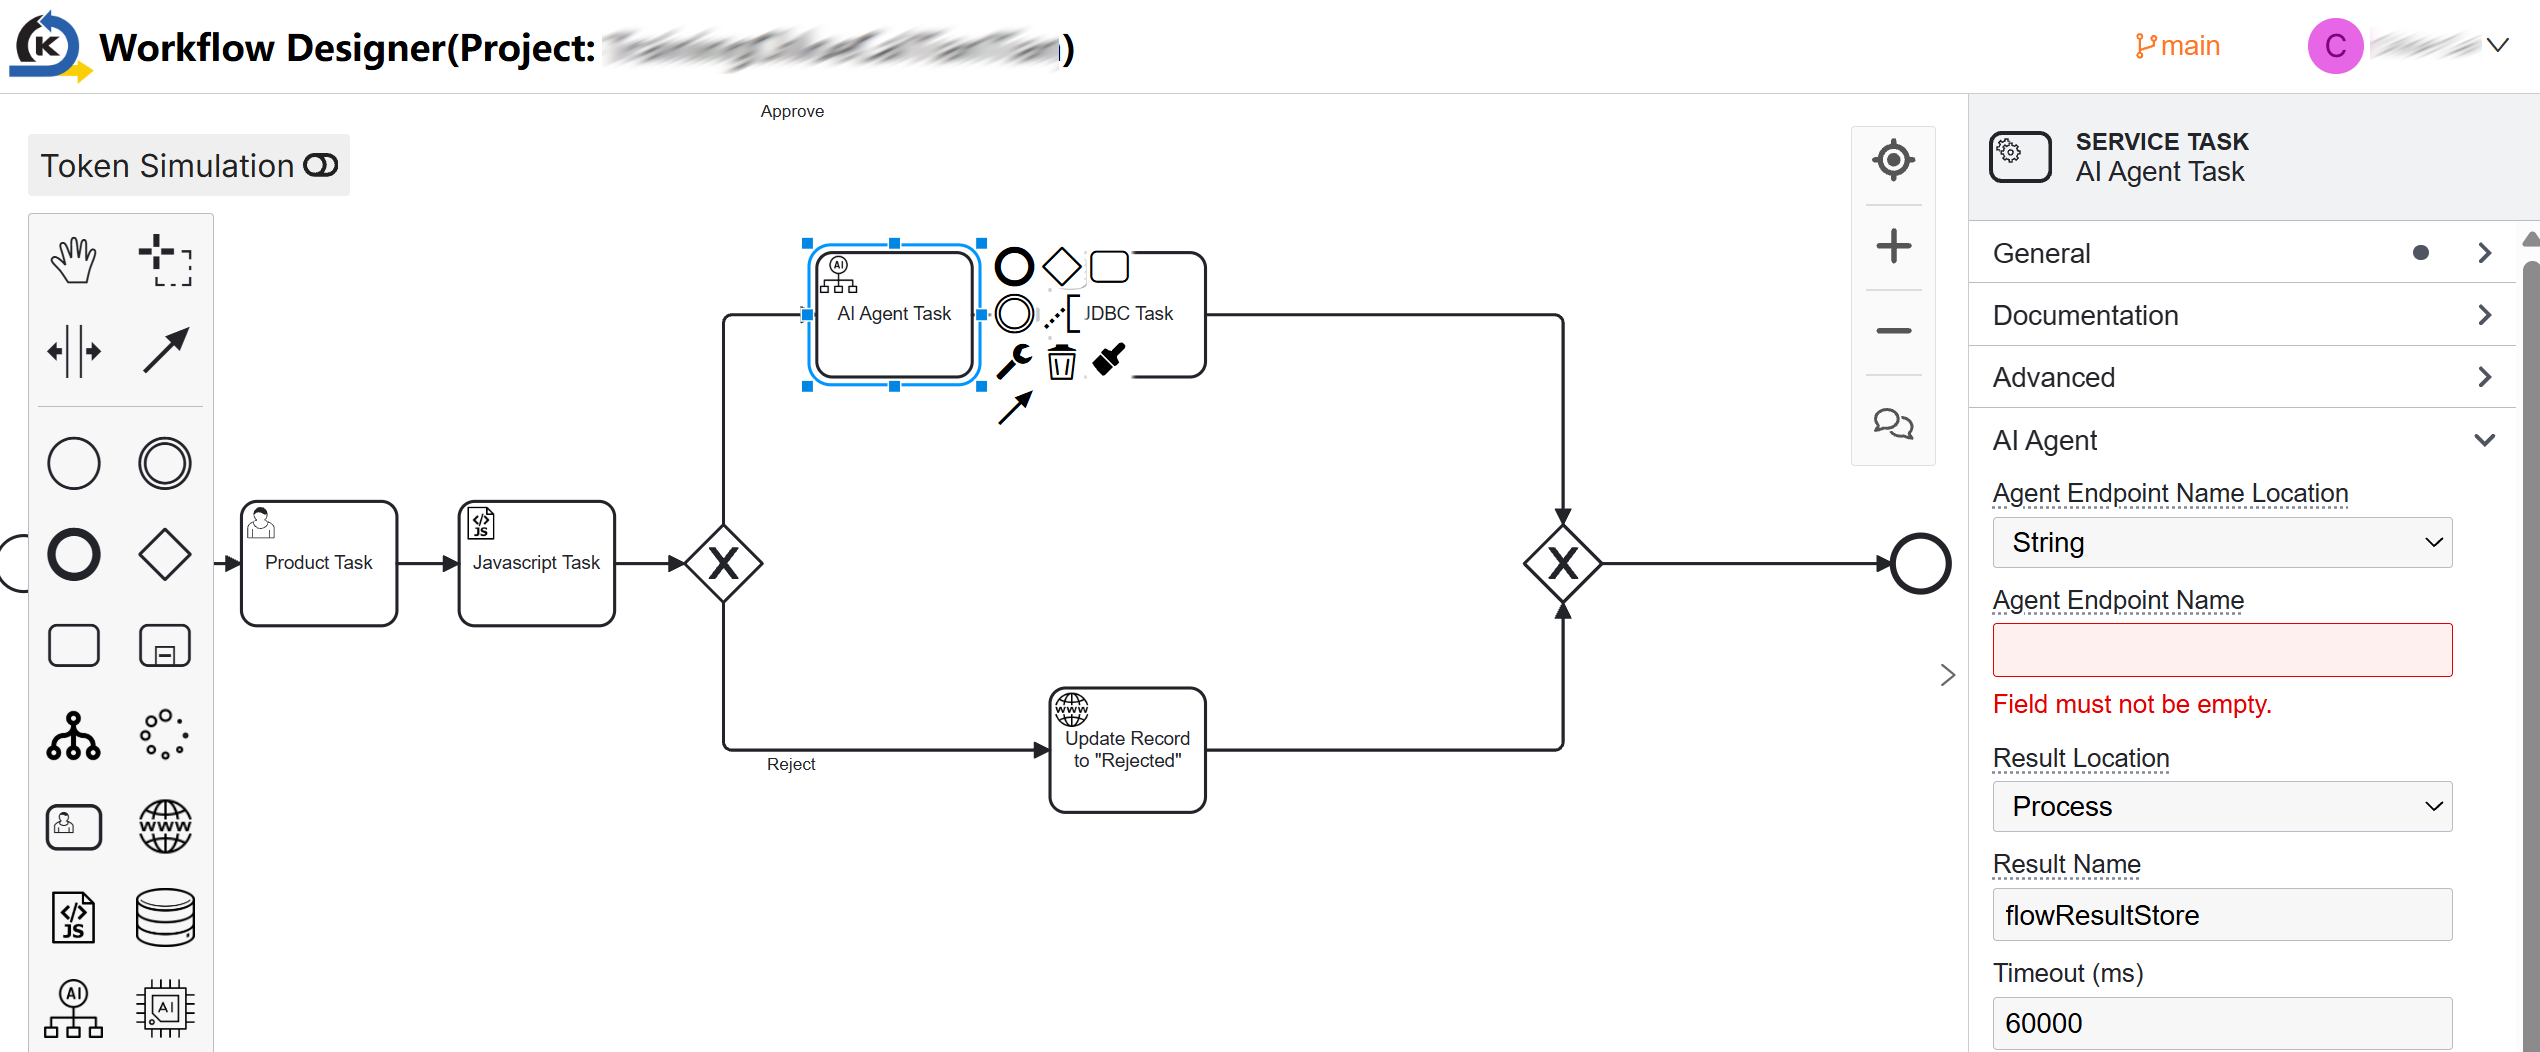
Open the Workflow Designer. Paste it into the Agent Endpoint Name property.
-
You can choose to add any of the following optional variables in Workflow Designer:
input_value: This stores your prompt for the AI Agent to perform tasks.session_id: This provides the chat context from a session of the AI agent flow.
Last updated on 21 Sep 2026