Create a new project
You need the admin rights to perform this action.
Create a new project
To create a new project, perform the following steps in your KAIZEN Studio Console:
-
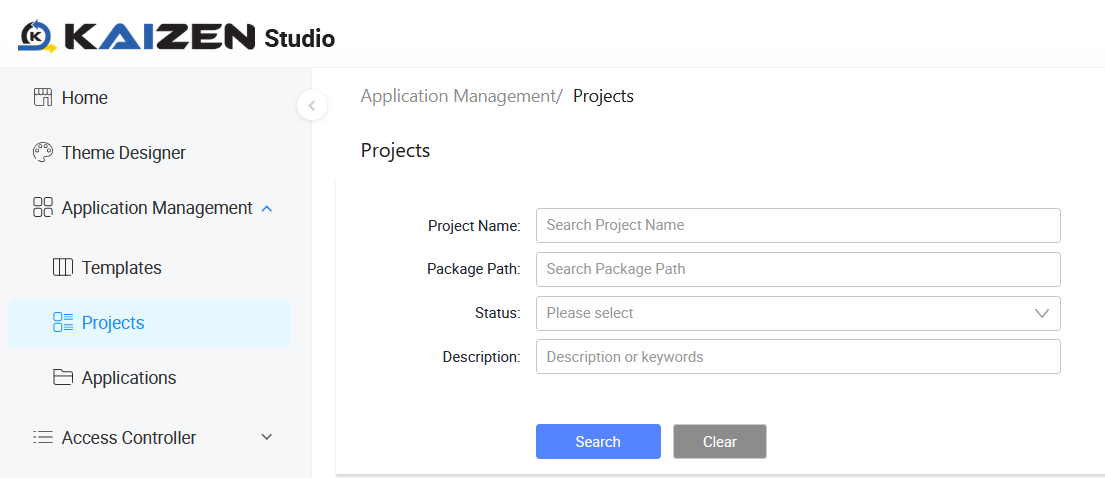
Expand the dropdown menu on the top left corner. Click Application Management. Click Projects. The Projects page displays.
-
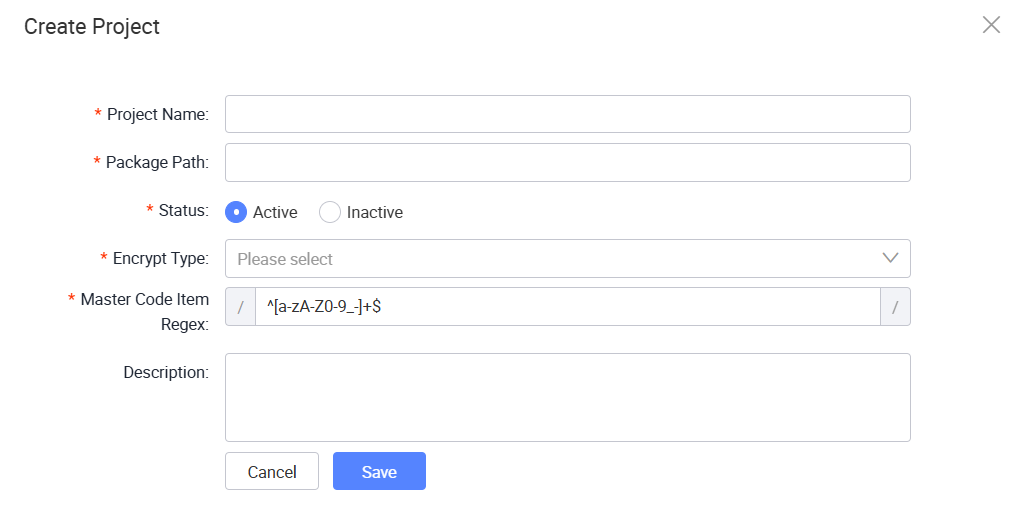
Click Create. The Create Project window opens.
-
Fill in the following information:
-
Project Name: The unique, human-readable name for the project. This name is displayed in the Projects List and the KAIZEN Studio Console.
-
Package Path: The Java-style package namespace for the project, used for organising the generated backend code. For example,
com.companyname.projectname. -
Status: The initial lifecycle status of the project. Set this to
Activeto open the project for development and deployment. -
Encrypt Type: The password hashing algorithm used for the project. Choose from BCRYPT, SCRYPT, and HASH.
-
BCRYPT: A Blowfish-based adaptive hashing function that incorporates a salt and is resistant to brute-force attacks. The cost factor is controlled by the log rounds value.
- Bcrypt Log Rounds: Enter an integer between 10 and 16. Default value is
12. Higher values increase computation time and security.
- Bcrypt Log Rounds: Enter an integer between 10 and 16. Default value is
-
SCRYPT: A memory-hard key derivation function designed to be costly in both CPU and memory usage, making it resistant to hardware-accelerated brute-force attacks. You can keep the following default values unchanged.
-
ScryptN: Default value is
16384. -
ScryptR: Default value is
8. -
ScryptP: Default value is
1.
-
-
HASH: A one-way cryptographic hash function. Use this option when you need to specify a particular hash algorithm.
- Hash Algorithm: Enter the name of the hash algorithm to use. Default value is
SHA-256.
- Hash Algorithm: Enter the name of the hash algorithm to use. Default value is
-
-
MasterCode Item Regex: The regular expression that validates MasterCode Item names.
The default value
^[a-zA-Z0-9_-]+$allows only letters, numbers, underscores, and dashes, with no spaces and no other special characters. You can keep the default value unchanged. -
Description: An optional summary of the project's purpose, scope, or any other relevant details.
-
-
After validating the input, click Save. The new project appears in the Projects list on Homepage.
Assign users to the project
After the project is created, assign users with appropriate role, so they can work on this project in KAIZEN studio console.
Assign a user
-
In KAIZEN studio console, use one of the following methods to assign a user to a project:
- From the Project toolbar
- From the Access Controller menu
On top of the project applications, click Project
 . From the dropdown, select Assign Users to Project.
Alternatively, on the left panel, click Application Management > Projects.
On the right, find your project in the list. Click More in the same row and select Assign.
The Assign Users To Project window opens.
-
In the Enter Account ID field, enter the account ID of the user.
-
In the Select User Role dropdown, select one of the following roles according to your project requirements:
Role Description Project Manager Full access to the project, including managing members, configuring project settings, and deleting the project. Maintainer Can manage applications and project resources, but cannot delete the project or manage project members. -
Click Assign.
Once you have assigned users to this project, move on to create applications.
Last updated on 20 May 2026