Navigation and access guide
- Orientation Topic: Find your way around the KAIZEN SaaS platform
- Target Audience: New members, organisation admins, and project leads
- Estimated Total Duration: 1.5 - 2 hours
Module 1. Onboarding & Dashboard Navigation
Focus: Logging in, changing your password, and finding your way around the primary landing screen (Navigation only).
1.1 Welcome & Orientation Agenda
Welcome to the KAIZEN platform. The goal of this orientation guide is to help you get familiar with the platform's visual layout and navigate the interface with confidence.
While the Express Training Guide focuses on building and utilising KAIZEN's core features, this guide serves as your map. It shows you where things are, how to manage your organisation, and how to access key features. We recommend keeping this guide open alongside your live KAIZEN account as you walk through these steps.
1.2 Initial Setup & Basic Navigation
-
First-Time Login:
-
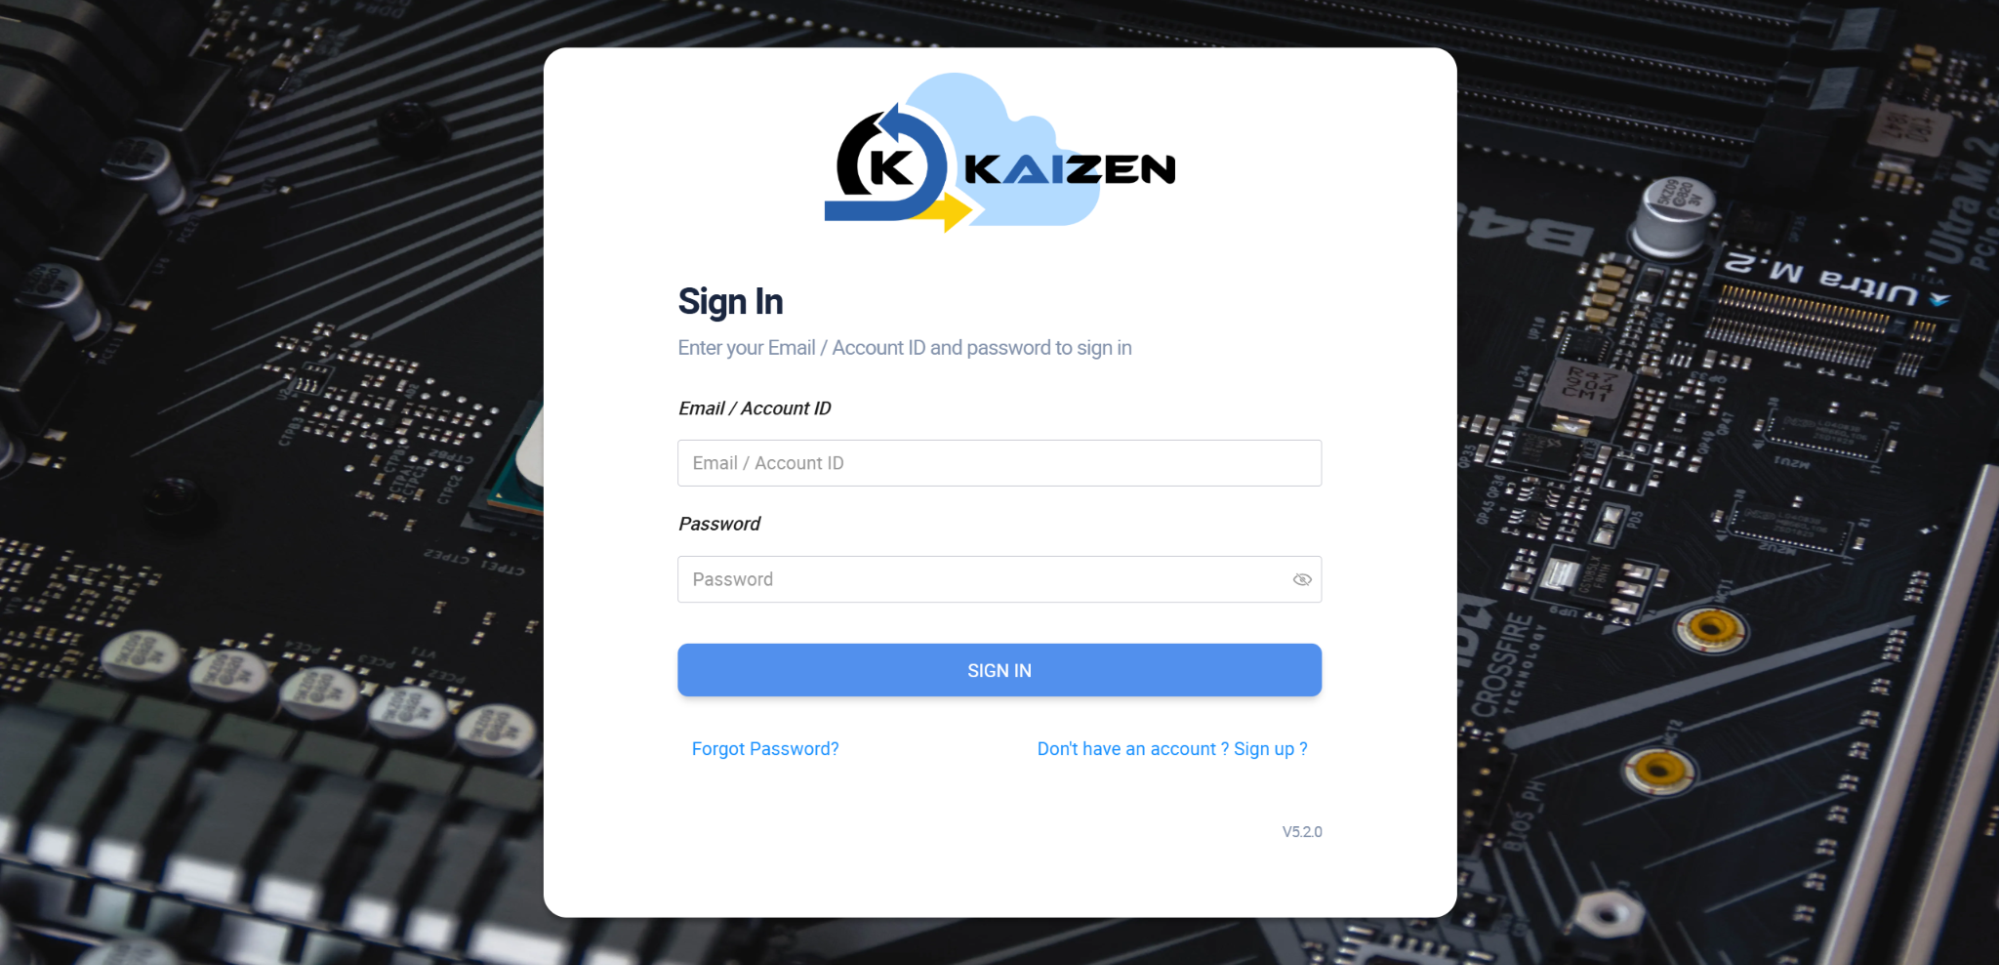
Open your web browser and navigate to https://studio.onekaizencloud.com.
-
Enter the temporary credentials provided in your welcome email.
-
Click Sign In.
-
-
Changing Your Password:
- Why this is important: Your initial temporary password was delivered via email, which is not a secure channel for long-term access. Updating your password immediately to a personalised, secure phrase ensures that only you can access your profile, invalidates the temporary email credentials, and helps protect your organisation's workspace environment.
- Upon logging in, look at the top right corner of the screen and click your User Profile Avatar.
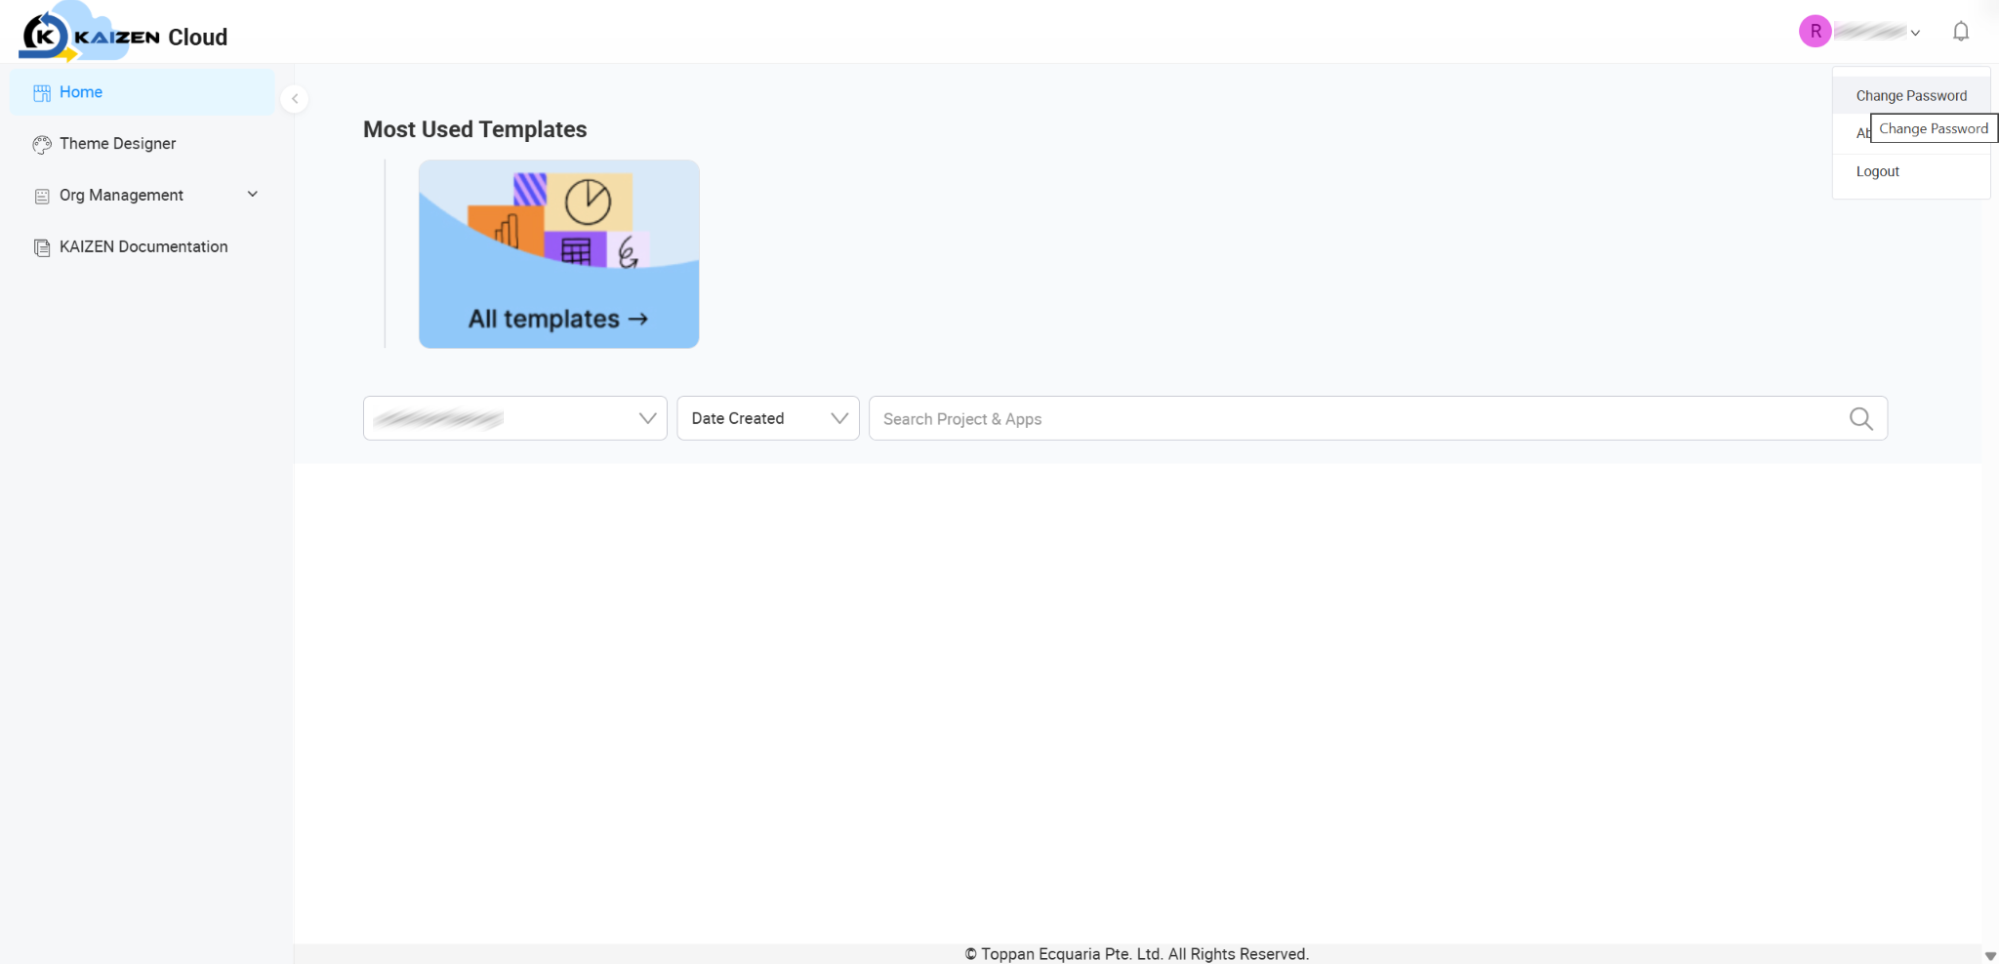
- Click Change Password.
- Input your temporary password, enter your new secure password, confirm it, and click Save Changes.
-
Navigating the Main Dashboard:
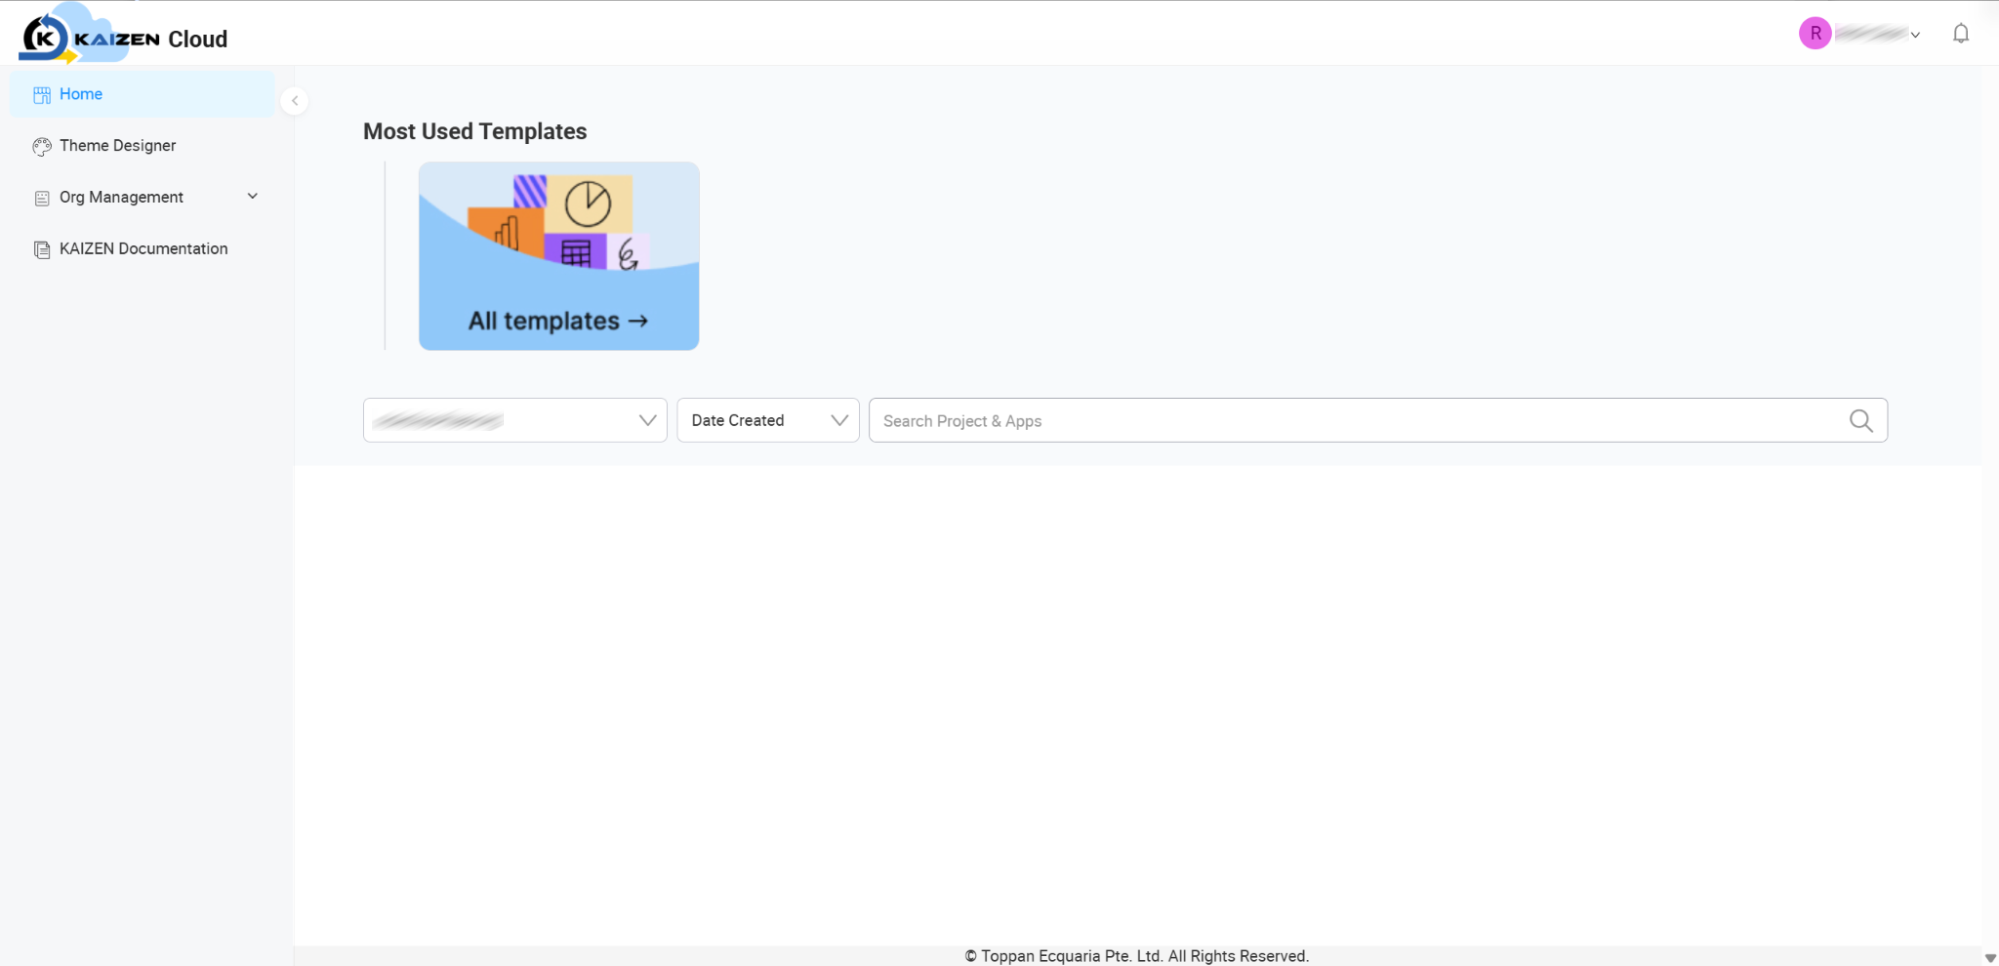
As illustrated in the platform screenshot above, the main landing screen is organised into three primary functional areas:
-
Left Sidebar Menu (Persistent Navigation):
- Home: Brings you back to your main organisation and project dashboard.
- Theme Designer: Access tools to customise global styles and themes for your applications.
- Org Management: A collapsible dropdown menu where Org Admins can manage organisation settings, members, and projects.
- KAIZEN Documentation: Direct access to help manuals and resource guides.
noteClick the Collapse button (<) next to the sidebar to hide it and maximise your screen space.
-
Header Bar (Top Right):
- Displays your User Profile Avatar and name. Clicking here opens your account settings and password management options.
- Displays the Notifications bell icon for platform alerts.
-
Main Workspace Panel (Centre Content Area):
- Most Used Templates: A quick-access banner to explore pre-built application templates.
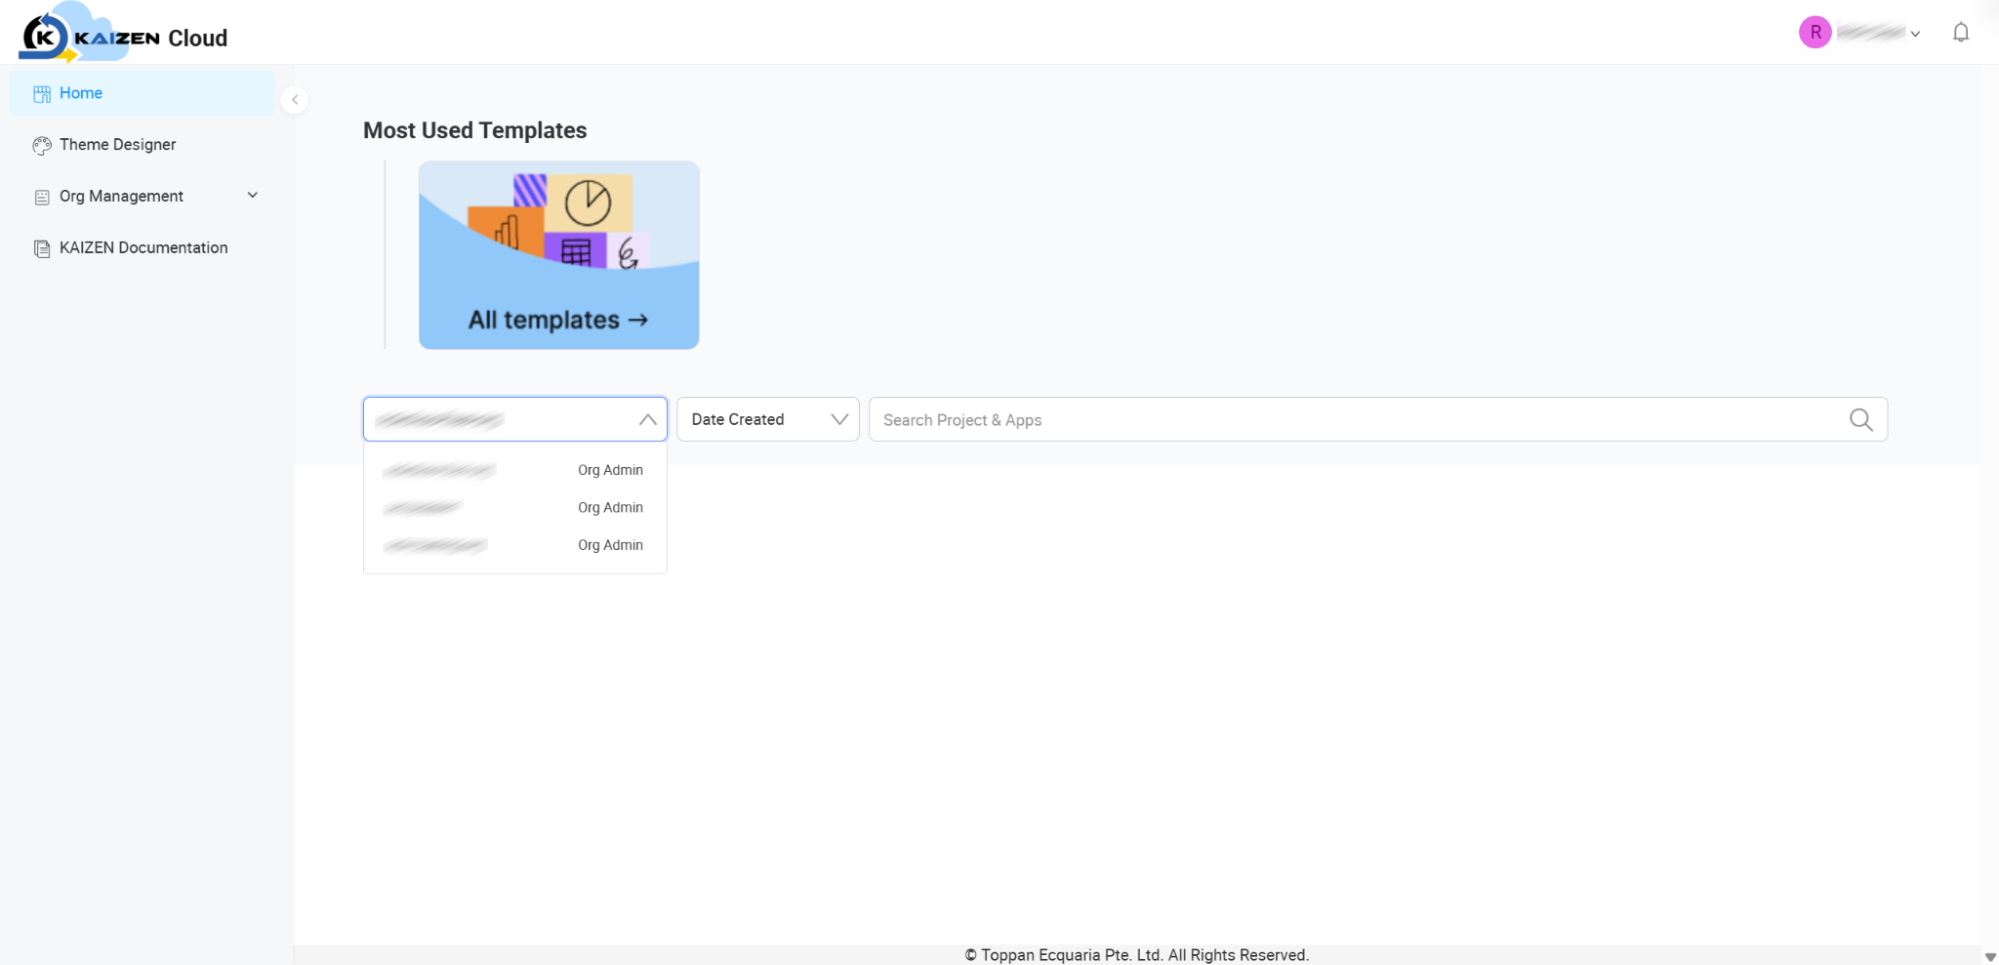
- Organisation Dropdown Switcher: Located on the left side of the filter bar, allowing you to switch between different workspaces if you belong to multiple organisations.
- Search and Filter Bar: Use the Search Project & Apps bar to quickly find your active projects, and use the adjacent sorting dropdowns (such as Date Created) to organise your dashboard view.
1.3 Understanding KAIZEN's Structural Hierarchy
To effectively manage your organisation, it is important to understand how structural components fit together in KAIZEN:
\[ Company / Enterprise \] ◄── (Your business or corporate entity)
    │
    └──► \[ Organisations \] ◄── (Created with a single subscription plan)
            │
            └──► \[ Projects \] ◄── (Isolated workspaces for teamwork and segregation)
                    │
                    └──► \[ Applications \] ◄── (The software tools built in a project)
- Company / Enterprise: This represents your business or corporate entity.
- Organisation: This is the administrative workspace created with your SaaS subscription plan.
- Tied to a Subscription: Each KAIZEN Organisation is directly linked to one active subscription plan.
- Multiple Organisations: A Company can manage multiple KAIZEN Organisations under its umbrella to separate departmental budgets, restrict access, or maintain completely independent workspace environments.
- Projects: These sit directly under an individual Organisation workspace. They act as distinct workspaces designed to isolate team collaborations, custom access lists, and specific business goals.
- Applications: These are the actual software systems (such as trackers, forms, or portals) created and managed within individual projects.
- Members: Users belong globally to the organisation workspace, but Org Admins can explicitly assign them to specific projects with restricted permissions.
Module 2. Organisation Administration (Detailed Step-by-Step)
Focus: Detailed procedures for managing organisation settings, inviting members, and managing projects (Org Admin Only).
2.1 Organisation Settings & Admin Console
Only members with administrative permissions can view the Admin Console.
KAIZEN features three distinct roles that determine what configurations a user can modify in the organisation:
| Role | Description |
|---|---|
| Org Admin | User with the Org Admin role of the organisation will be responsible to manage the organisation setting including: Changes to the organisation name, Subscribe to paid subscription for organisation (currently not open to end users and requires email request to support@onekaizencloud.com), Deactivate Organisation, Manage organisation's member, Manage Projects under the organisation |
| Org Admin Only | Have the same rights as Org Admin but will not have the access to perform any development to the project/application under the organisation. User with Org Admin Role only will not take up any of the named user quota |
| Org Member | User with the Org Member role will be able to assign to the projects under the organisation to perform development |
Navigating the Console:
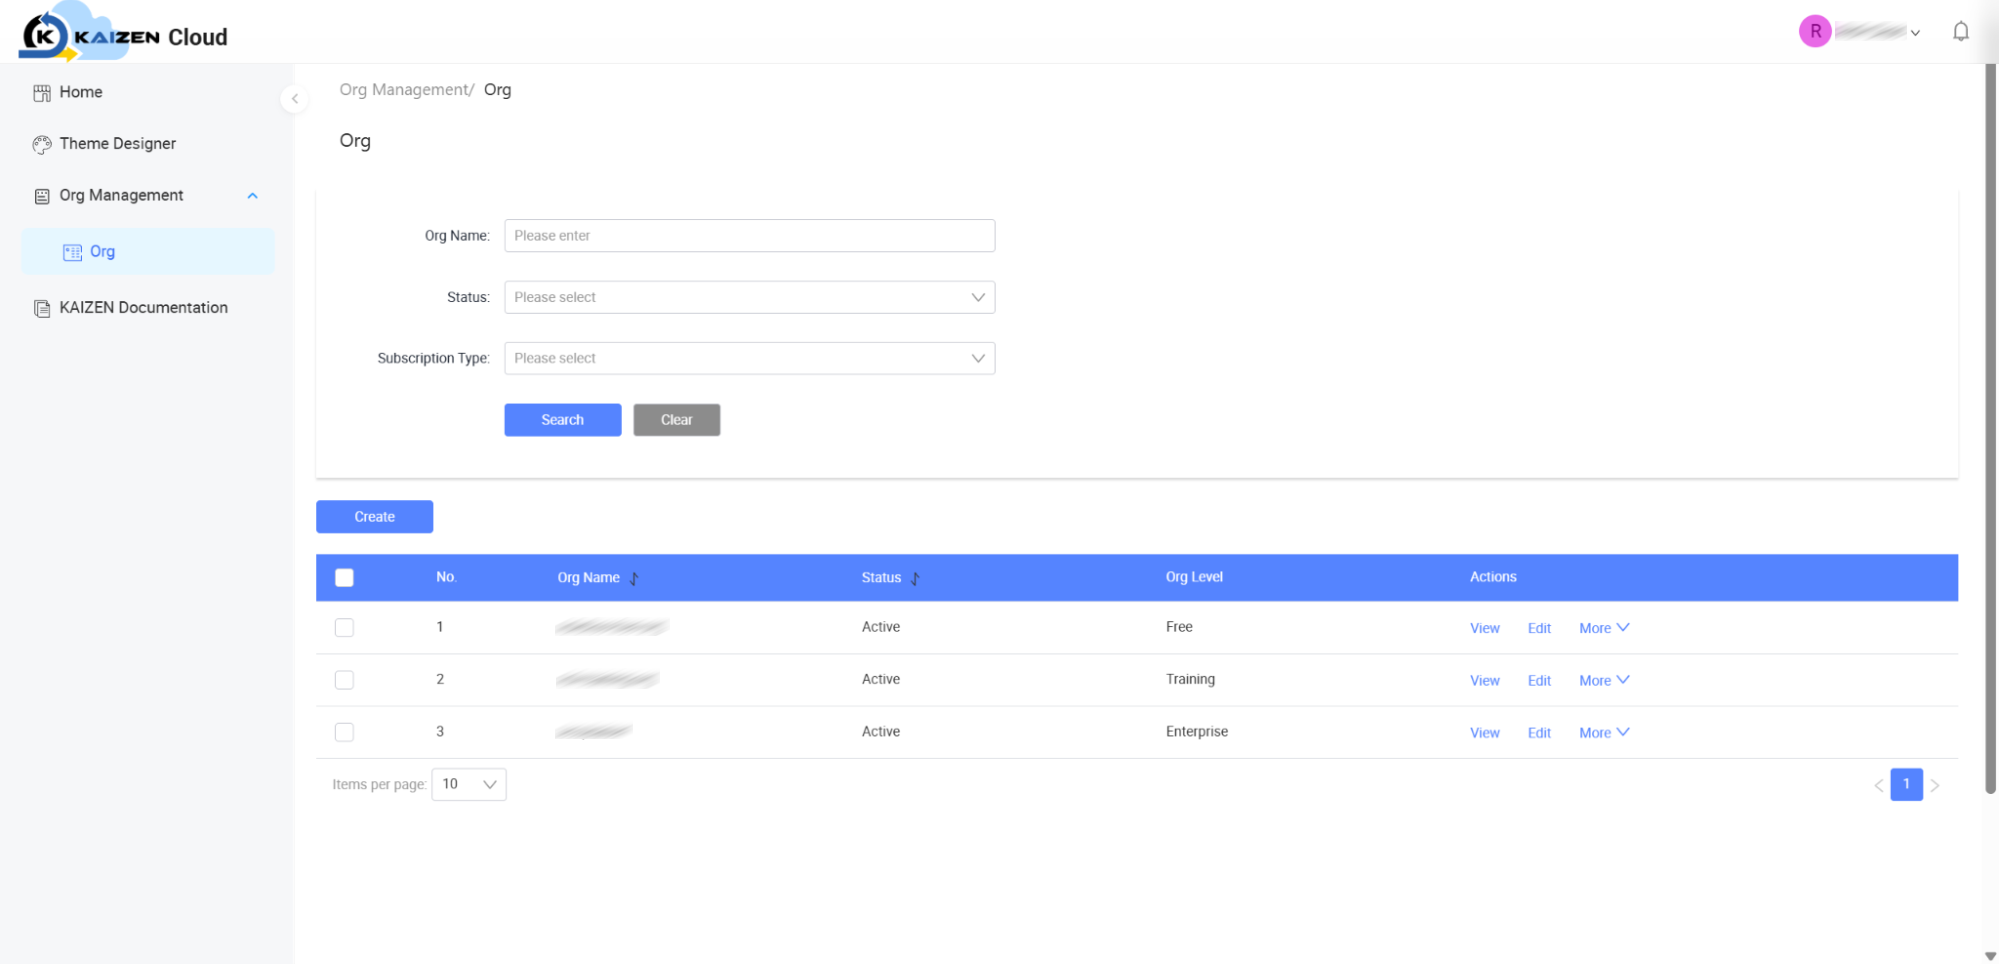
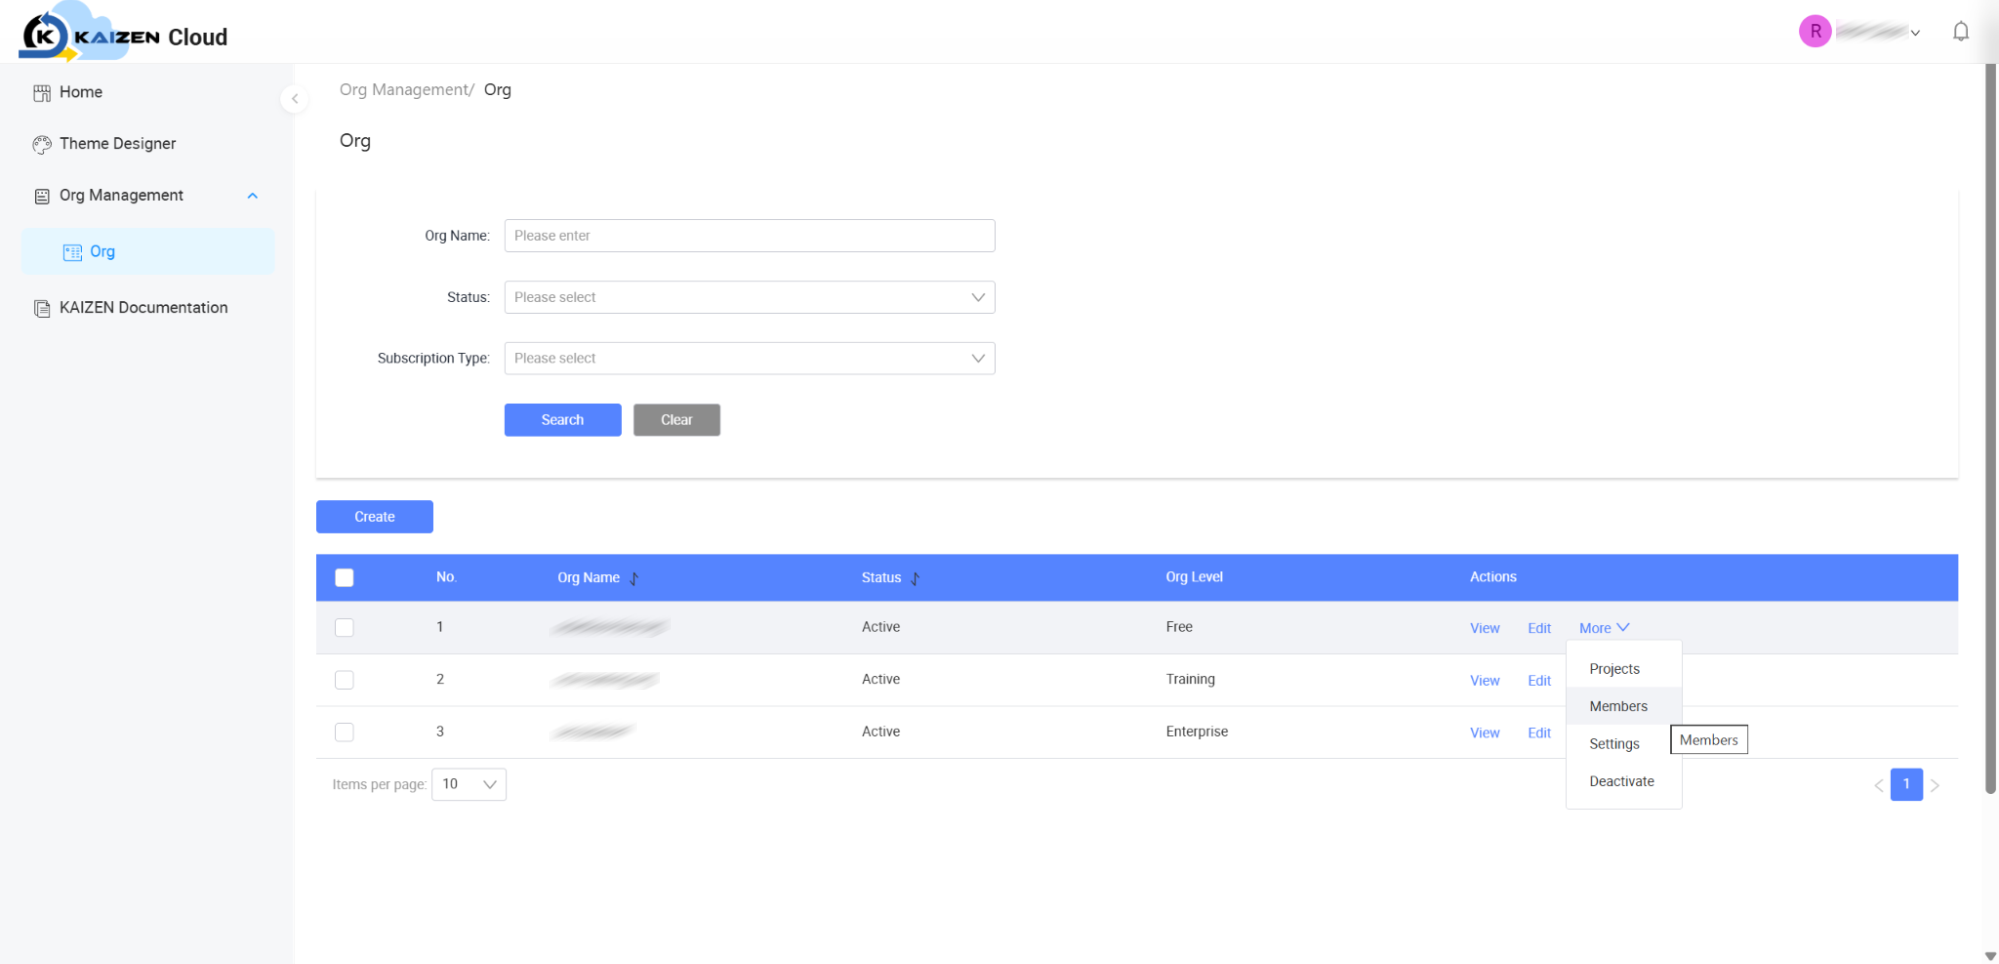
As shown in image above, you can access your organisation settings directly:
- Locate the Global Sidebar on the left side of your dashboard.
- Click Org Management to expand the administrative dropdown list.
- Click the Org tab (which will highlight in blue and display the breadcrumb path Org Management / Org at the top of your workspace).
- In the main workspace panel, you will see:
- Search Filter Form: Fields to search your organisations by Org Name, Status, and Subscription Type, along with Search and Clear action buttons.
- Create Button: A button to initialise a new organisation workspace.
- Organisation Directory Table: A detailed list showing column headers for No., Org Name, Status, Org Level, and Actions (such as View, Edit, and More options).
2.2 Member Management & Invitations
How to Access the Member Management Screen:
-
Navigate to the Admin Console (as described in Section 2.1).
-
Locate the Organisation Directory Table.
-
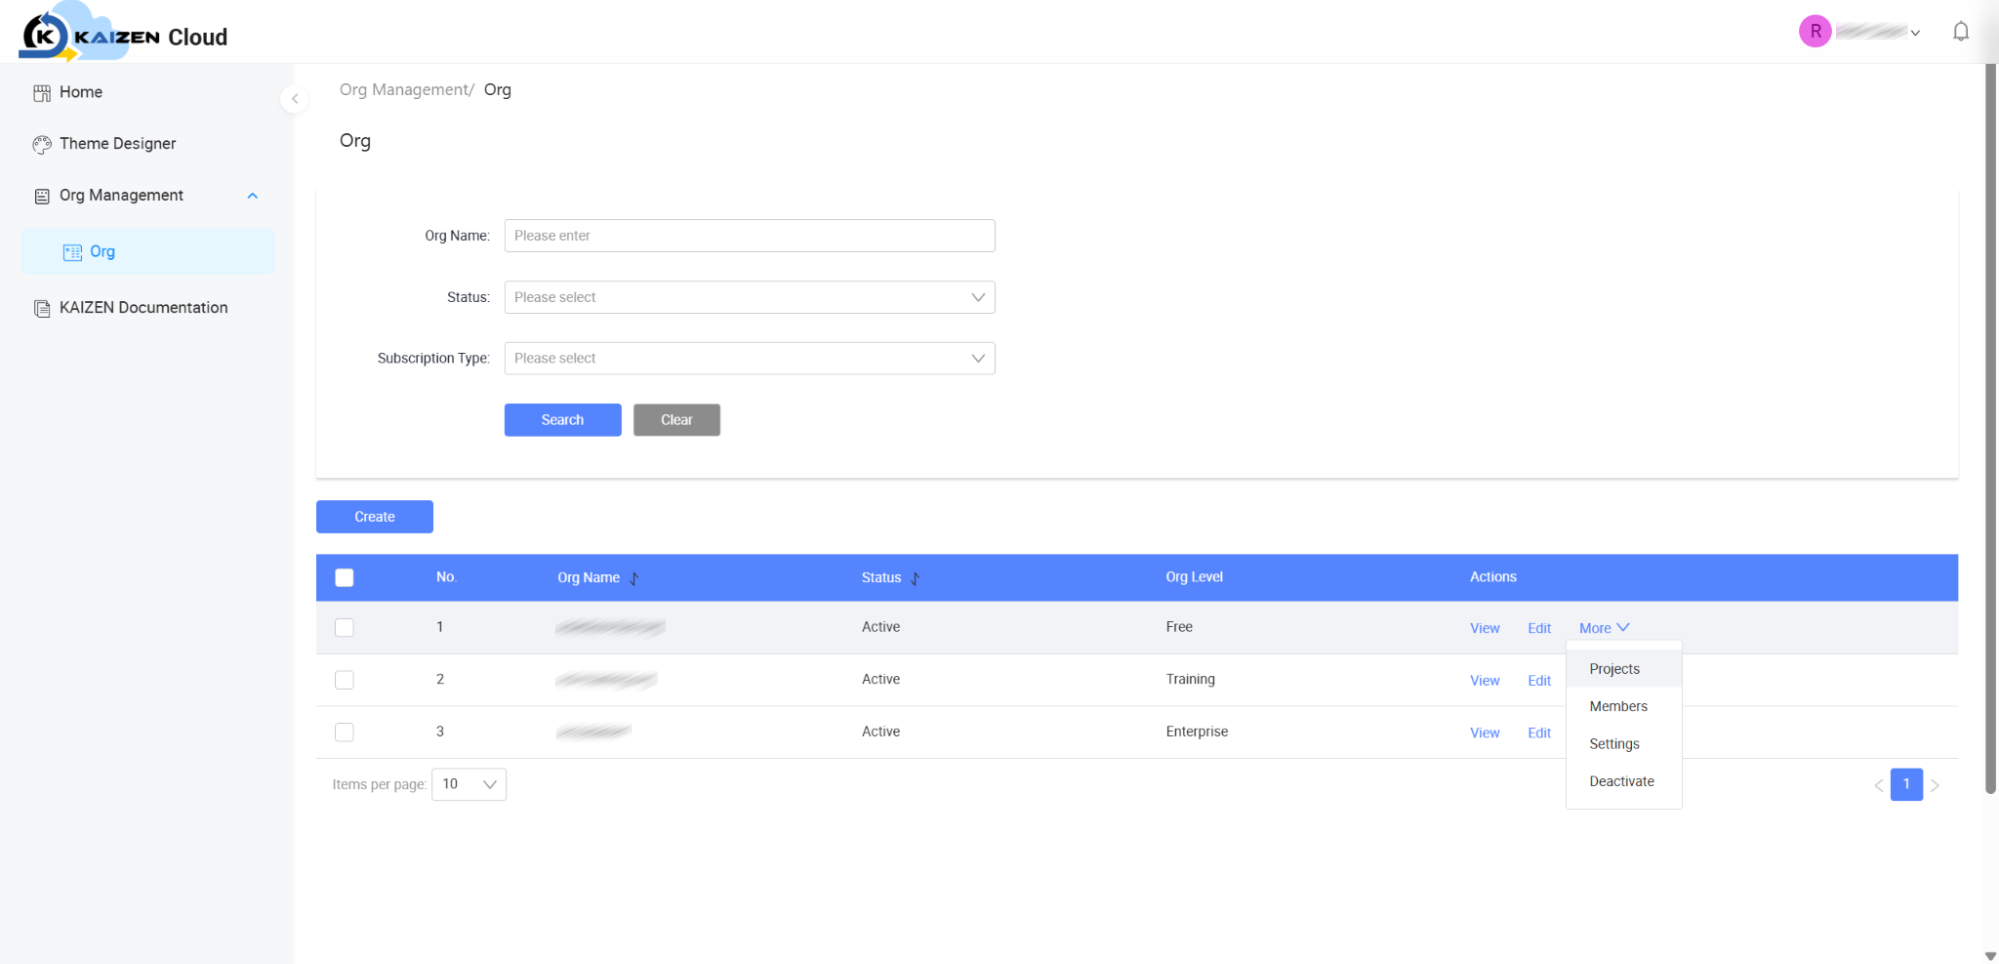
Find the target Organisation workspace and locate the Actions column on the right.
-
Hover over the More dropdown menu to reveal the option list.
-
Click Members. This action will direct you to the dedicated Member Management screen shown below (displaying the breadcrumb path Org Management / Org / Members).
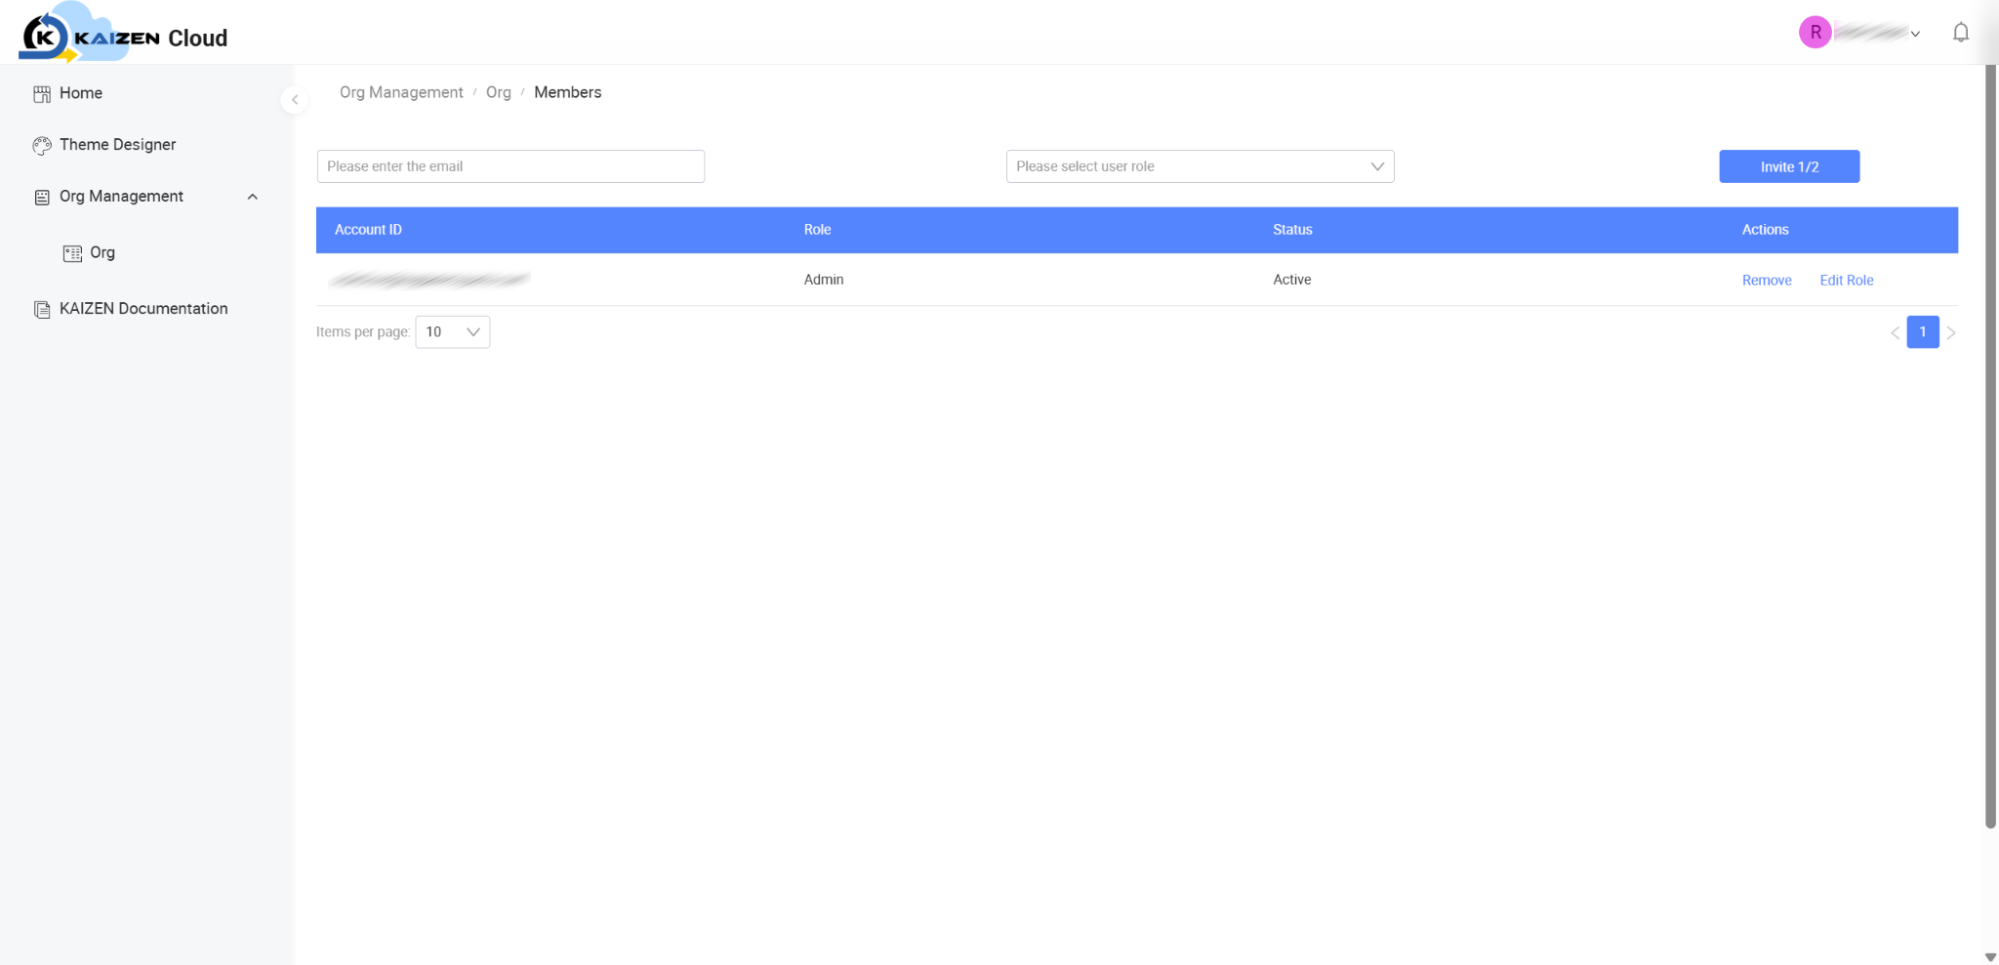
How to Invite a New Member:
- Prerequisite: The target user must already have a registered KAIZEN platform account. If they do not have one, you must request account creation for them before sending the organisation invitation.
Once you are on the Member Management screen:
-
Locate the invite bar at the top of the workspace.
-
In the "Please enter the email" text field, input the registered professional email address of the user.
-
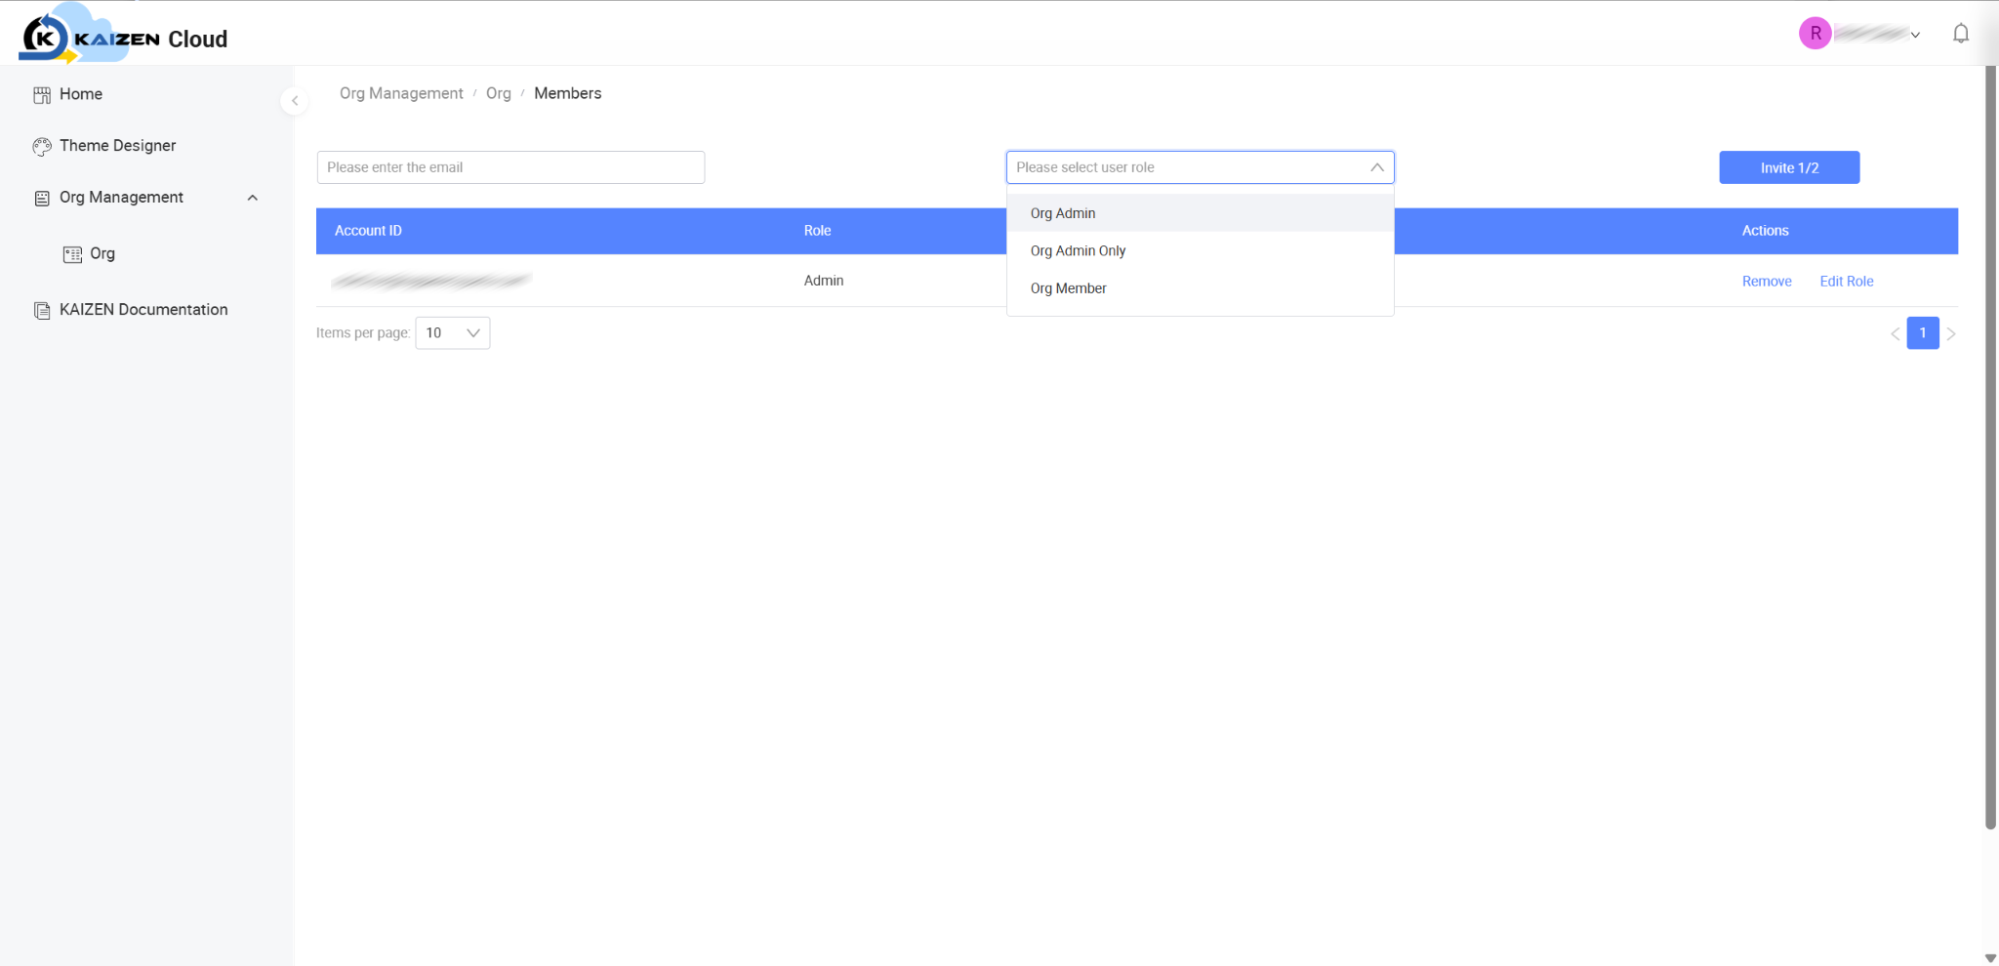
Click the Please select user role dropdown menu. As illustrated below, select one of the following available roles:
-
Org Admin
-
Org Admin Only
-
Org Member
-
-
Click the Invite button.
-
Post-Invitation Action Flow:
- After clicking Invite, KAIZEN automatically dispatches an invitation email to the recipient's address.
- The recipient must locate this email, open it, and click the confirmation link to accept the invitation and successfully join the organisation workspace.
Managing Member Access & Permissions:
Under the members table shown in Section 2.2, administrators can perform the following actions under the Actions column for any member row:
-
Edit Role:
-
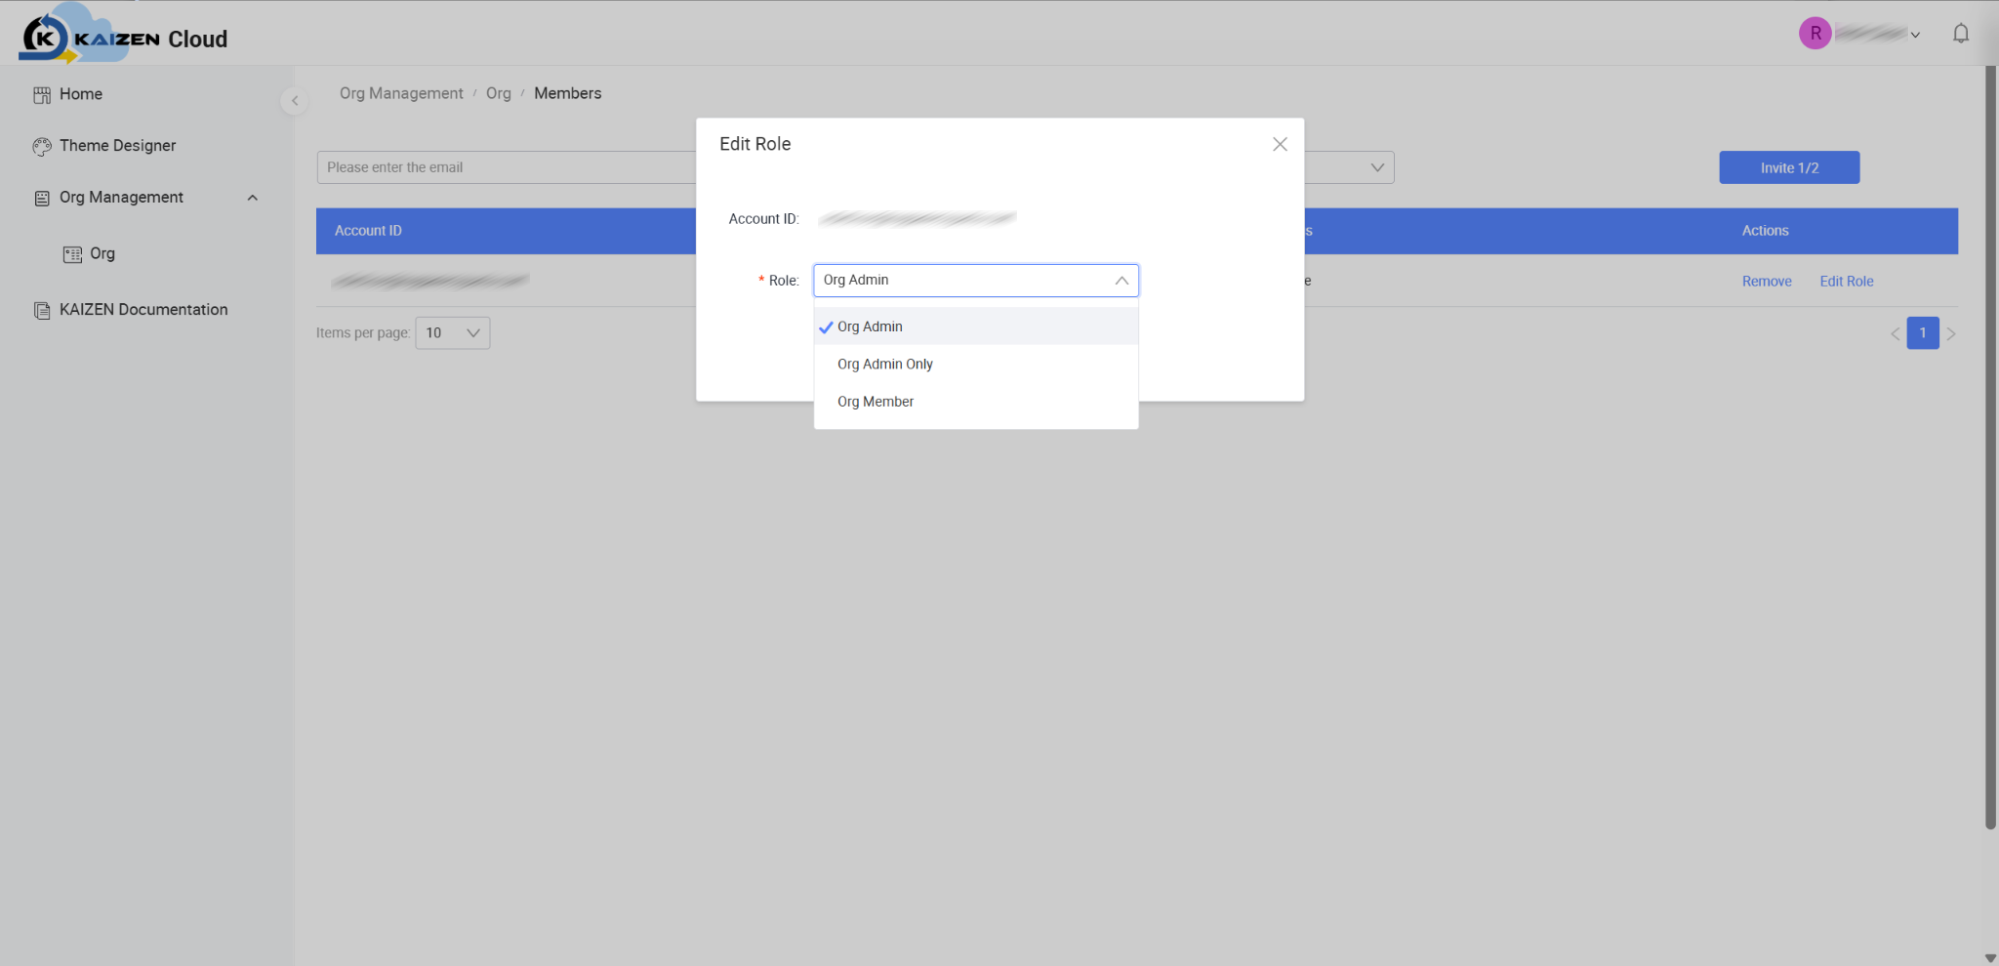
Click Edit Role next to a member's row. This will launch the Edit Role modal shown below.
-
In the modal, verify the Account ID displayed for the user you are modifying.
-
Click the Role dropdown menu (indicated with a red asterisk * to show it is a required field) and select their updated role: Org Admin, Org Admin Only, or Org Member.
-
Click the Submit button to save and apply the changes immediately, or click Cancel (or the close X icon on the top right) to exit without saving.
-
-
Remove Member: Click Remove to instantly revoke the user's access credentials and remove them from your organisation workspace.
2.3 Creating and Managing Organisation Projects
How to Access the Organisation Projects Screen:
-
Navigate to the Admin Console (as described in Section 2.1).
-
Locate the Organisation Directory Table.
-
Find your target Organisation workspace and locate the Actions column on the right.
-
Hover over or click the More dropdown menu to reveal the option list.
-
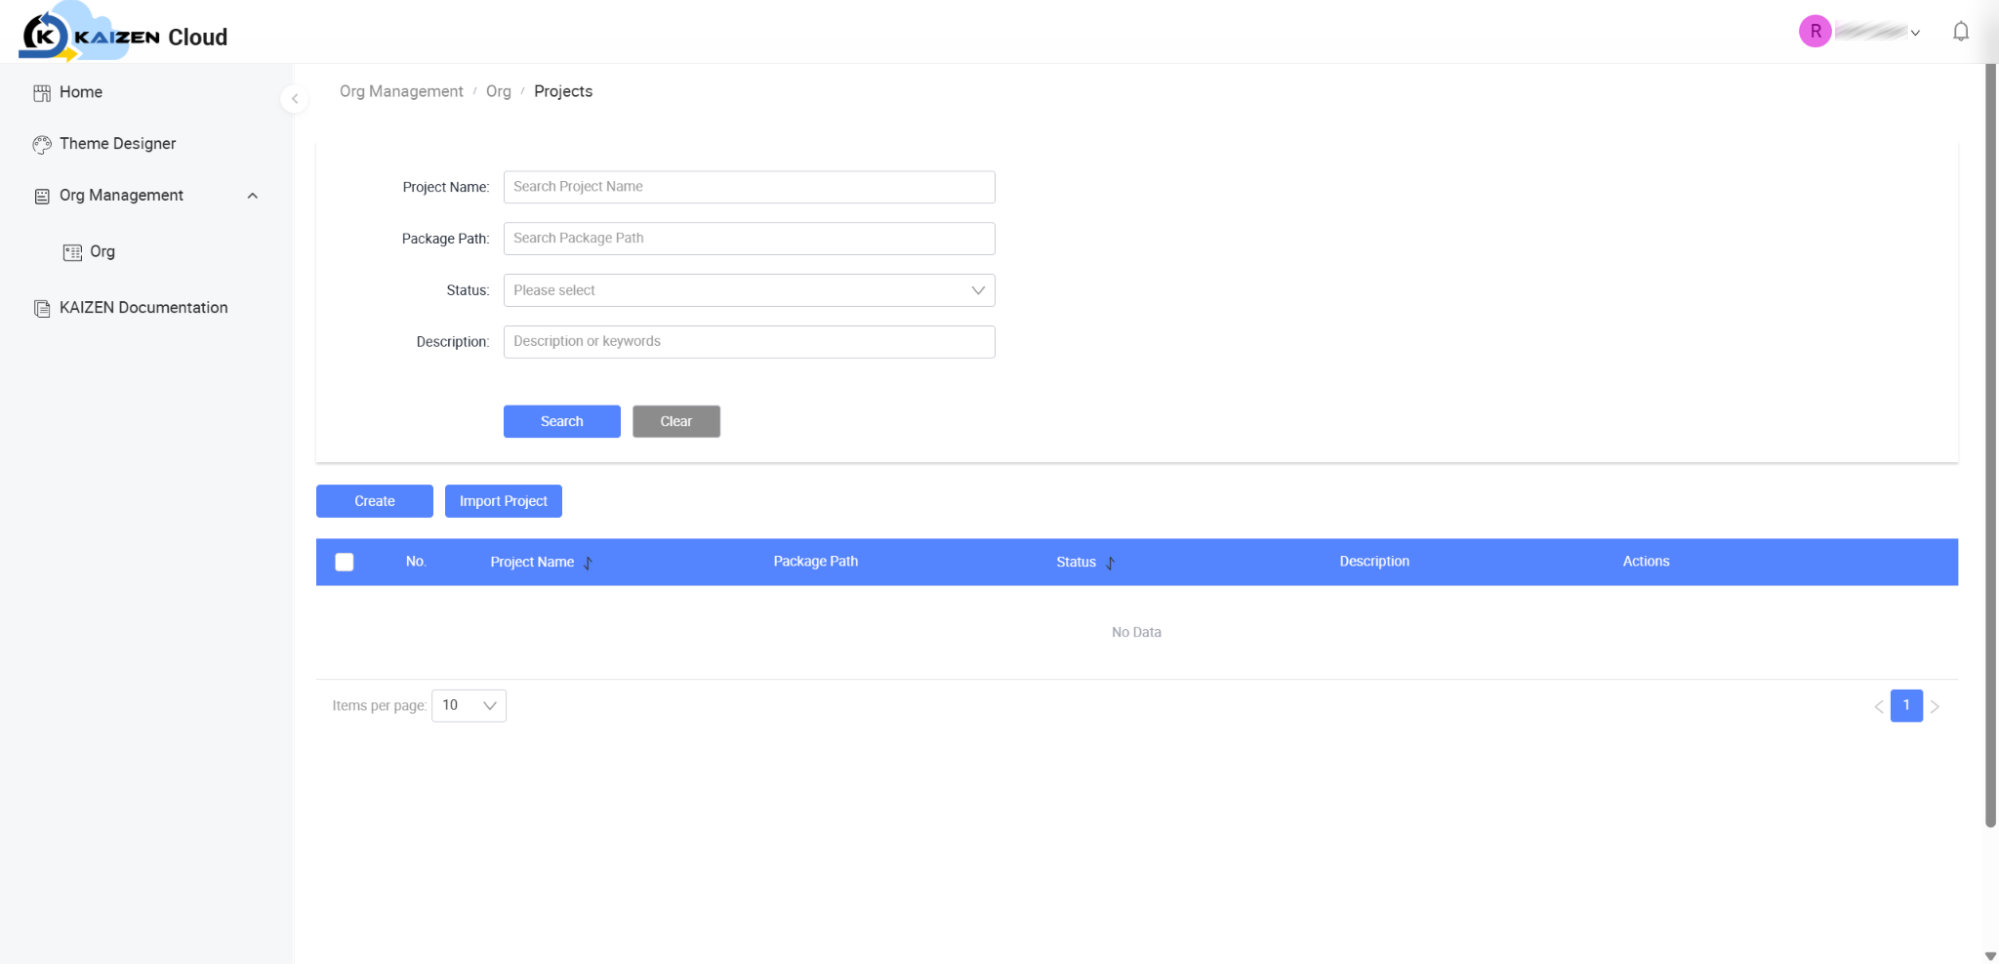
Click Projects. This will open the Organisation Projects screen shown below (displaying the breadcrumb path Org Management / Org / Projects).
Understanding the Projects Screen Layout:
As illustrated above, this workspace area includes:
- Search Filter Form: Fields to search projects within the selected organisation by Project Name, Package Path, Status, and Description, complete with Search and Clear action buttons.
- Action Buttons: A Create button and a Import Project button.
- Projects Directory Table: Displays your list of active organisation projects with columns for No., Project Name, Package Path, Status (indicated in green as Active), Description, and Actions (such as View, Edit, or More).
Creating a New Project:
-
Navigate to the Organisation Projects screen.
-
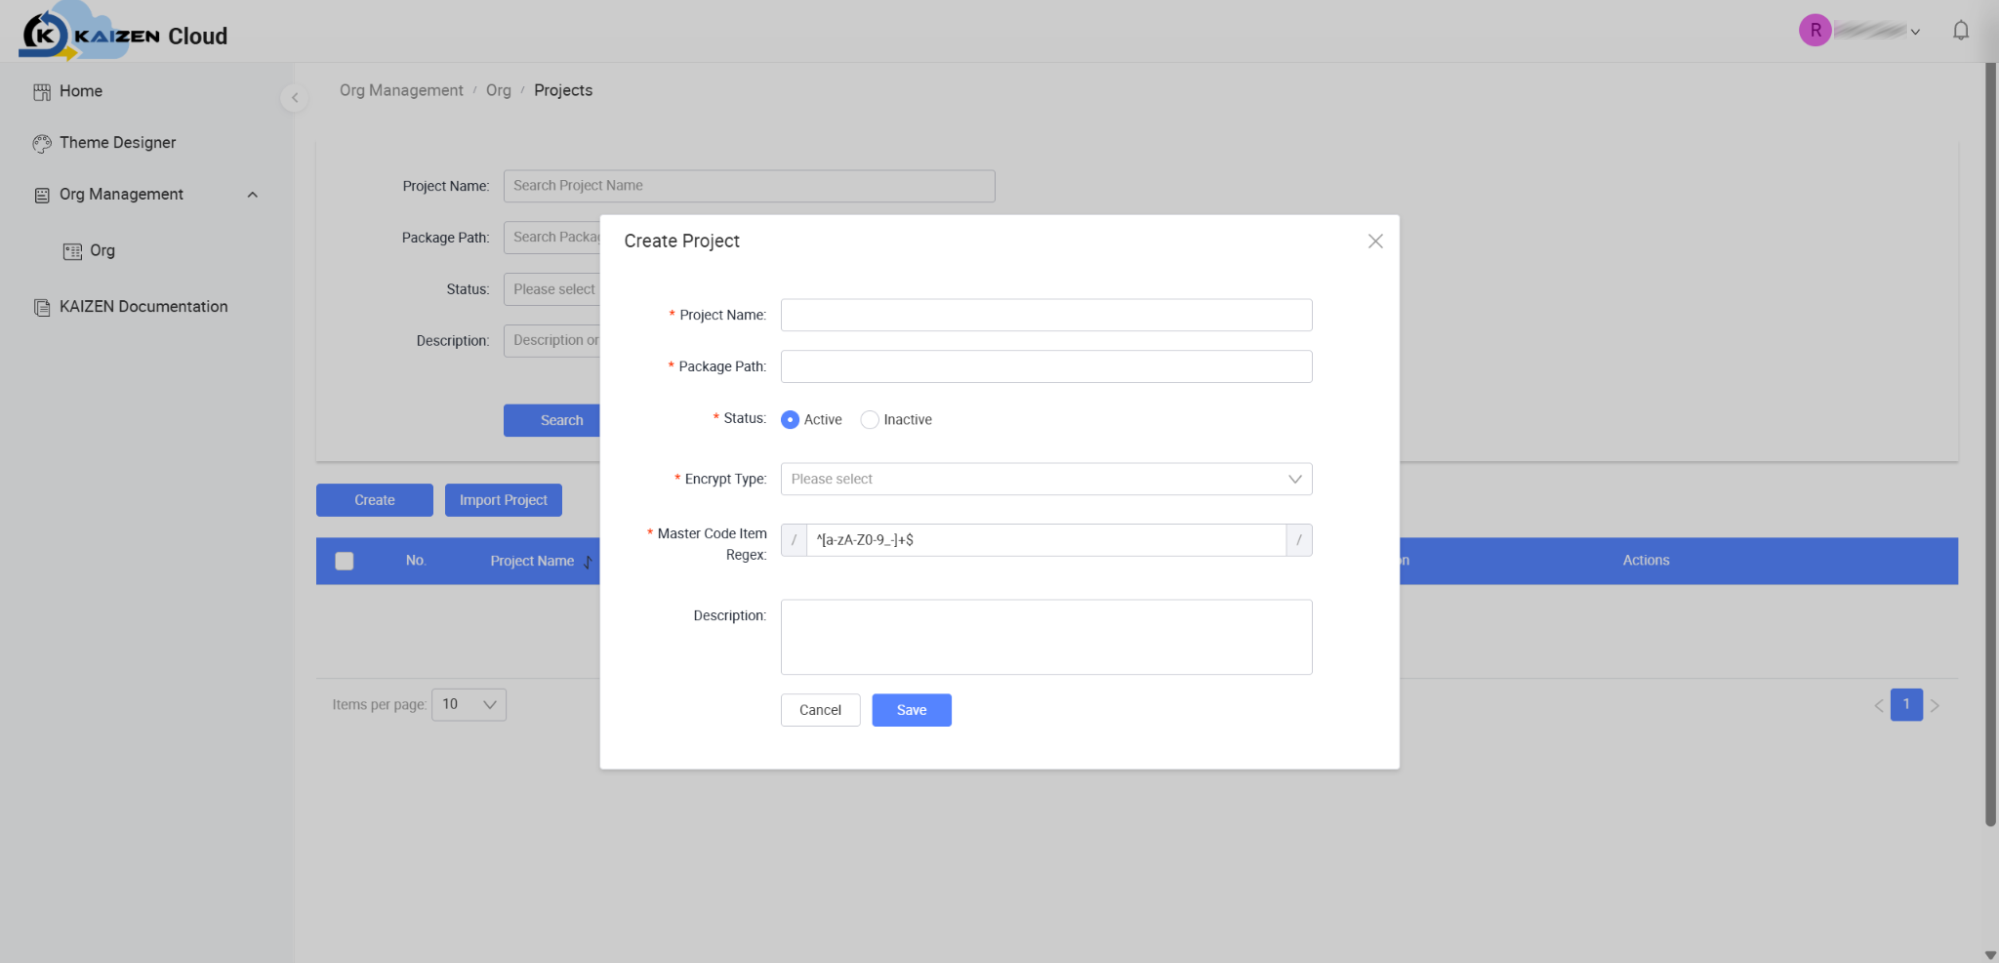
Click the Create button. This action will launch the Create Project modal shown in below.
-
In the creation modal, fill out the following parameters:
- Project Name: Enter the custom title for your project.
- Package Path: Enter the system-level namespace path, adhering to standard Java package naming conventions (such as com.company.project).
- Status: Toggle the radio selector to configure the project's initial status as Active or Inactive (defaults to Active).
- Encrypt Type: Select your encryption preference from the dropdown menu (options include BCRYPT, SCRYPT, or HASH). This defines the encryption algorithm used when exporting project configurations.
- MasterCode Item Regex: Define or review the regular expression rule used to enforce custom configuration key formatting (pre-populated with ^[a-zA-Z0-9_-]+$).
- Description: Provide a brief summary outlining the primary goals or team context for the project workspace.
-
Click the Save button to finalise and register the project, or click Cancel to exit the modal without saving.
Deactivating / Archiving an Inactive Project:
-
From the Projects Directory table, locate the target project row you wish to archive.
-
Locate the Actions column on the right side of the row.
-
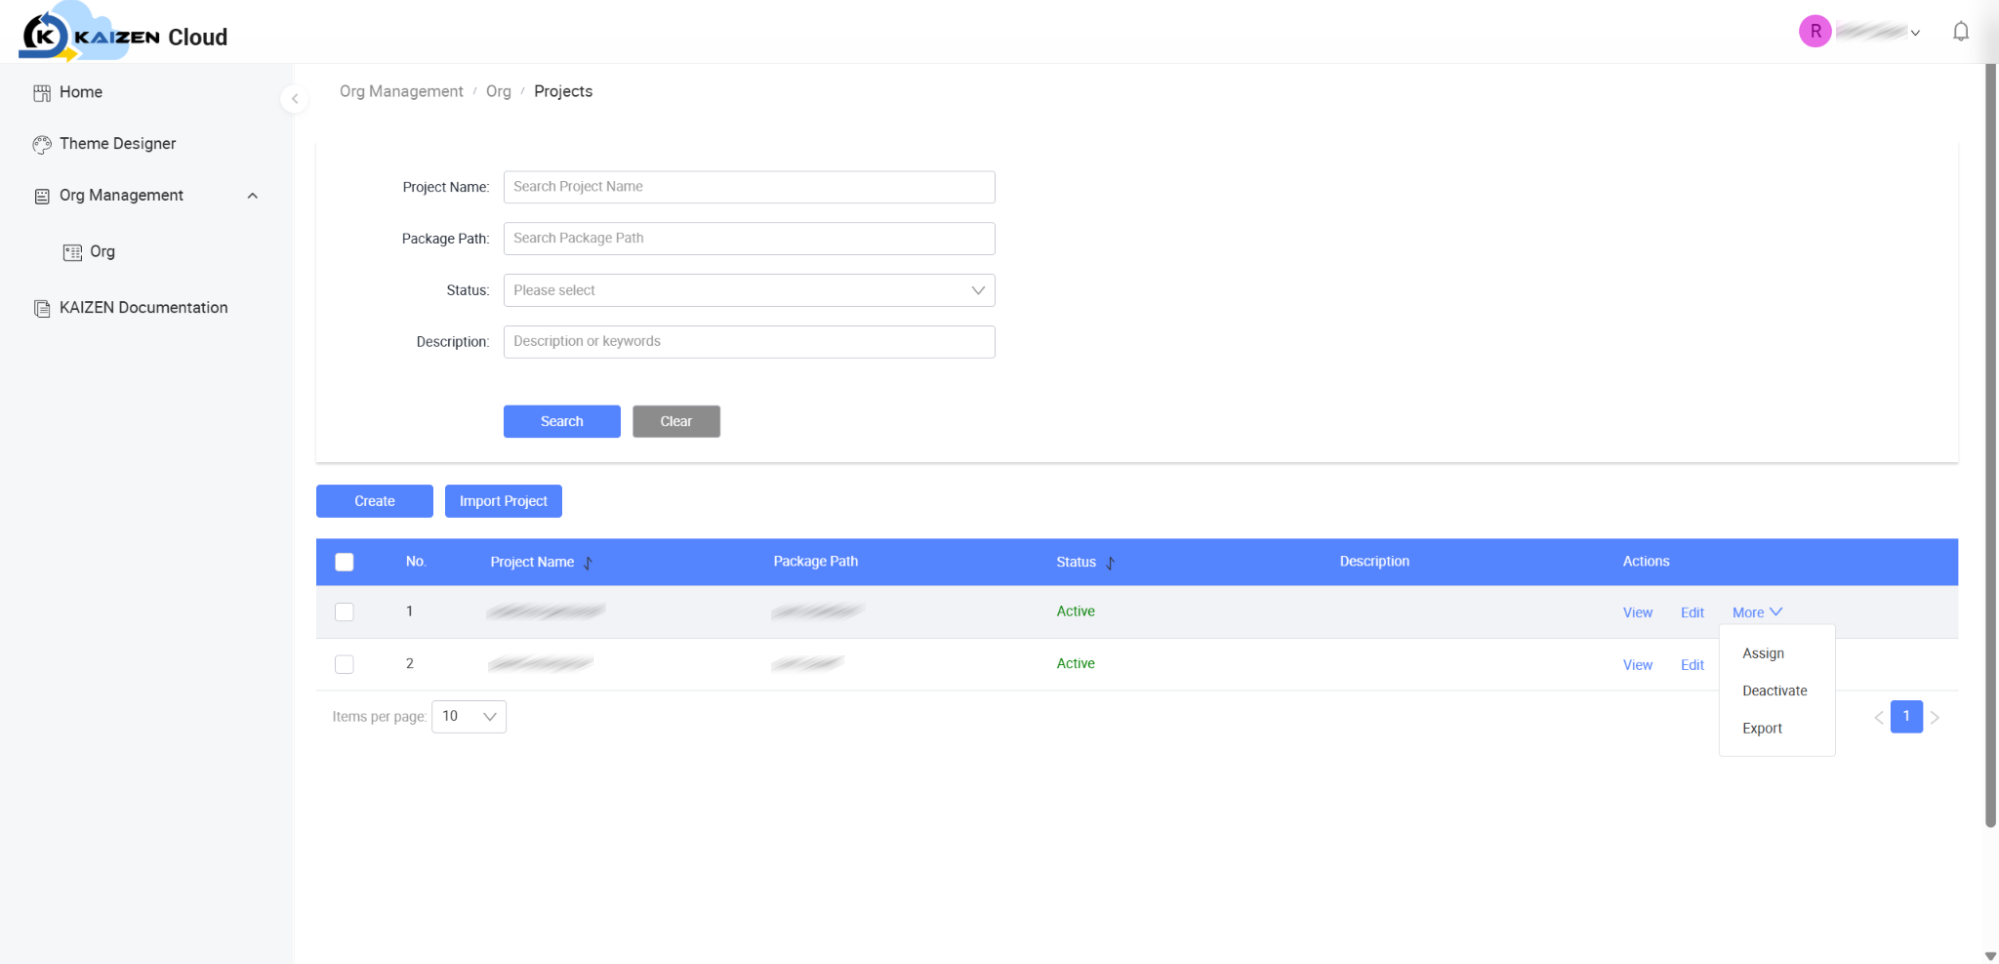
Hover over or click the More dropdown menu to reveal the option list, as shown below.
-
Click Deactivate.
-
This launches the Change Status warning dialog.
-
Verify the prompt text "Are you sure you want to deactivate [project-name]?" and click the OK button to confirm, or click Cancel to abort.
Deactivating a project safely hides it from active developer queues while fully preserving its database schemas, applications, and configurations for potential restoration later.
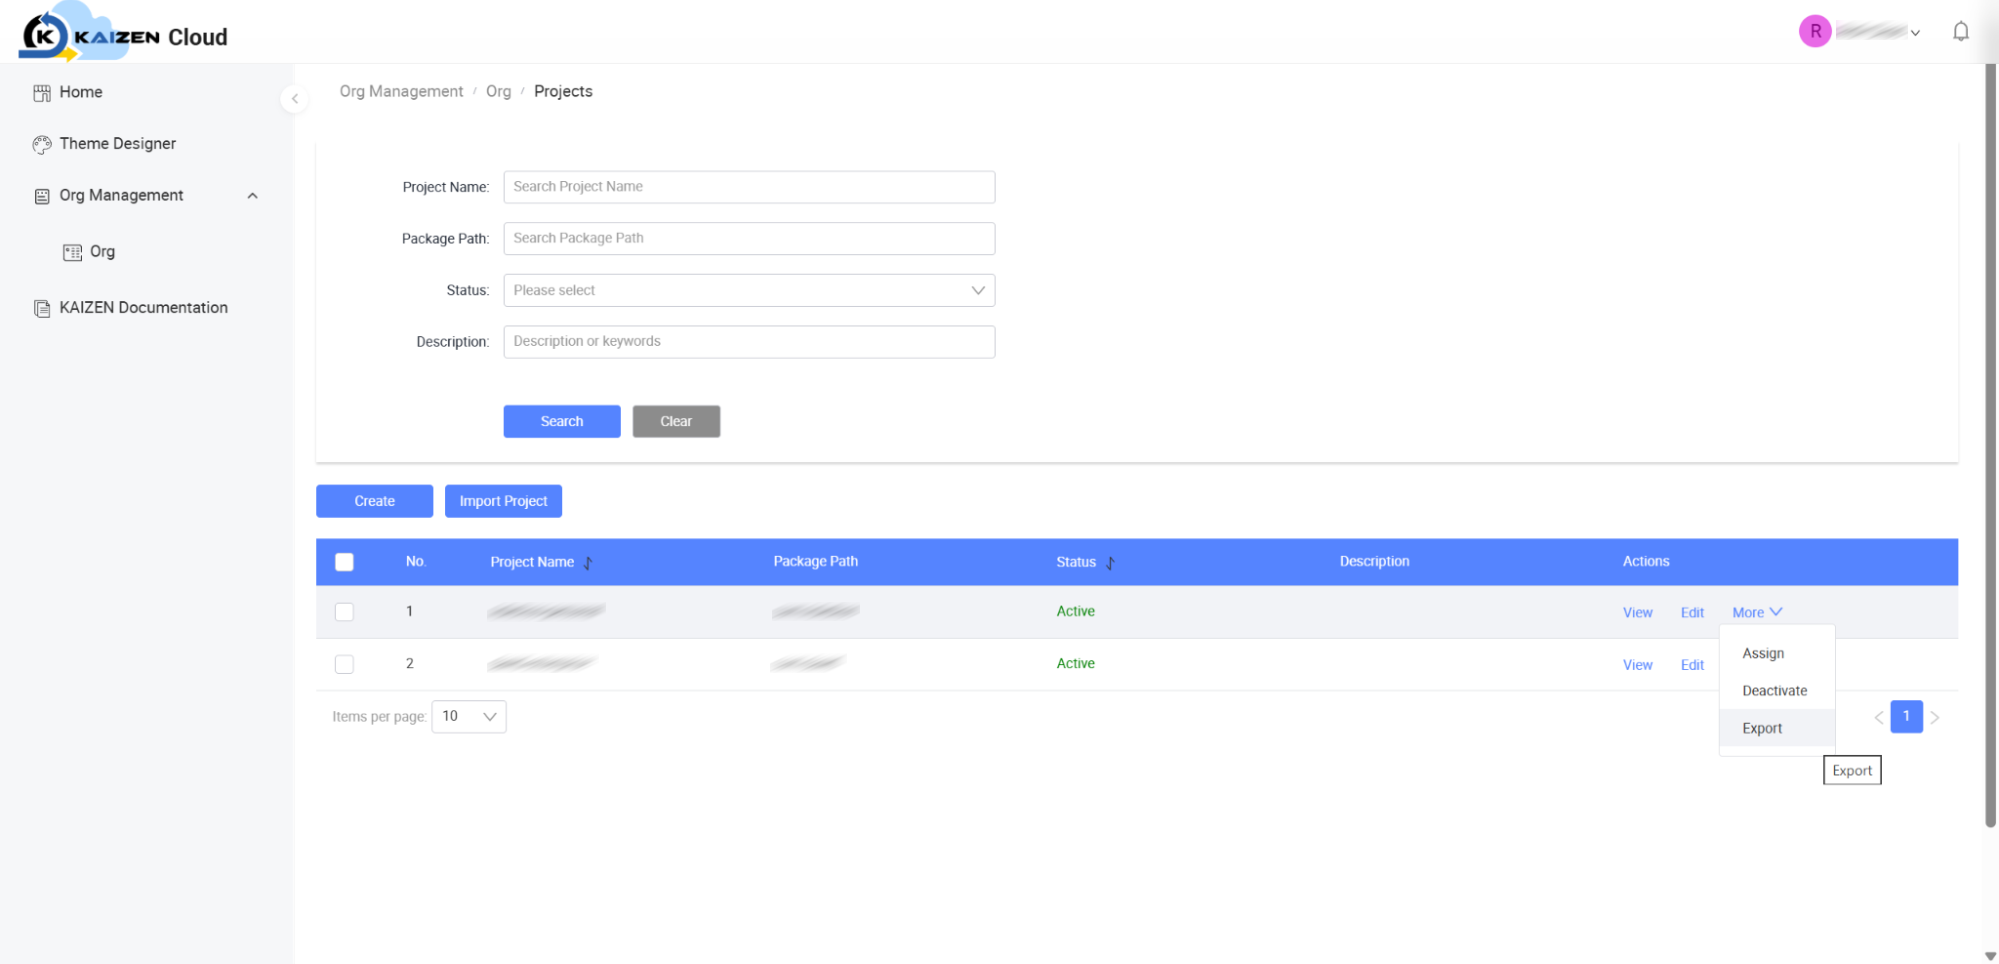
Exporting Project Configurations:
-
From the Projects Directory table, locate the target project row.
-
Hover over or click the More dropdown menu in the Actions column.
-
Click Export from the menu list.
-
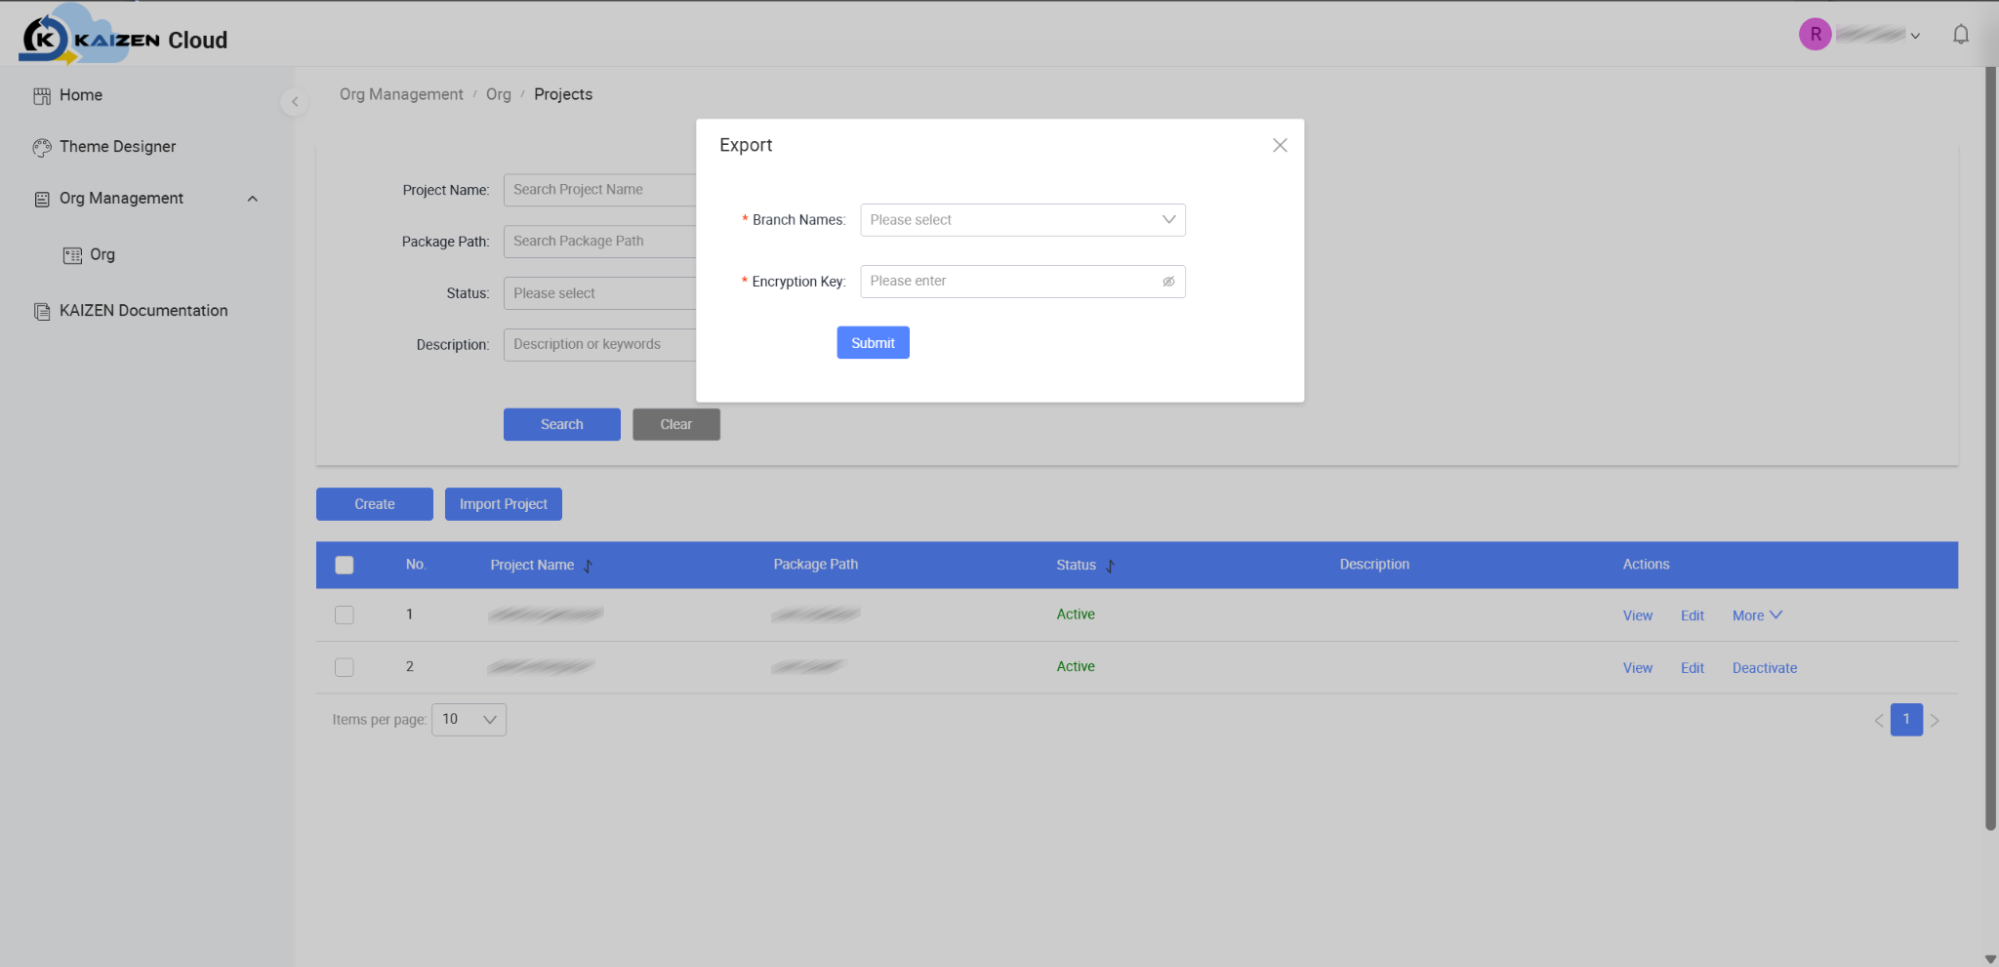
This launches the Export configurations modal shown below.
-
In the Export modal, fill out the required parameters (indicated with a red asterisk *):
- Branch Names: Select the targeted development branch from the dropdown list.
- Encryption Key: Input your custom workspace security password (you can click the eye icon to show/hide the password characters).
noteIn KAIZEN version 5.3.0, when no user data is involved, the import/export process will not require the encryption key.
-
Click the Submit button to finalise and compile the configuration package.
Module 3. Project Workspaces & Access Control (Detailed Step-by-Step)
Focus: Detailed procedures for configuring project-level members, assignments, and initial application setup.
3.1 Project Member Assignment & Role Configuration
To protect and organise your work, every project maintains its own isolated access roster. Users must be explicitly assigned to a project before they can view or edit any of its resources.
KAIZEN features two distinct project-level roles:
| Role | Description |
|---|---|
| Project Manager | User given Project Manager role is the owner of the project whereby having the all access to maintain the project and is given default access when a new application is created |
| Maintainer | Project Maintainer role has all the rights as Project Manager with the exception of unlocking locked Page and given default access when a new application is created |
How to Assign Members to a Project:
-
Navigate to the Admin Console and open the Organisation Projects screen as described in Section 2.3.
-
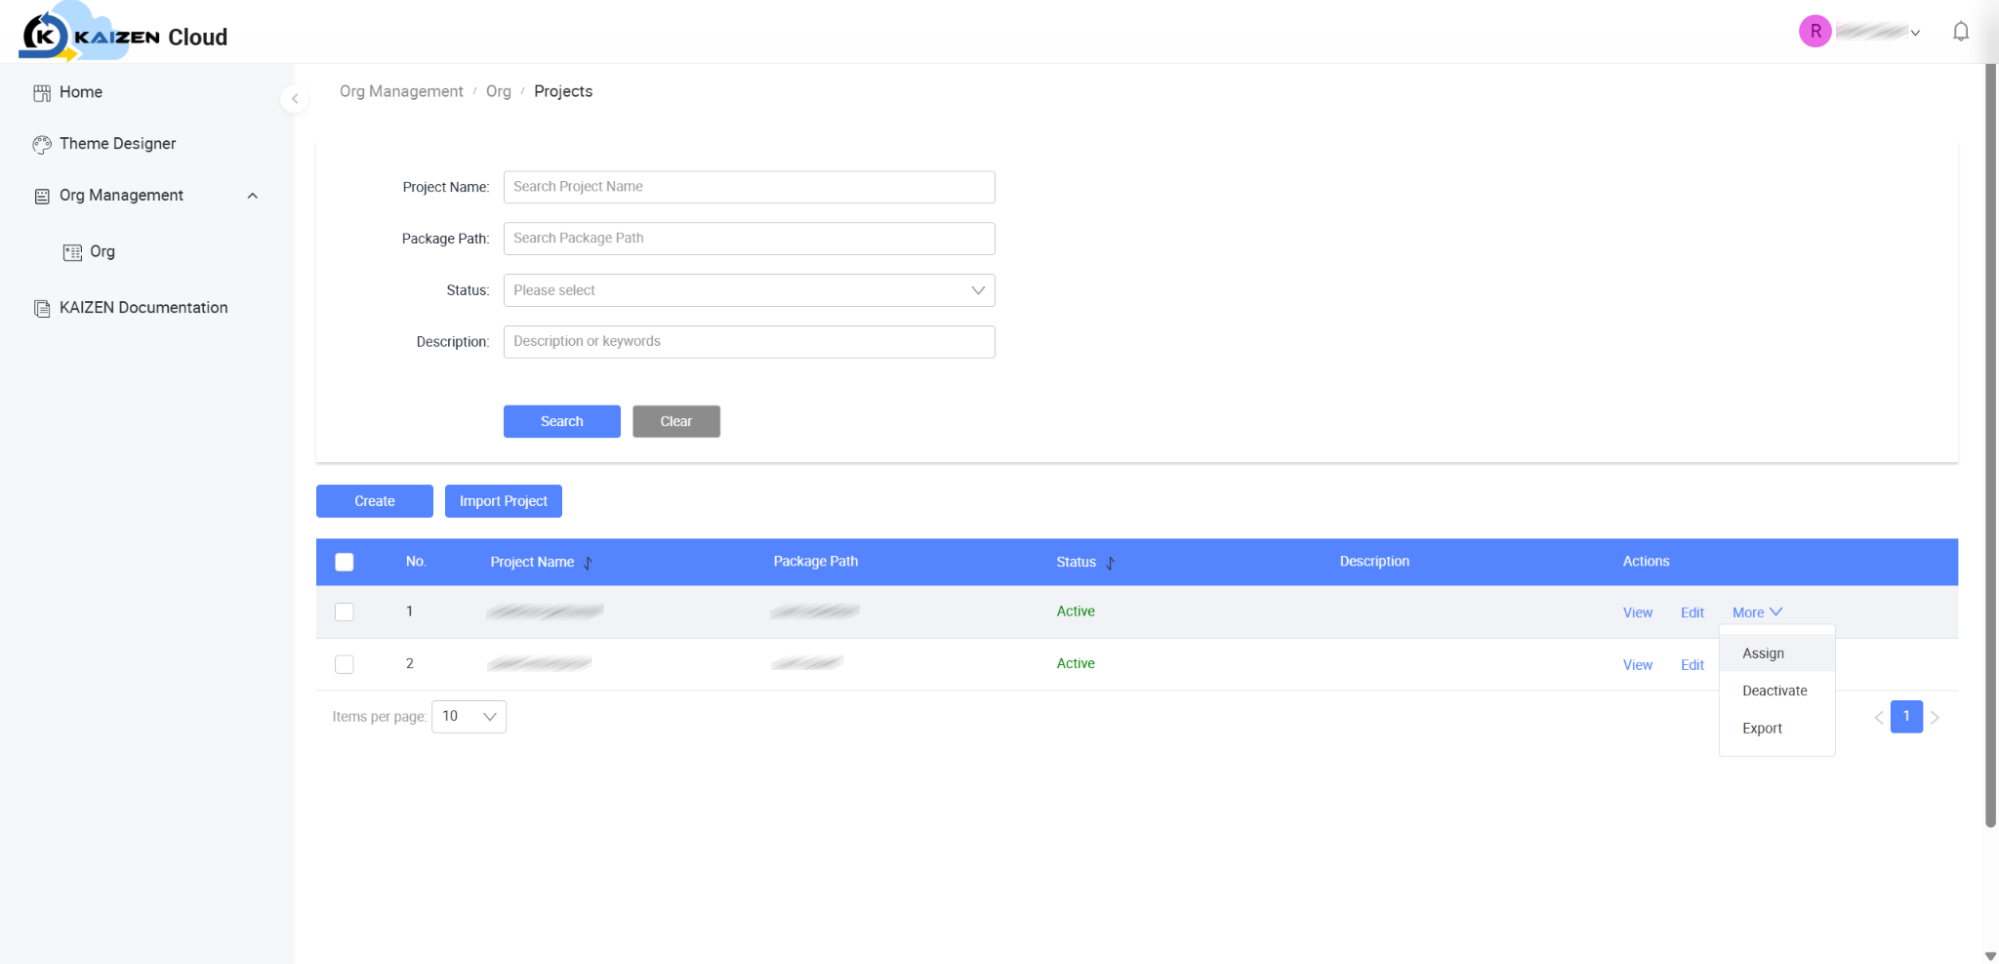
Locate the row of your target project and look at the Actions column on the right.
-
Click the More dropdown option list.
-
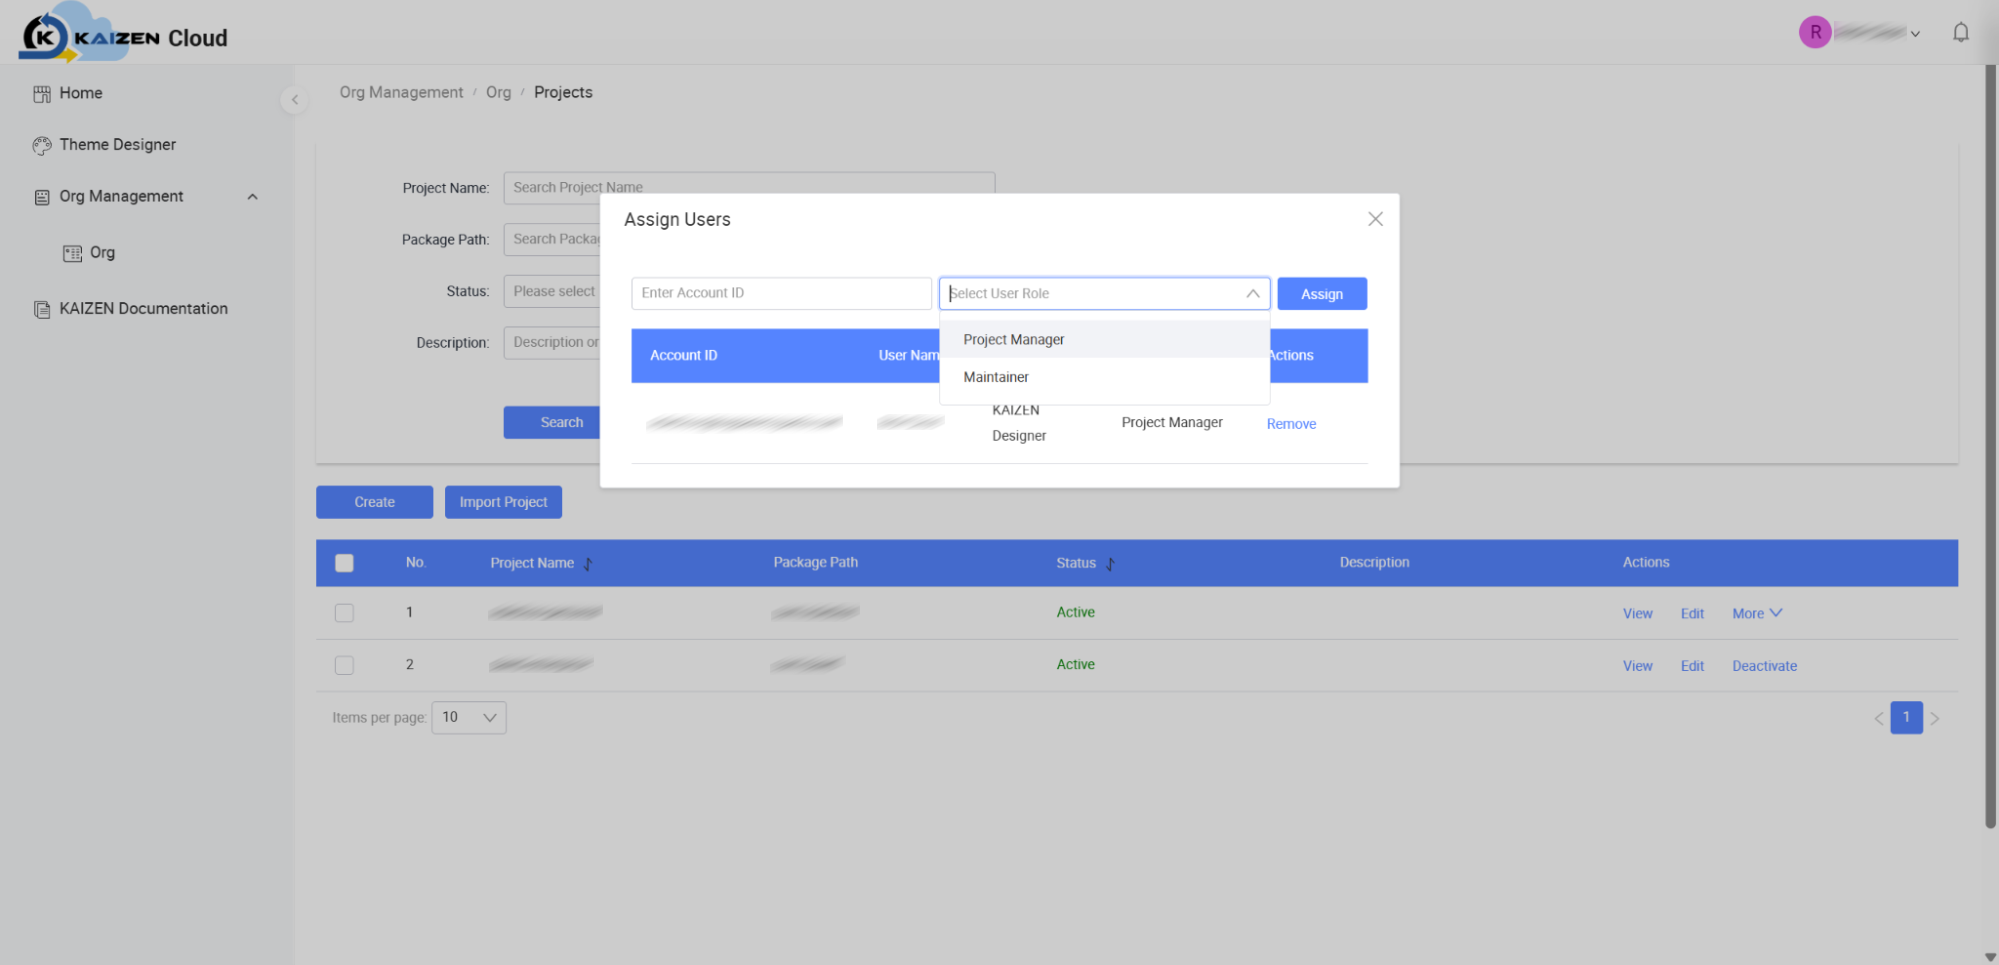
Select Assign from the dropdown menu. This will launch the dedicated modal shown below.
-
Within the Assign Users modal:
- Enter Account ID: Type the registered KAIZEN professional email address of the team member you wish to assign.
- Select User Role: Click the dropdown menu and select their project-level role: Project Manager or Maintainer.
-
Click the Assign button.
-
The user is immediately registered, and their details (Account ID, Name, Role) are displayed in the assigned members table located in the bottom half of the modal.
Modifying or Revoking Project Access:
Within the Assign Users modal table:
- To revoke a user's access, locate their name row, navigate to the Actions column on the right, and click the Remove action button. This immediately terminates their access to the project's applications and resources.
3.2 Creating Applications within a Project Workspace
Applications are the functional building blocks inside your project workspace.
-
Dashboard Verification:
-
Click Home in the Global Sidebar menu.
-
Locate the Organisation Dropdown Switcher on the left side of the dashboard filter bar and verify your target organisation is selected.
-
Ensure that the selected organisation contains the active Project workspace created in Section 2.3.
-
-
Launching the Creation Form:
-
Locate the project bar workspace panel.
-
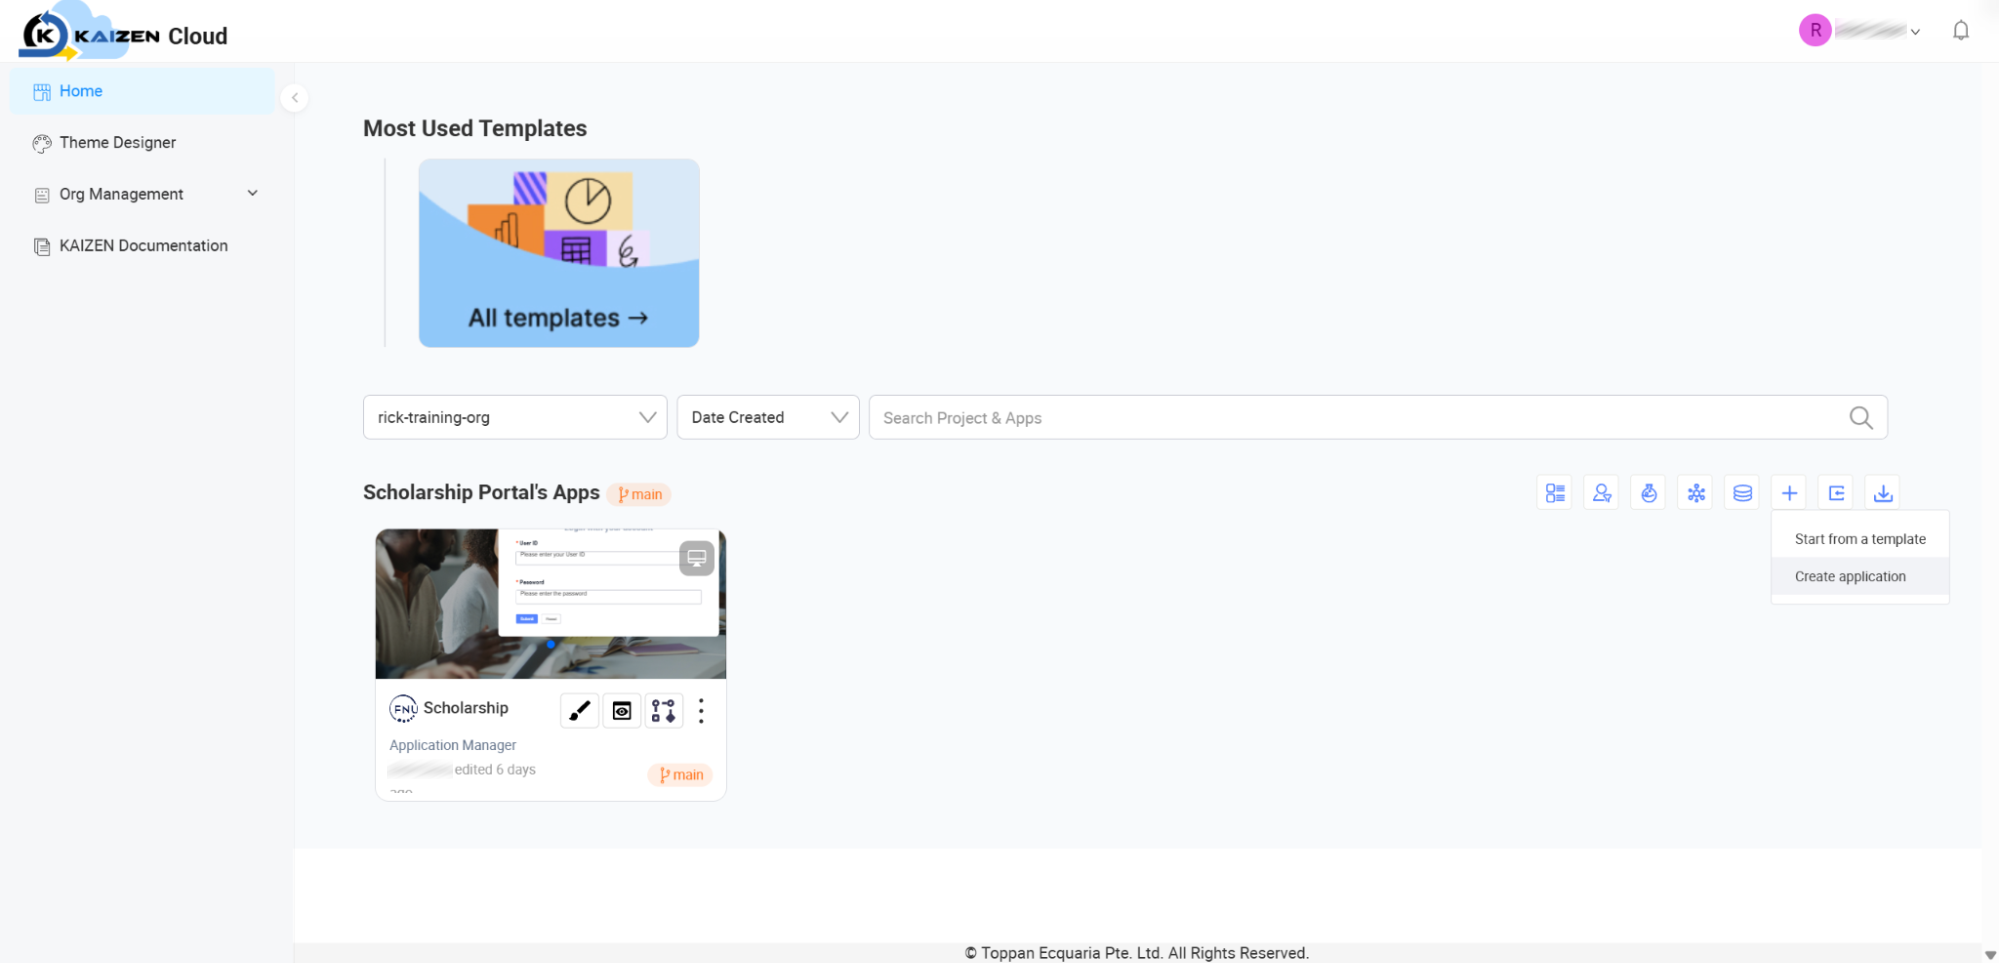
Navigate to the action toolbar on the right and click the + (Create Application) button.
-
This will trigger a dropdown popover menu. Click Create application (be sure to ignore the "Start from a template" option).
-
-
Configuring Application Parameters:
-
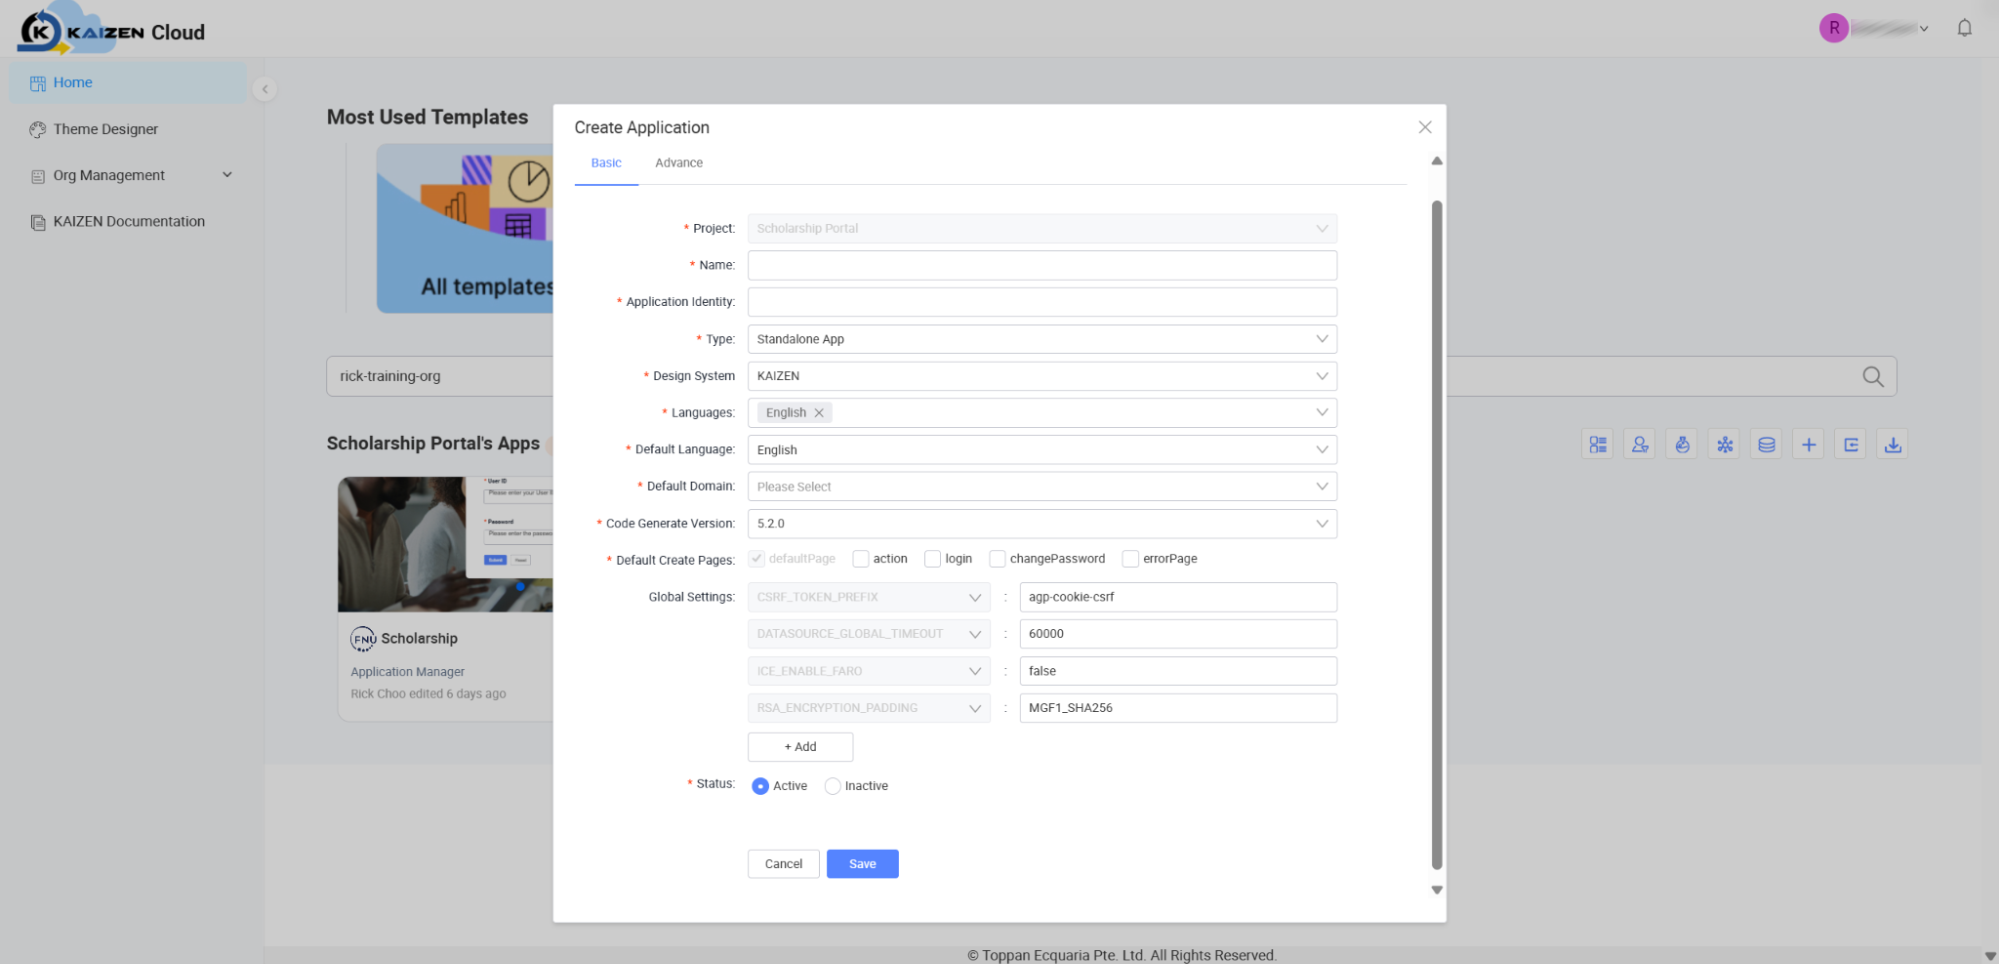
In the Create Application modal shown below, fill out the basic initialisation parameters:
-
Name: Enter the custom display name of the application (e.g., "App A").
-
Application Identity: Enter a code-safe, system-friendly URL key. This field uses strict identifier syntax and cannot have spaces. For example, if your application display name is "App A", you can format the Application Identity as "App_A".
-
-
Finalising Creation:
- Click the Save button to compile and instantiate your new application container environment.
Module 4. Accessing KAIZEN Core Features (Navigation & Access Only)
Focus: Quick "where-to-click" guide to open visual designers, understanding layouts at a glance without building.
4.1 Accessing the App Designer
How to access:
-
Click Home in the Global Sidebar to return to the main dashboard workspace.
-
Locate the project workspace block containing your newly initialised application.
-
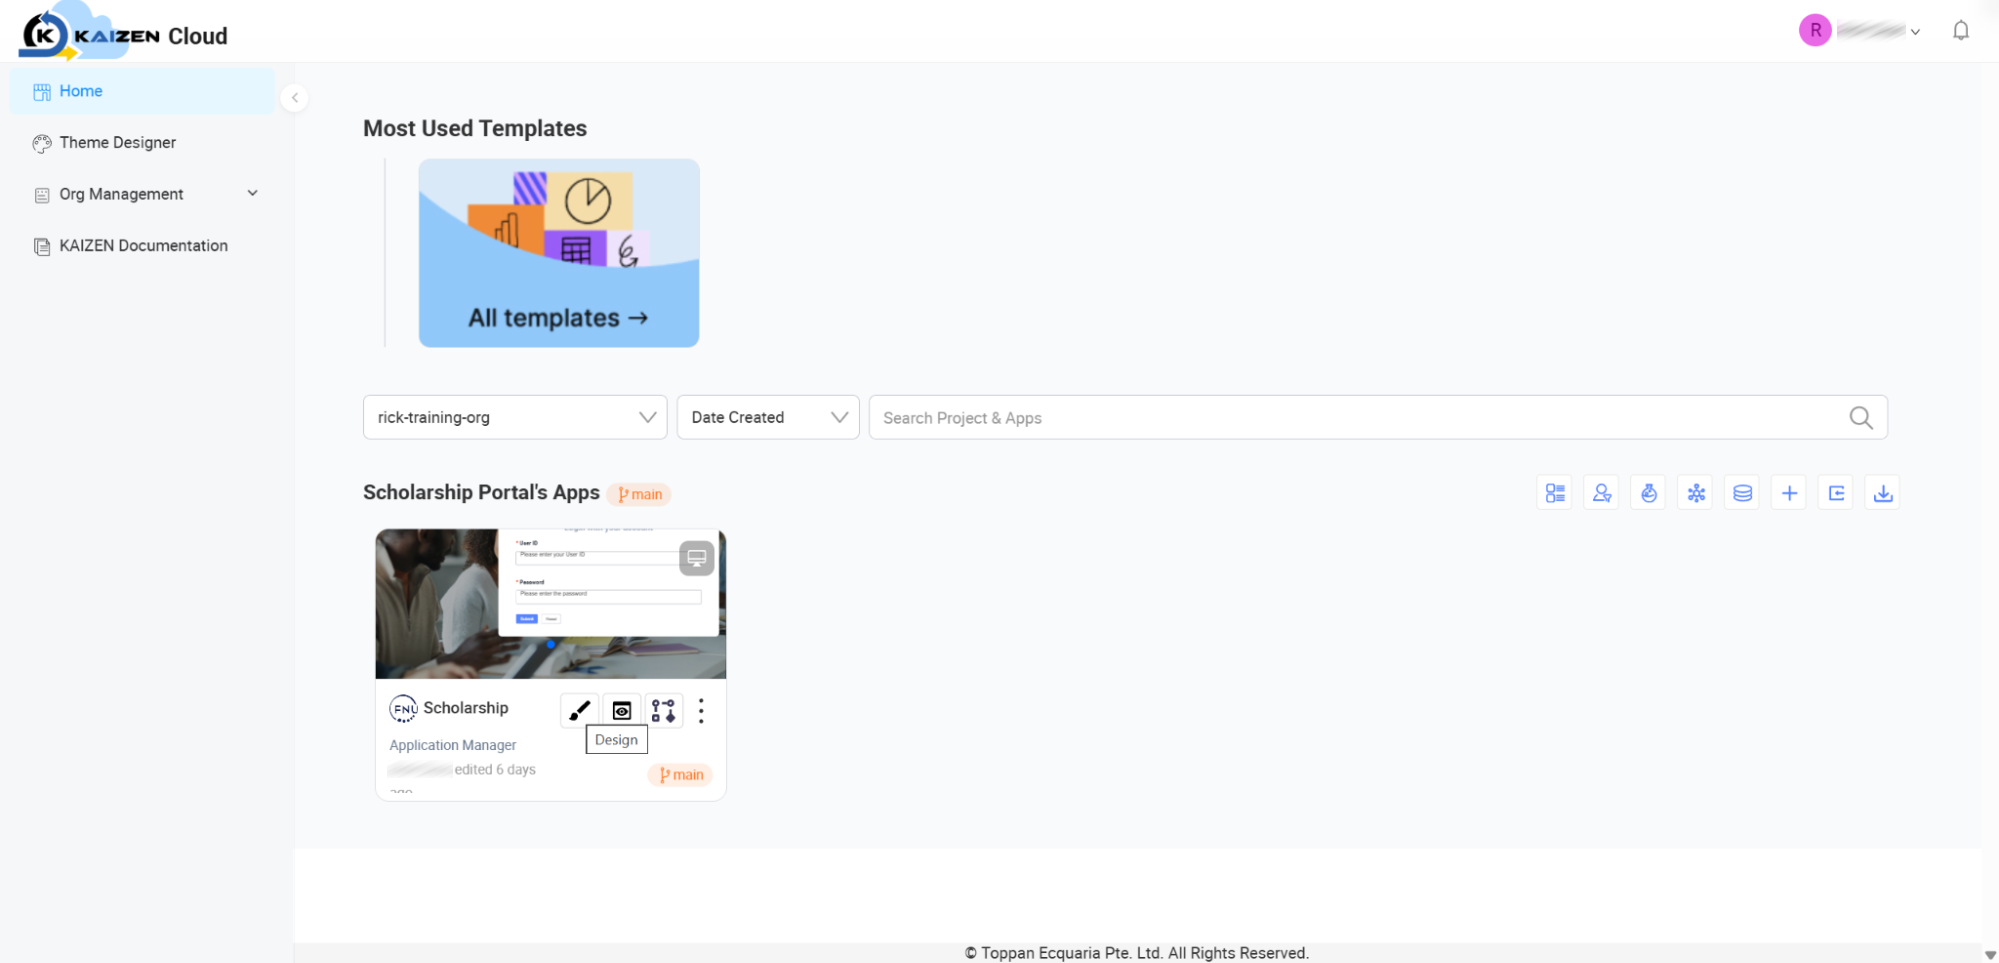
Simply click directly on the application card (displaying your application name and default visual block).
-
This action will launch the application and automatically bring you directly to the App Designer interface shown below.
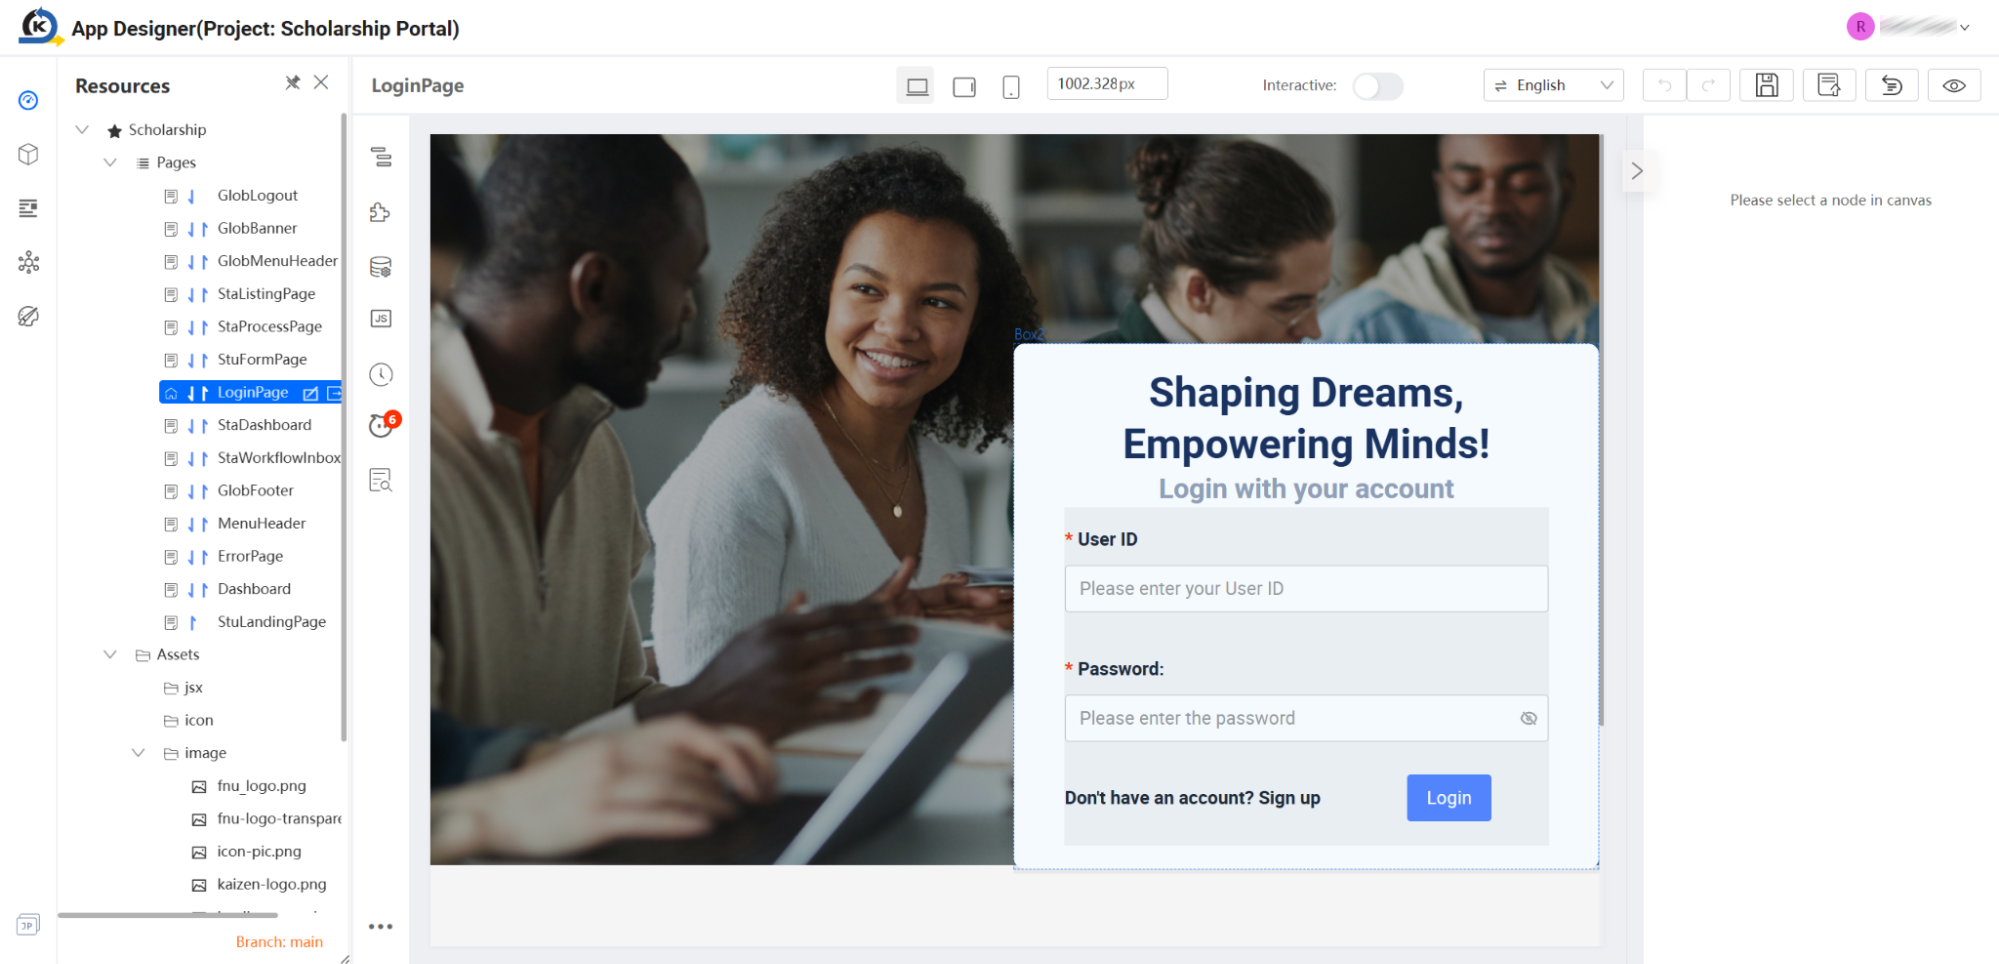
Visual layout at a glance:
- The Component & Resource Panel (Left Sidebar): A multi-tab navigation sidebar showcasing pages, layout components, and custom media assets.
- The Canvas (Centre): This is the visual layout editor where your application screens are rendered and designed.
- Properties Sidebar (Right Sidebar): Whenever you select an element on the canvas, this panel updates to show its specific style, alignment, and behaviour properties.
4.2 Accessing the Workflow Designer
How to access:
-
Navigate to Home in the Global Sidebar to view your active projects and application cards.
-
Locate your target application card.
-
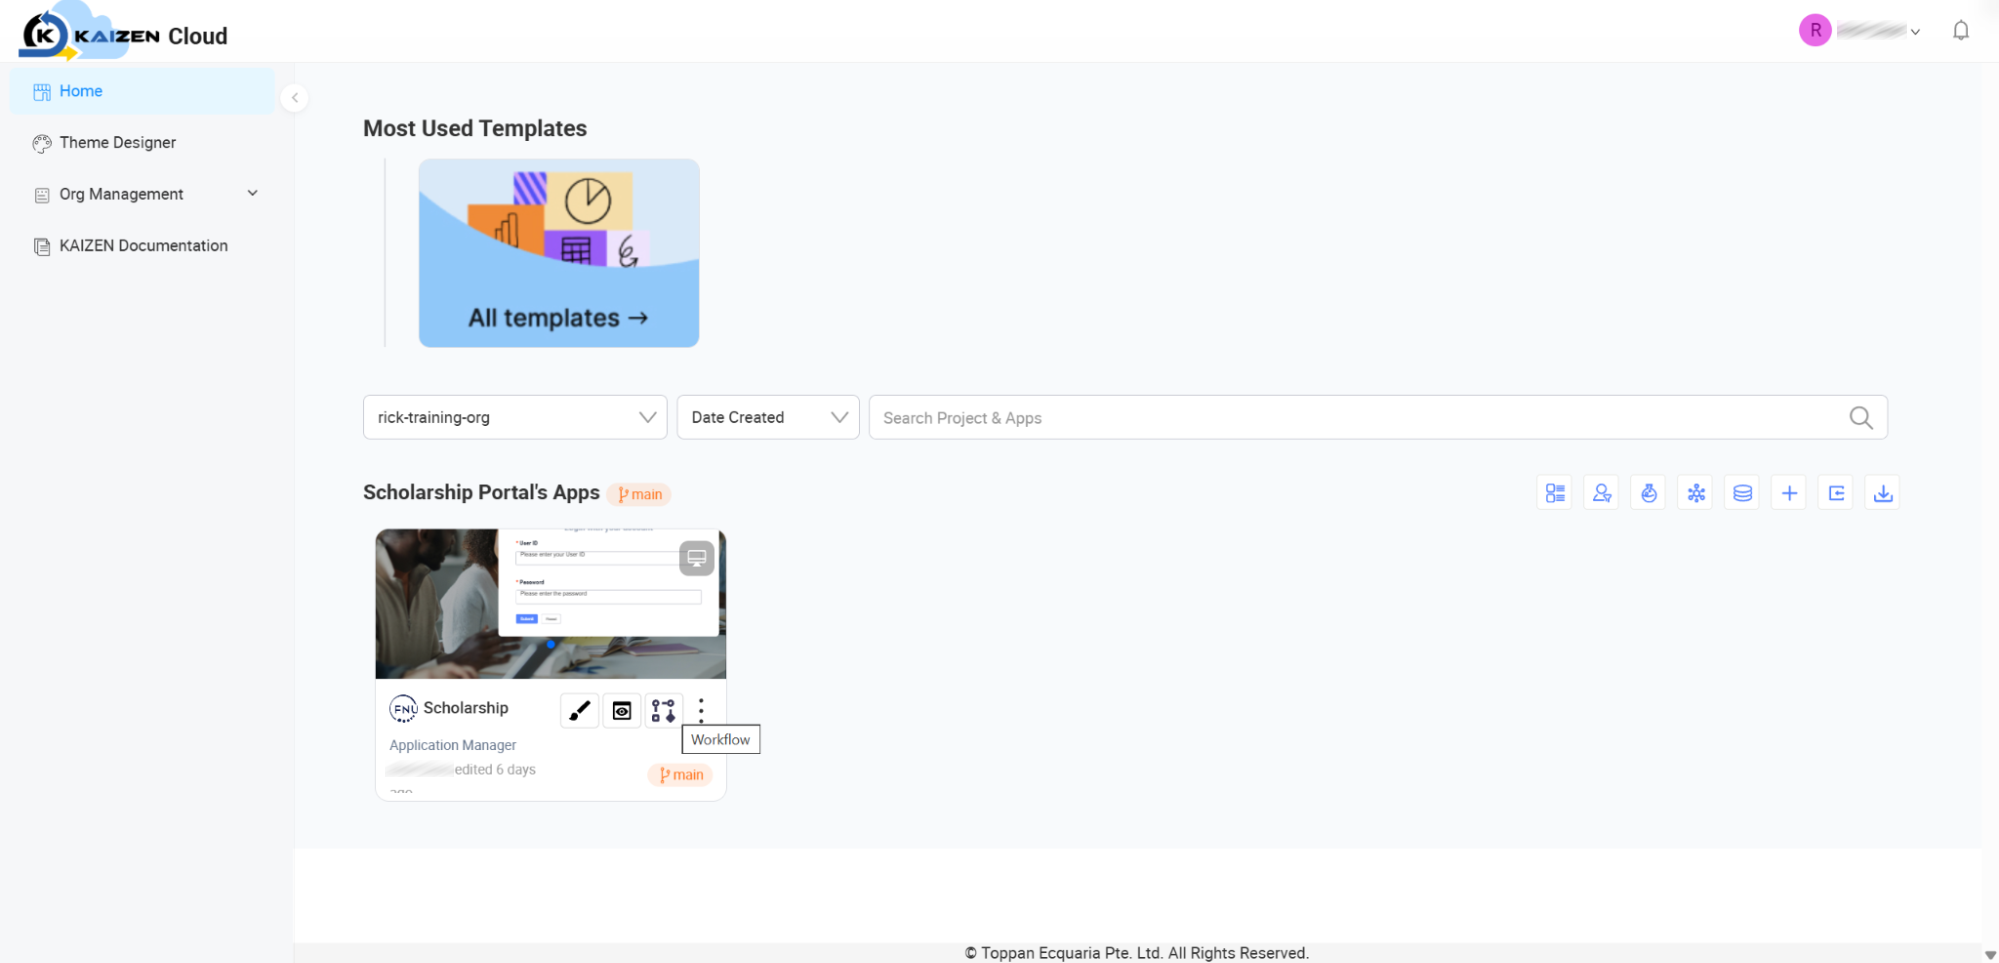
At the bottom of the card, click the Workflow icon (represented by connected nodes, which displays a "Workflow" tooltip upon hover).
-
This action will redirect you to the Workflow Designer interface shown below.
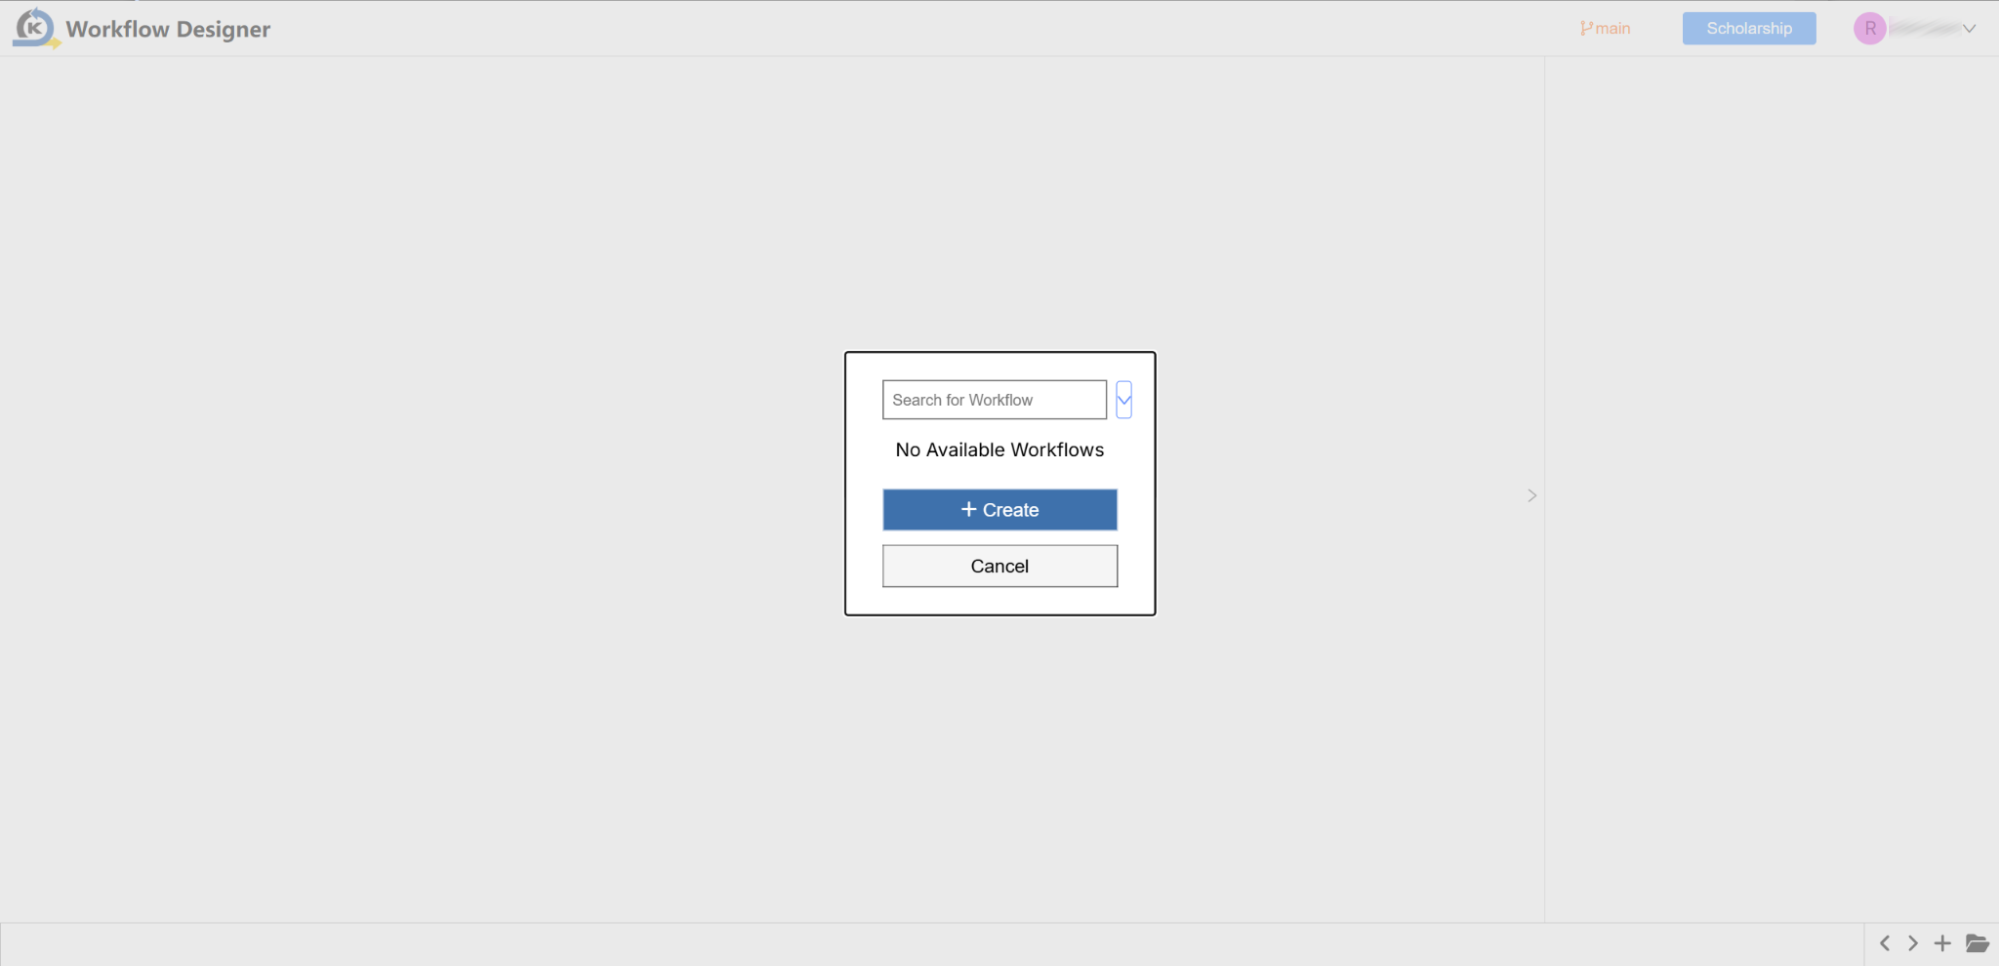
Visual layout at a glance:
- Workflow Initialisation Dialog (Centre): Since no workflows are configured initially, a central dialog window displays a Search for Workflow lookup field, a + Create button to start a new workflow, and a Cancel option.
- Global Layout (Background): A clean designer canvas with breadcrumbs showing the active branch path (such as main) and the parent application workspace locator in the top right.
4.3 Accessing the Database Designer
How to access:
-
Click Home in the Global Sidebar to return to the main dashboard.
-
Find your active project section.
-
Locate the utility actions bar on the right side of the project panel header.
-
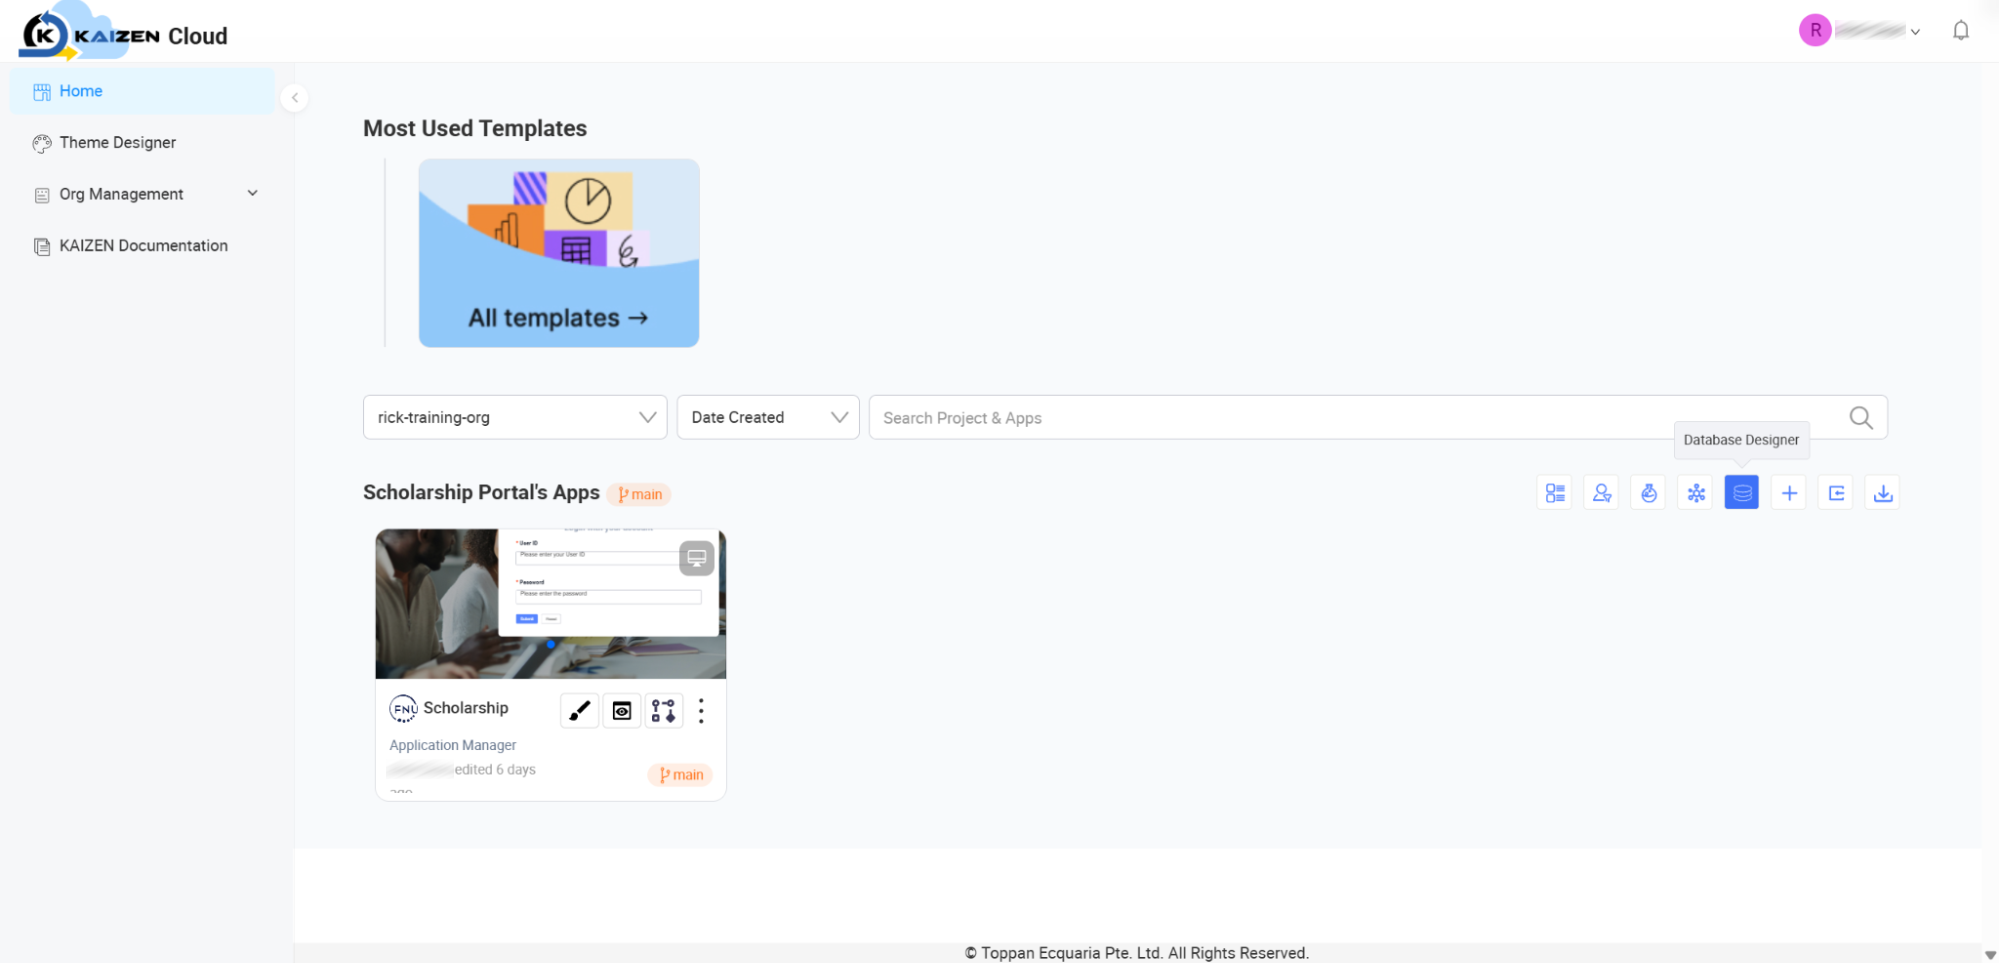
Click the cylindrical Database Designer icon.
-
This action will redirect you directly to the Database Designer layout shown below.
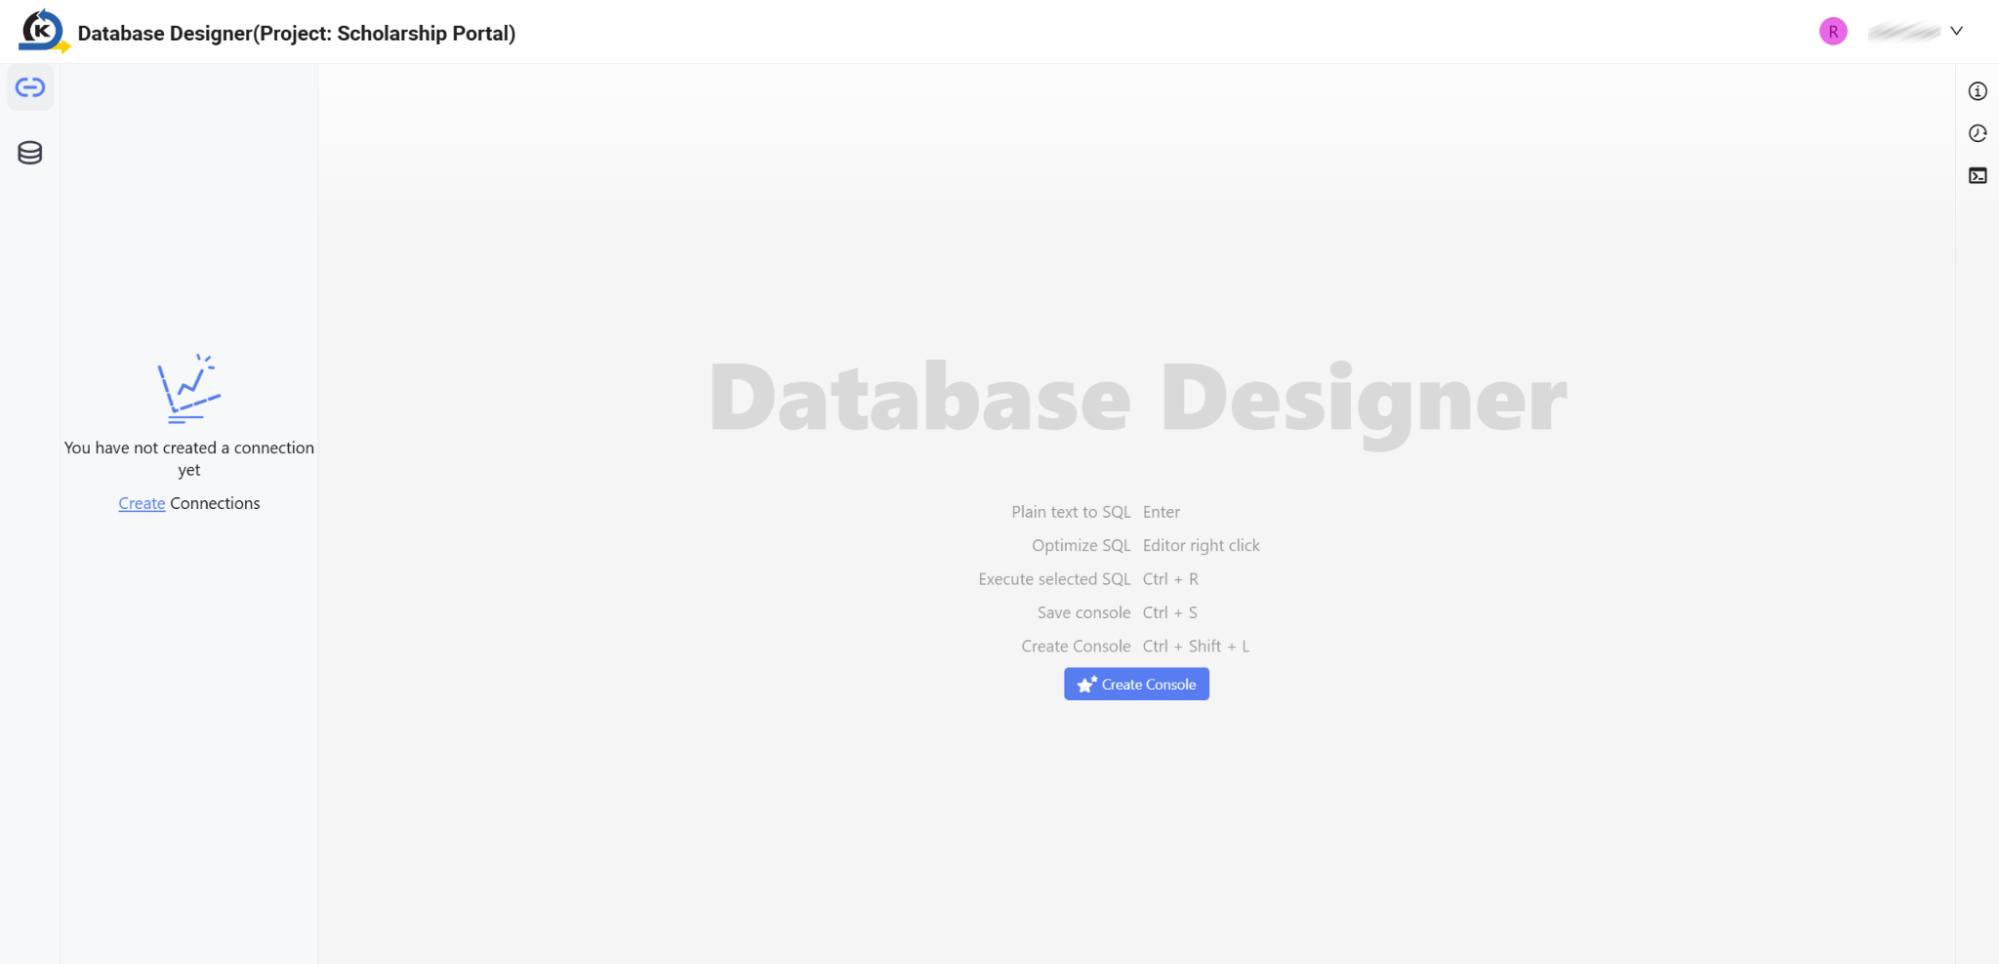
Visual layout at a glance:
- Left Connection Status Panel: Shows your database connections status, featuring a placeholder icon stating "You have not created a connection yet" and a Create Connections link.
- SQL Console Canvas (Centre Area): A powerful query sheet layout displaying direct hotkeys for execution (such as Plain text to SQL: Enter, Optimise SQL: Editor right click, Execute selected SQL: Ctrl + R, Save console: Ctrl + S, and Create Console: Ctrl + Shift + L). A prominent Create Console button sits centred at the bottom of the helper list.
- Global Layout (Background): A minimal, uncluttered workspace environment showing your target project scope in the window title bar.
4.4 Accessing the Service Designer
How to access:
-
Click Home in the Global Sidebar to return to the main dashboard.
-
Locate the active project section containing your target application.
-
On the right side of the project header actions bar, click the network branching Services icon.
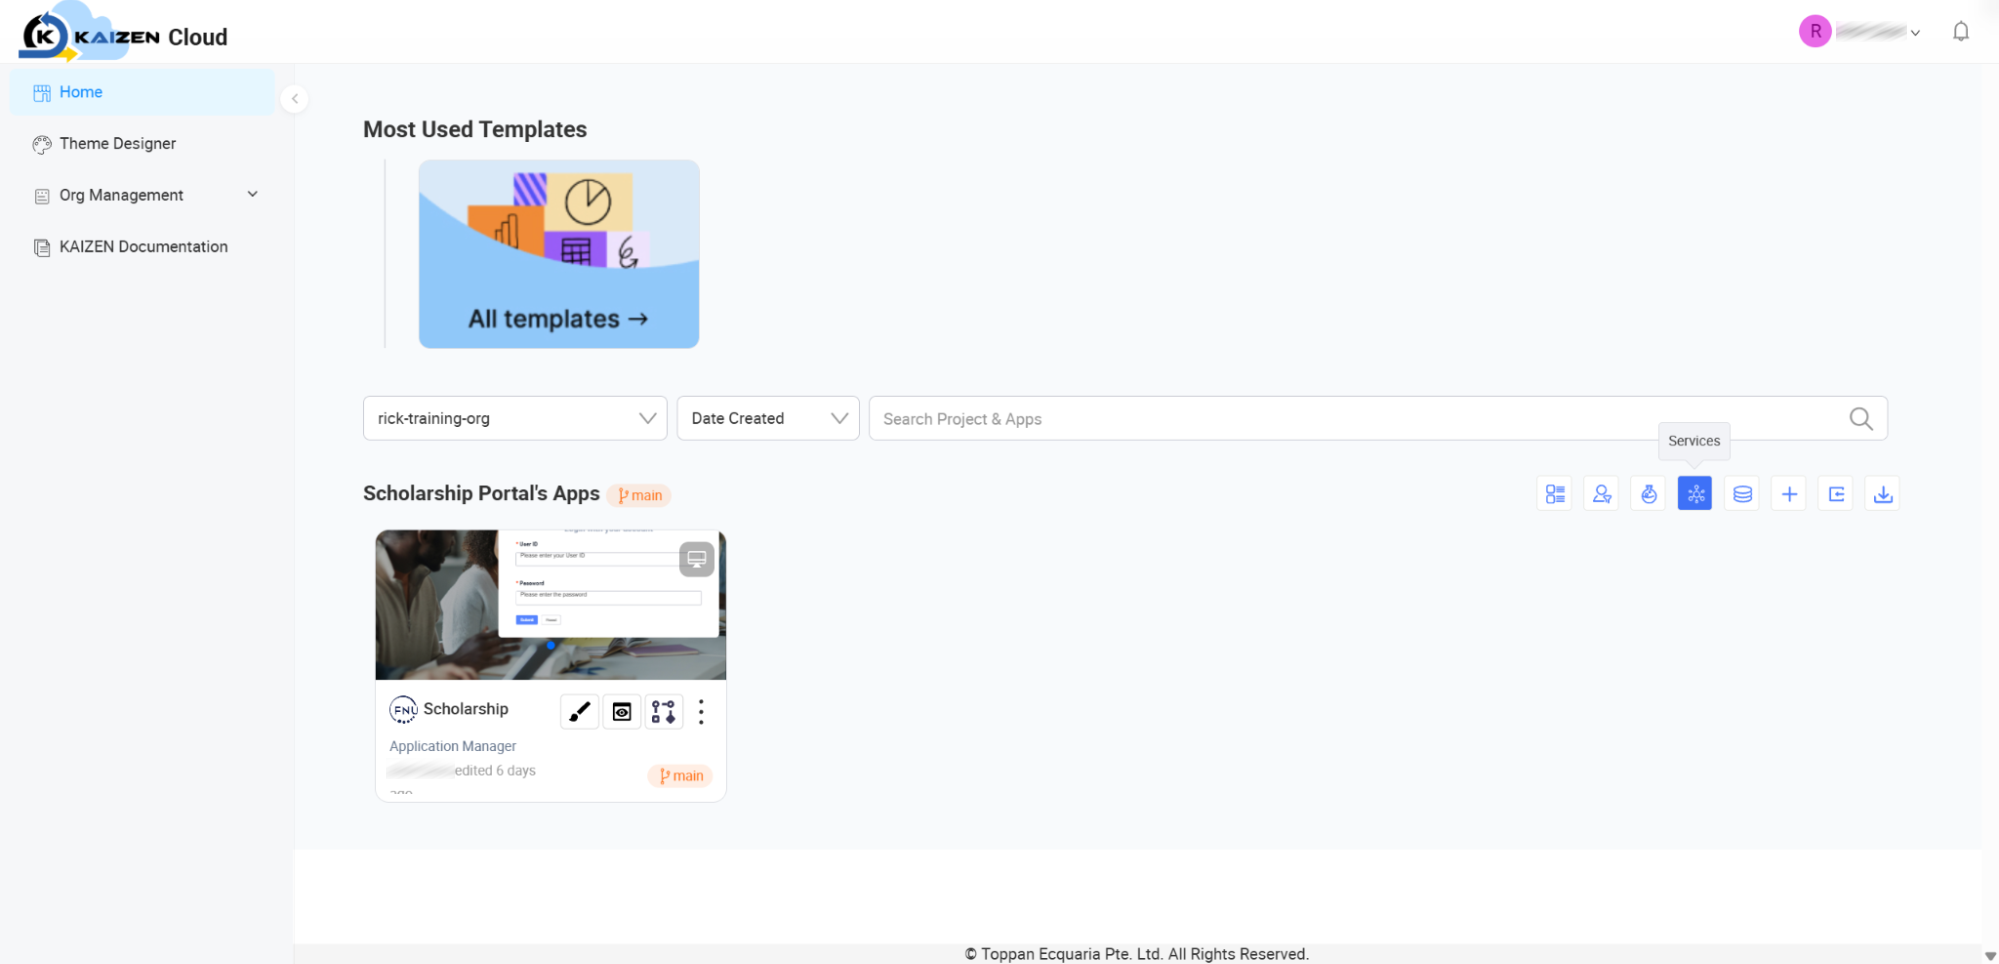
-
This action will redirect you directly to the Service Designer workspace shown below.
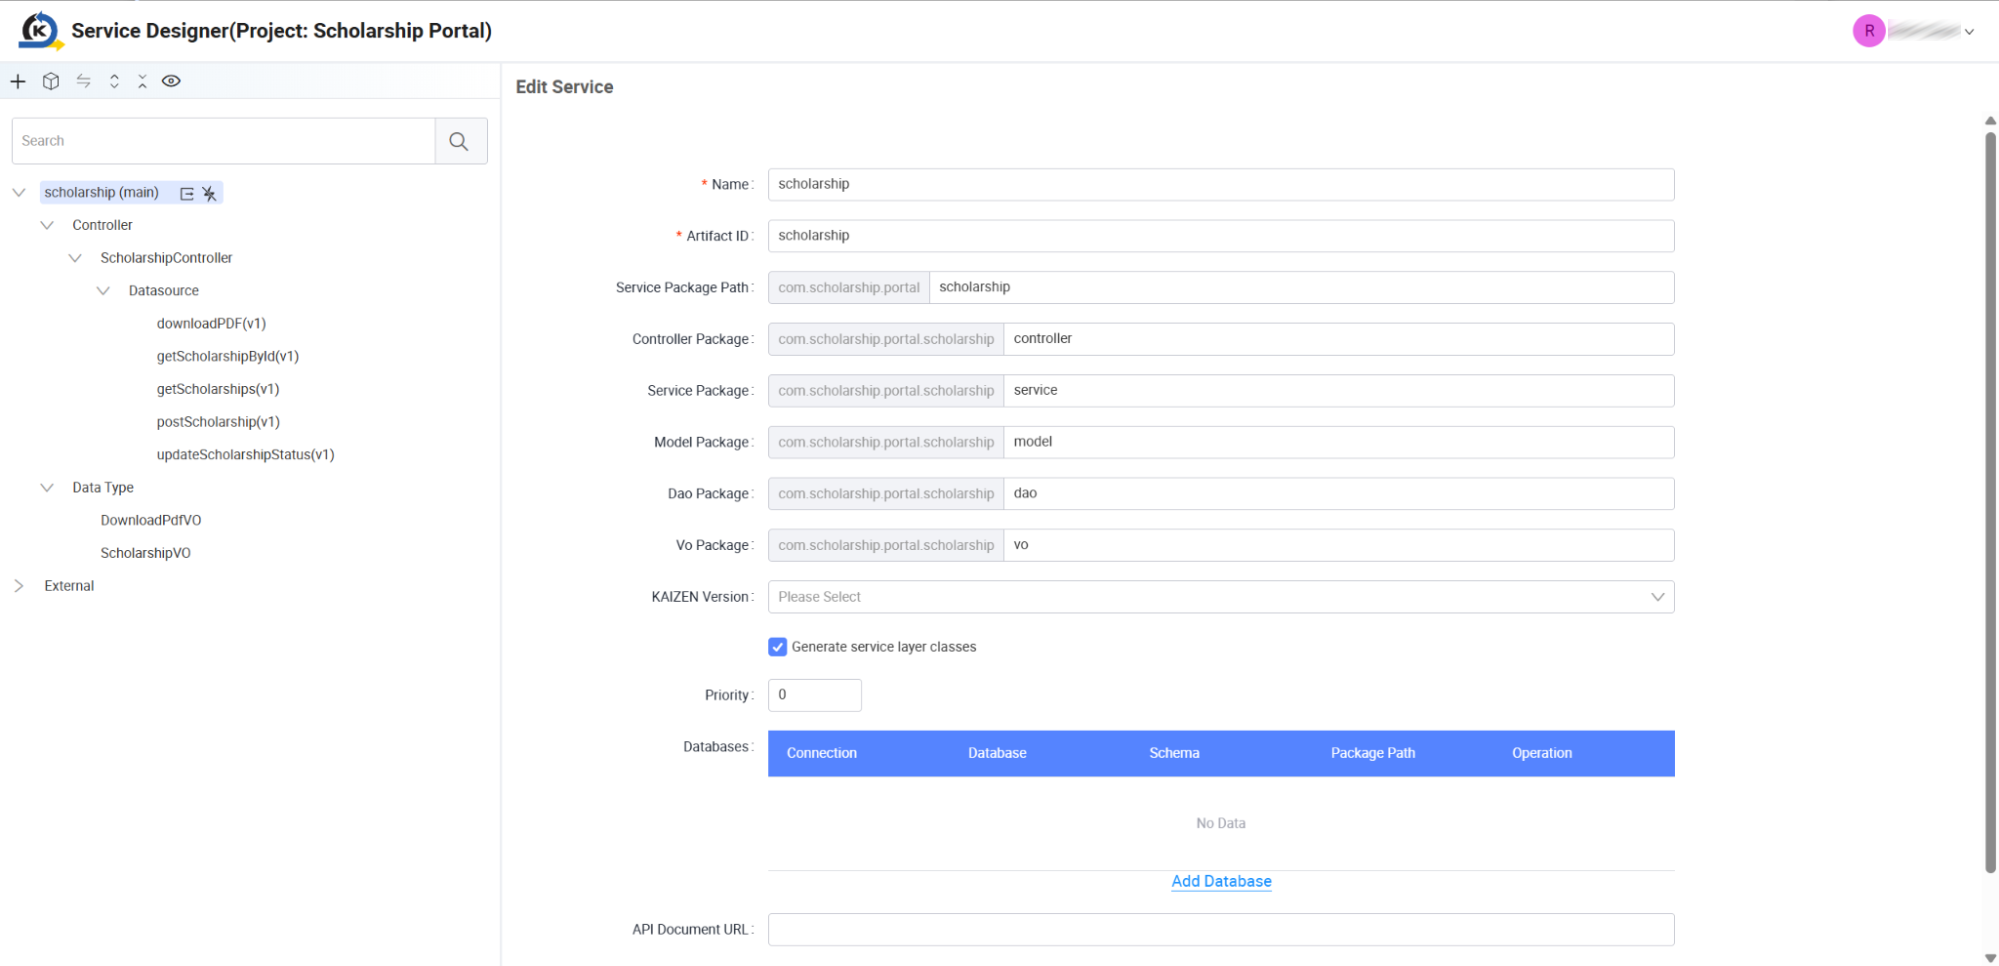
Visual layout at a glance:
- Left Tree Panel: A search-enabled controller hierarchy that organises active API resources, Datasource connectors, and external system pathways (e.g. download, post, and update operations).
- Centre Workspace Panel: A form-based configuration area labelled "Edit Service" which houses specific service package directories, DAO packages, generating service layer class options, priority selectors, and a bottom horizontal tab row for Database, Schema, Package Path, and Operations management.
4.5 Accessing the AI Agent Builder
How to access:
-
Click Home in the Global Sidebar to return to the main dashboard.
-
Locate your active project section.
-
On the right side of the project header actions bar, click the flask-shaped AI Agent Builder icon.
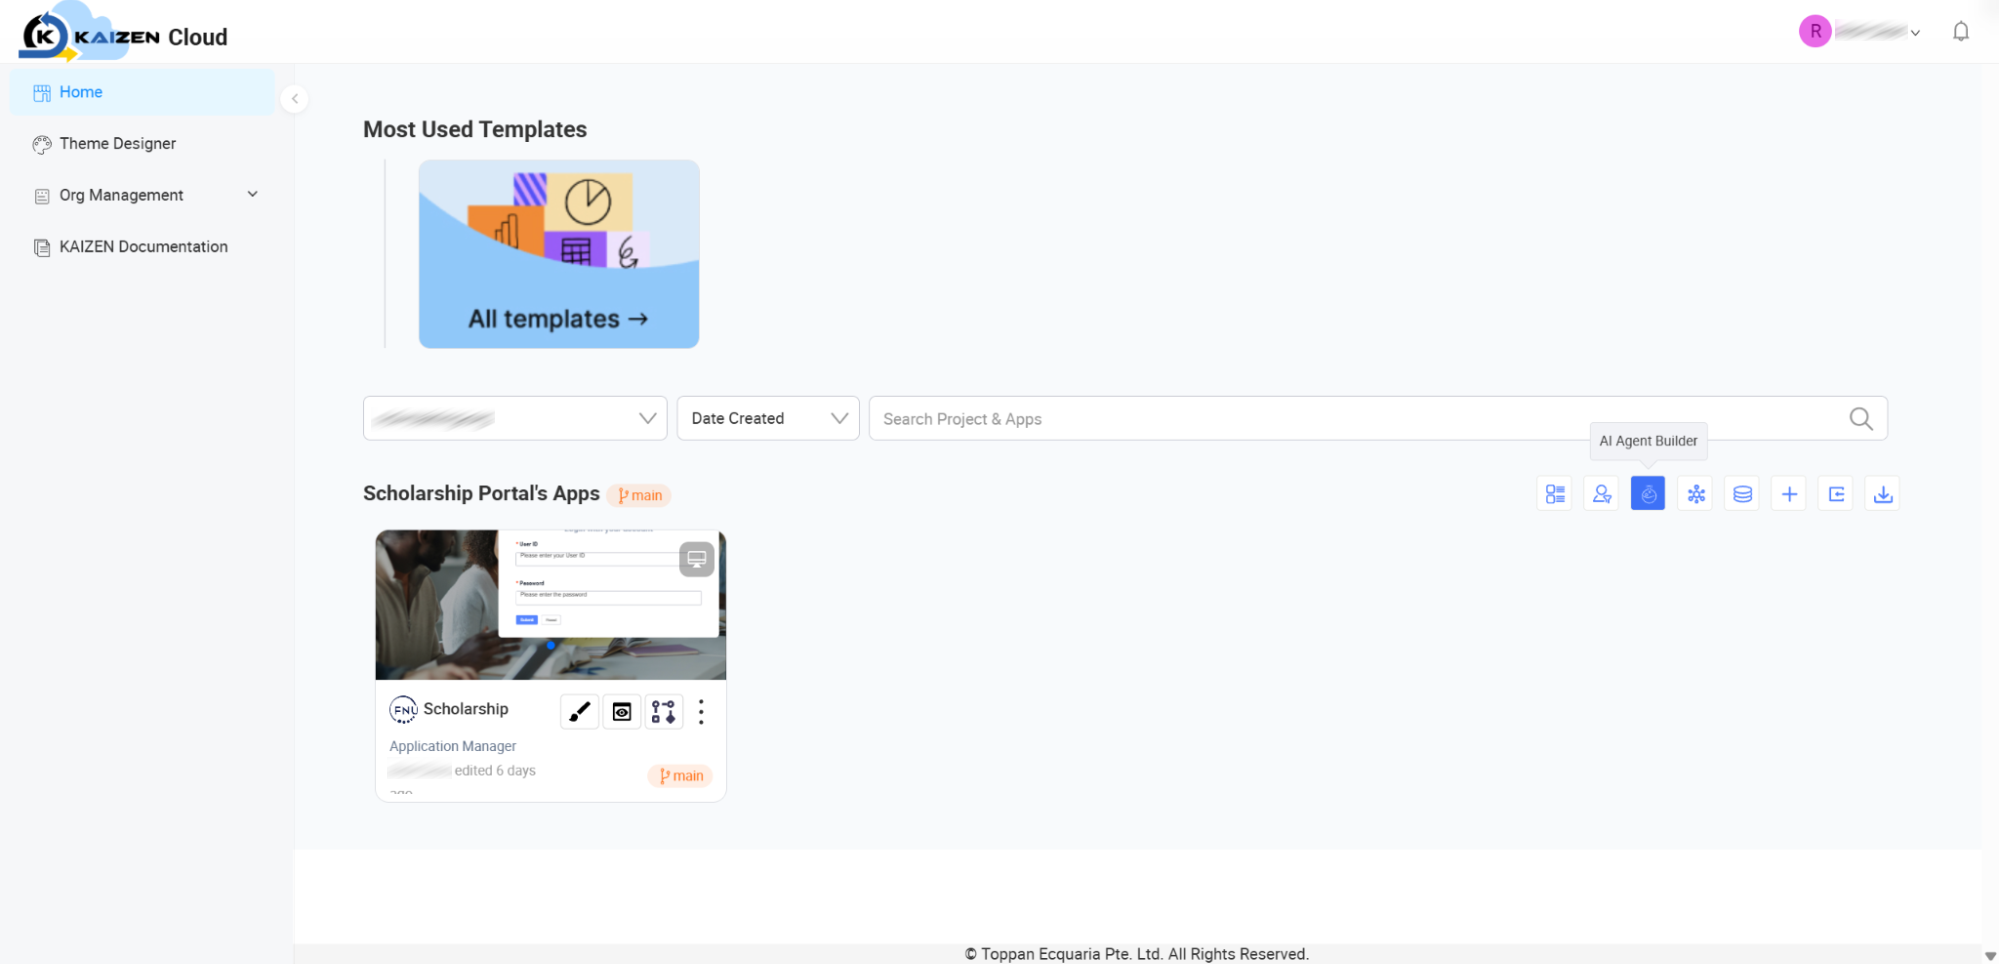
-
This action will redirect you directly to the AI Agent Builder workspace shown below.
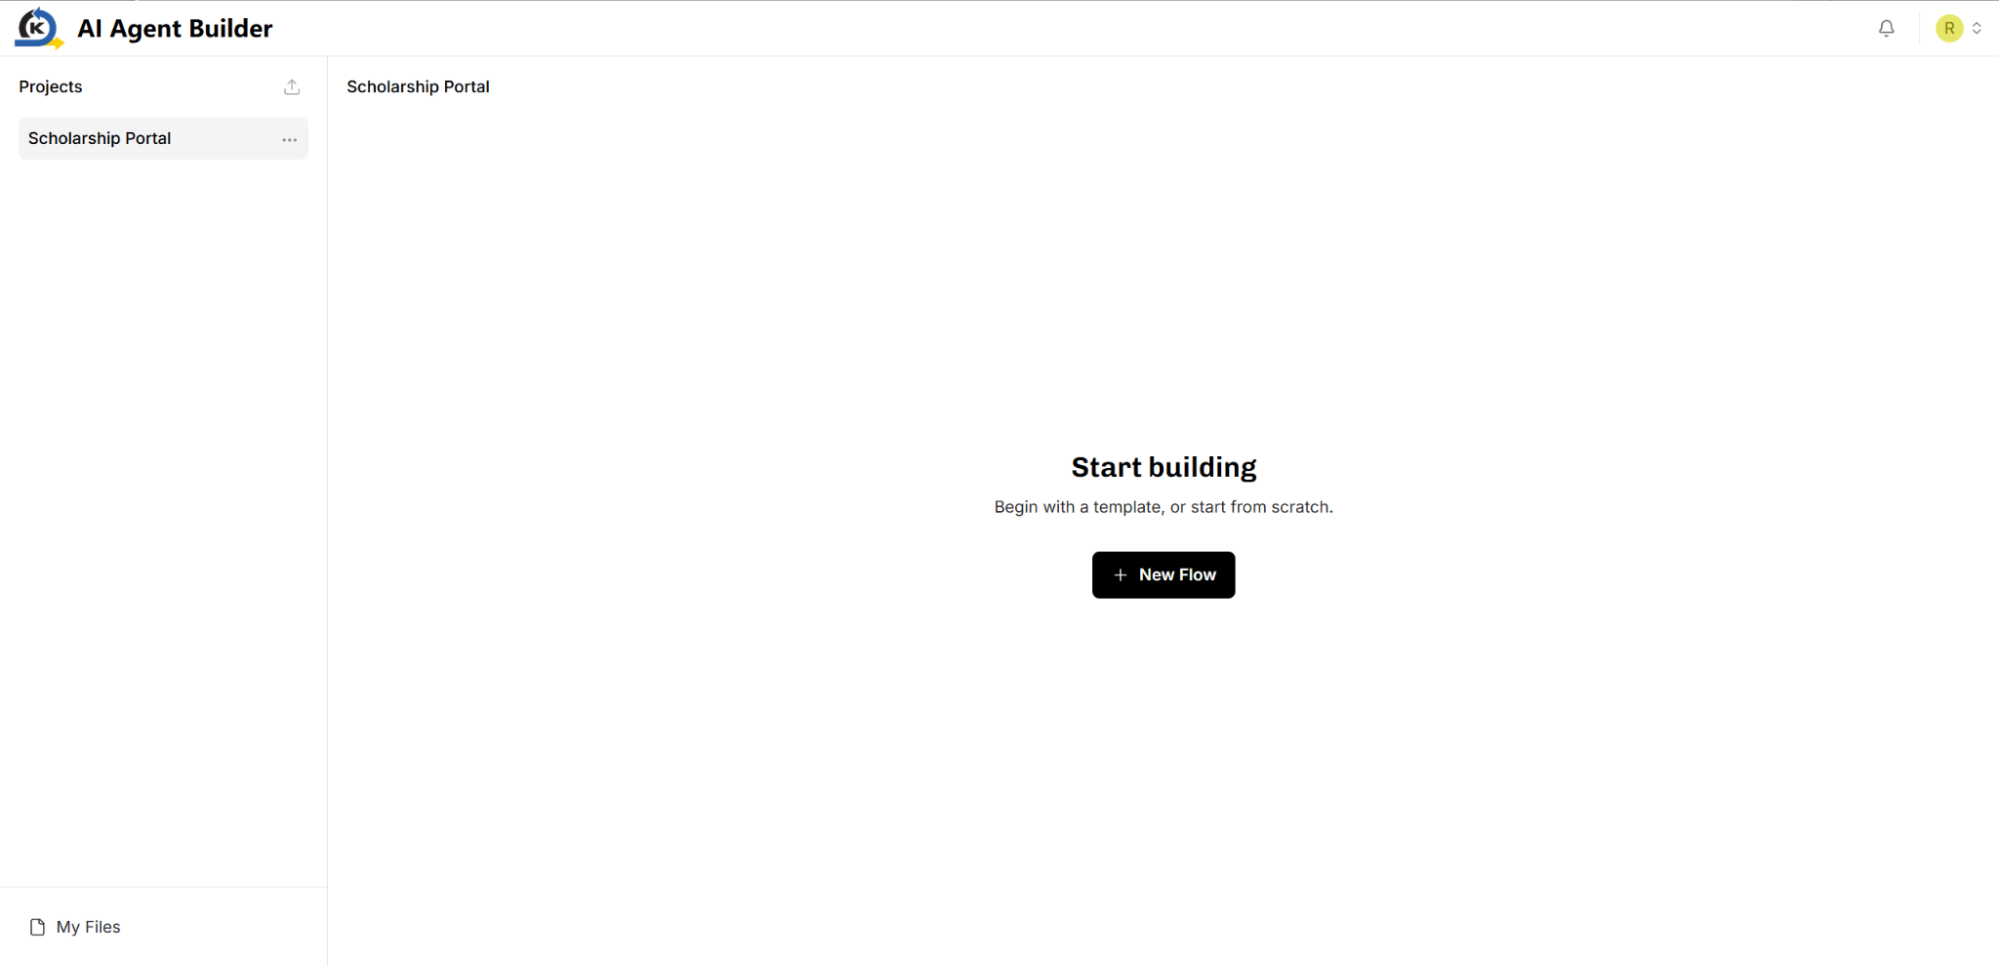
Visual layout at a glance:
- Left Sidebar Panel: Organises your project directory under a Projects list and provides quick access to uploaded system documents via the My Files button at the bottom.
- Centre Workspace Panel: Displays the selected project title along with a welcome prompt to "Start building" (encouraging you to Begin with a template, or start from scratch). A prominent + New Flow button sits centred to kick off your builder workspace.
Module 5. Wrap-up & Support Access
Focus: Where to go when you are ready to start building or need assistance.
5.1 Platform Documentation
If you want to look up specific features, visual elements, or settings while moving through the interface, you can access our comprehensive, searchable platform documentation at any time by clicking the KAIZEN Documentation button located on the left-hand persistent sidebar menu.
5.2 Support Email
If you encounter system access problems, permission locks, or unexpected technical hurdles, you can contact our dedicated help desk directly by emailing support@onekaizancloud.com.
5.3 Express Training Guide
Now that you know how to navigate the platform, manage administrative settings, and locate the key visual workspaces, you are ready to start building.
Your next step is to open the KAIZEN Express Training Guide to begin utilising KAIZEN's essential features.
Last updated on 21 Sep 2026